Simple Ways to Convert Keynote File to Video on iPhone, iPad, and Mac - A Complete Guide
 |
| Simple Ways to Convert Keynote File to Video on iPhone, iPad, and Mac |
Apple's Keynote is the presentation component of their iWork productivity suite of software, and a companion app to Pages for word processing and Numbers for spreadsheets. All three are universal apps that work on iPhone, iPod touch, and iPad, and are popular choices for document management on the go. They've also just been updated to support iOS 5.1 and the new iPad's Retina display.
If you're a new iPad or iPhone owner and need a way to create, edit, and give presentations on the go, Keynote is Apple's iCloud integrated solution. It was designed for Apple's late co-founder, Steve Jobs, and the desktop version was used to give every one of his presentations, including the original iPhone and iPad introductions.
Keynote isn't Powerpoint, and that's a good thing
While most of the iWork apps pale in comparison to Microsoft's Office suite, Keynote is a possible exception. Again, it was made for and used by arguably the best corporate presenter in a generation, and that says a lot.
However, because Keynote and Powerpoint are both intended for the same purpose, there's a lot of overlap in features, and if you've used Powerpoint or Keynote on the Mac, you shouldn't have any trouble getting used to Keynote for iPhone and iPad.
If anything, the layout and controls on iOS are even more intuitive than desktop presentation software. Once you've gotten the basics down, you'll be creating amazing presentations that you can share with co-workers, friends, and family with just a few taps.
How to use Keynote to Create presentations in Keynote
From the main Keynote screen you can open, edit, delete or create a presentation. To create a new one just tap the "+" sign in the upper right-hand corner and select Create Presentation. You'll be presented with several templates that you can choose from.
While Apple hasn't added any new ones since Keynote was released, there are still quite a few different selections that should suit most users just fine.
Keynote's user interface is simple and streamlined. In the upper right-hand corner are four icons.
- Format brush: You'll use this to change the different properties of texts and objects such as font style, colors, and size.
- Insert button: This is where you'll tap to add content to your slides. You can input many objects such as images from your camera roll, tables, charts, and several shapes.
- Tools: This menu allows you to add different transitions to your slides, share your presentations, add presenter notes, and many other options.
- Play button: This does exactly what you'd think, plays your slideshow. To exit play mode, just pinch the screen to go back to editing mode.
To add a slide to your project, tap the add slide button in the bottom left-hand corner. There are a good amount of slide types to choose from such as title slides, bulleted slides, and more. You can also choose to use a blank slide and build your own custom content.
To change the order of slides within your project, hold your finger down on the slide you'd like to move and you can drag it up or down to the position you desire.
There is a good selection of built-in transitions in the tools menu. Once you select Transitions and Builds, your slide will get a marker next to it. Tap the "+" sign to add a transition to it.
You can also tap on options to adjust the timing of transitions.
You can also add photos, tables, charts, or shapes directly to your presentation from your iPhone or iPad. To do so, tap the insert button in the top right and choose what kind of media you'd like to add.
Once you insert a chart you can double-tap it to bring up the editing menu. You can choose to edit data which will bring up a table format that allows you to change the data and labels for your charts or graphs.
Once you've added an object, you can continue to manipulate them further with the format brush. Select an object, select the format brush, and Keynote will then bring up format options based on what you have highlighted.
If you have a chart or graph highlighted, it will allow you to edit the color and dimension of the chart as well as many other elements.
Resizing an object is easy. Just tap the object and blue anchors will appear. You can then use the grid lines to resize and straighten or off-center an object to your liking.
Moving objects is just as simple. Tap and hold on to an object and move it around. The same yellow grid lines will show up to assist you with centering it with the rest of your text and content.
How to Convert Keynote File to Video on iPhone, iPad
 |
| Photo: guidingtech |
The Keynote app on your iPhone allows you to create a quick presentation on the go. It’s also a good way to review a presentation before sharing with others or in a meeting. Most of the times, the conference rooms or meeting locations might not have support for an Apple device – be it the iPhone, iPad, or Mac. Instead of dealing with dongles, you can figure out a better option – convert the file to video.
Here’s how to do it on your iPhone and the same steps apply to the iPad as well.
Step 1: Open Keynote app on your iPhone. If you don’t have it, get it from the App Store.
Step 2: Open your presentation file.
Step 3: Tap on the three dots icon at the top.
Step 4: Select Export.
Step 5: Select Movie from the list of export options.
Select the desired frame rate, video resolution, and slide duration.
You can even export your presentation in 4K resolution to achieve the best quality. However, the time to export that video will depend on your iPhone model – latest ones are faster.
Step 6: After selecting your preferences, tap on Export.
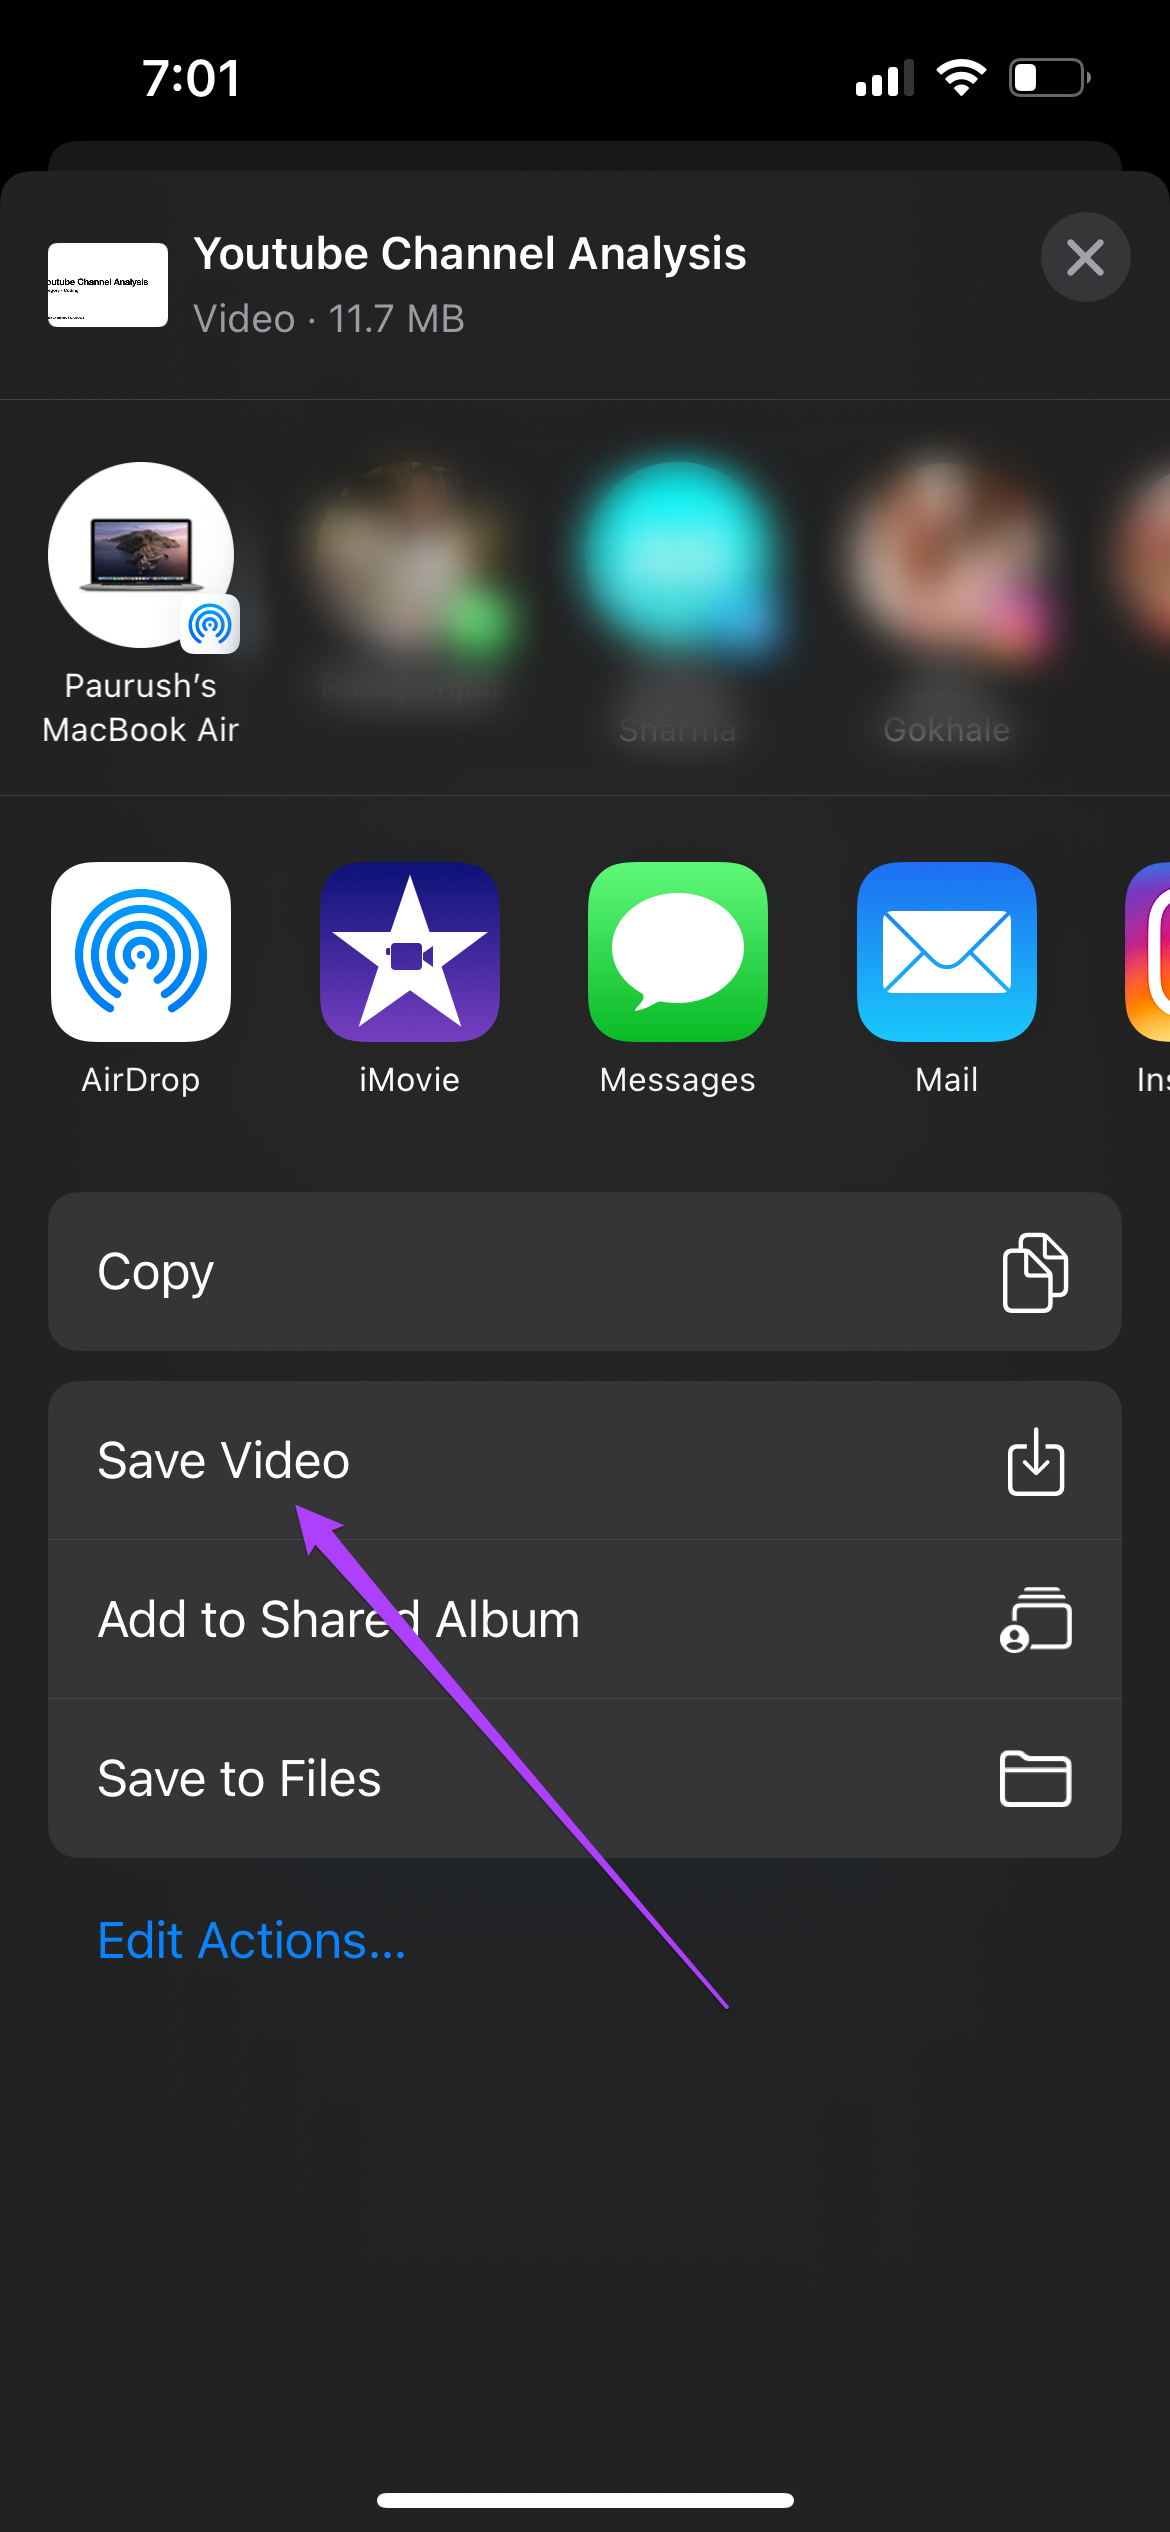
After Keynote app exports your presentation, you’ll see the share sheet for the file.
Step 7: Scroll down and select Save Video.
Your iPhone will save your presentation as a video file in the Files app. If you convert the file on your iPad, it will be saved in the Files folder.
How to Convert Keynote File to Video on your Mac
A Mac would work great to present your Keynote at a conference or meeting. But if you aren’t carrying it along or allowed to take it along, convert the Keynote file to a video. Plus, you can choose to convert every Keynote file into an MP4 file in advance to avoid any hassles at the time of presentation. To avoid any hiccups, update the Keynote app on your Mac.
Then, follow these steps.
Step 1: Launch the Keynote app on your Mac.
Step 2: Open the presentation file that you want to convert and click on Open.
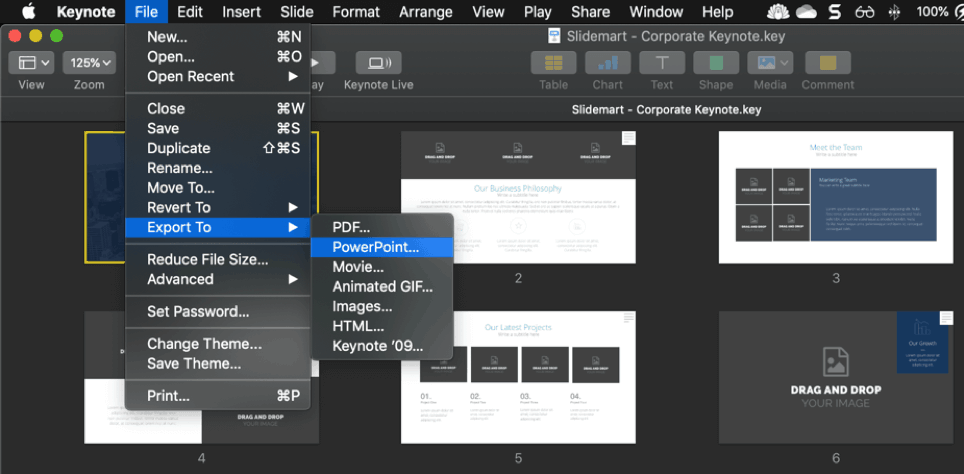
Step 3: After the file opens, click on the File option in the top-left corner of the menu bar.
Step 4: Select the Export To option from the drop-down menu.
Step 5: Click on Movie.
Step 6: Next, select your preferences for video frame rate, playback style, slide playtime, resolution, etc.
Step 7: After selecting relevant options, click the Next button in the bottom-right corner.
Step 8: Choose the location where you want to save the file, give it a name, and click on Export.
The app will then convert the presentation into a video. Typically, choosing 720p resolution does work smoothly on most systems – old or not powerful enough.
How to Export to PowerPoint or another file format in Keynote on Mac
 |
| Photo: 24slides |
To save a copy of a Keynote presentation in another format, you export it in the new format. This is useful when you need to send the presentation to people who are using different software. Any changes made to the exported presentation don’t affect the original. Keynote also remembers the last export preferences you used.
-
Open the presentation, then choose File > Export To > [ file format] (from the File menu at the top of your screen).
-
Specify export settings:
-
PDF: These files can be opened and sometimes edited with applications like Preview and Adobe Acrobat. Each slide appears on its own page of the PDF. Select the checkbox next to presenter notes and skipped slides if you want to print them. If you select “Print each stage of builds,” each build is printed on its own page, in the same order as they appear in the presentation. To include comments in the PDF, select the “Include comments” checkbox.
Click the Image Quality pop-up menu, then choose an option (the higher the image quality, the larger the file size). If you added image, drawing, audio, or video descriptions for assistive technology (for example, VoiceOver), they’re automatically exported. To include accessibility tags for large tables, click Advanced Options, then choose On.
Note: For more PDF options, click Cancel, choose File > Print, then click Show Details at the bottom of the print options.
-
PowerPoint: If the file needs to be compatible with an older version of Microsoft PowerPoint (1997-2003), click Advanced Options, then choose .ppt from the pop-up menu.
-
Movie: To export only part of the presentation, select From and enter the beginning and ending slide numbers. If you recorded a narration, you can click the Playback pop-up menu, then choose Slideshow Recording. Otherwise, your presentation is self-playing and advances to the next slide or build according to the time intervals you enter. If you have an animation that’s set to advance following a previous build or transition, it’s not affected by the time interval you enter.
Click the Resolution pop-up menu, then choose a resolution. To set a custom resolution, click Custom at the bottom of the menu.
-
Animated GIF: The slides you select are exported as an animated GIF that you can send or post. See Create an animated GIF in Keynote on Mac.
-
Images: Choose the slides you want to export as images, and select an image format for your slides. The higher quality the image, the larger the file size.
-
HTML: Open the index.html file to open your presentation in a web browser. Animations and builds are also exported with your presentation.
-
Keynote ’09: This format can be opened by Keynote 5.0 through 5.3.
-
-
If there’s a password checkbox, do one of the following:
-
Set a password: Select the “Require password to open” checkbox, then enter a password. It applies only to the exported copy.
-
Keep the original presentation password: Make sure the “Require password to open” checkbox is selected.
-
Use a different password for the exported copy: Select the “Require password to open” checkbox, click Change Password, then set a new password.
-
Export the copy without a password: Deselect the “Require password to open” checkbox.
-
-
Click Next, then type a name for the presentation (without the filename extension, such as .pdf or .ppt, which is appended to the name automatically).
-
Enter one or more tags (optional).
-
To choose where to save the presentation, click the Where pop-up menu, choose a location, then click Export.
Bonus Tip: Add Voiceover to Export A Keynote Presentation As A Video
If you wish to record and add a voiceover to your presentation video to make it more insightful, follow these steps.
Step 1: Open the Keynote presentation.
Step 2: Click on Play and select Record Slideshow.
Step 3: Click on Ok to permit Keynote access to the microphone of your Mac.
The Slideshow recording window will open your screen.
Step 3: Click on the record button at the bottom left to start recording your voiceover.
You can change the slides using the Left and Right arrow keys while recording the voiceover.
Step 4: Click on the record button again to stop recording.
Step 5: If you wish to record again, click on the Delete icon in the bottom-right corner to erase the previous recording.
Step 7: After recording your voiceover, click on the X icon in the top-right corner to return to the main screen.
Step 8: Click on File, select Export To option, and click on Movie to export your file.
Step 9: Choose your preferences and click on Next.
Step 10: Click on Export to save your recording.
Keynote will convert and save your video file with a voiceover into an .MP4 file.
What's new in Keynote 1.6Not too much has changed in the new version of Keynote. There aren't any new templates from what I can tell. While iWork did get a few new features across the board, most enhancements were done under the hood. 3D charts and graphsThis is probably a bigger deal to spreadsheet users but there's no denying the new 3D charts make the presentation look a lot more interesting than the standard 2D charts. And since it only takes a few taps to turn a boring table into an animated 3D one, why not? You can also rotate the chart and change its orientation and position. This is especially convenient when working with line graphs that overlap each other. You can stretch the graph outwards so you can easily see the difference between them and they don't seem so bunched up against each other. |
 Easy Ways to Change iPhone Rotation Lock Without Opening Control Center Easy Ways to Change iPhone Rotation Lock Without Opening Control Center If you don't know how to change the iPhone rotation lock without opening the control center, follow the steps below to activate Rotation Lock by ... |
 Simple Ways to Change Safari’s Default Search Engine on iPhone, iPad and Mac Simple Ways to Change Safari’s Default Search Engine on iPhone, iPad and Mac If you want to change the search engine in Safari on your devices, let's you get to read here a complete guide with the simple ... |
 Simple Tips to Make a Picture on Your iPhone an Apple Watch Face Simple Tips to Make a Picture on Your iPhone an Apple Watch Face One of the coolest things about the Apple Watch is that you can pick from a variety of faces. Right below is a super-easy way ... |

