How To Transfer Music, Photo From Computer to iPhone
 |
| How To Transfer Music From Computer to iPhone. Photo KnowInsiders |
How To Transfer Music From Computer To iPhone Without iTunes
iTunes, indeed, will help you transfer music from Windows to iPhone. However, it also will cause data loss on your device by syncing. That's the main reason why I recommend you try the way to copy music to iPhone without iTunes first.
To transfer music from computer to iPhone safely and quickly, the reliable iPhone transfer software - EaseUS MobiMover works well to get your needs met. In addition, it also allows you to:
-Transfer music from iPhone to computer
-Transfer music from one iPhone/iPad to another
-Transfer photos, videos, contacts, messages, audiobooks, and more
Other than the data transfer, it also supports video download, WhatsApp backup & Restore, and iPhone backup & Restore. Therefore, getting this tool could help to manage your iPhone, iPad, and iPod touch content well.
Simple Steps To transfer music from computer to iPhone
Step 1. Connect your iPhone to your computer and run EaseUS MobiMover. Then click "PC to Phone" > "Select Files".
Step 2. Select the music files you want to transfer from computer to your iPhone and then click "Open".
Step 3. Check the songs and click "Transfer" to start transferring music from PC to iPhone. When it has done, go to the Music app on the iOS device to enjoy music.
After transferring music from Windows to your iPhone, now you can enjoy your favorite songs freely on your iOS device.
READ MORE: How To Change Text Size For Individual Apps In iOS15
How to Transfer Music from PC to iPhone with iTunes
If the songs you want to put on your iPhone are stored in the iTunes library, you can move songs from iTunes to iPhone directly. Even if the music is not existing in the iTunes library yet, it's also practicable to put music from computer to iPhone with iTunes.
Before you start, it's necessary for you to know that the newly added items will replace the existing music, TV shows, movies, tones, and books on your iPhone. If you don't want to lose these files, try the alternative ways to transfer music from Windows to iPhone instead.
To transfer music from PC to iPhone using iTunes:
Step 1. Connect your mobile device to the computer and wait for iTunes to run automatically.
Step 2. If the songs are in the music library in iTunes, jump to the next step. If not, click "File" > "Add File to Library" to add music to iTunes.
Step 3. Click the device icon and choose the "Music" option.
Step 4. Select "Sync Music" and choose "Remove and Sync" in the popup window that telling you the existing files on your iPhone will be replaced.
Step 5. Choose the songs you want to transfer and click "Apply" > "Sync".
Step 6. After you sync music to your iPhone via iTunes, go to "Music" > "Library" > "Songs" on your device to check the items.
How to Transfer Music from Computer to iPhone with Cloud Services
Another popular way to transfer music from Windows to iPhone is to use a cloud service like Dropbox. With a cloud storage service, you can store your files, including music, in the cloud storage, and access the items on all your devices that use the service with the same account.
To make Dropbox work smoothly to put music on iPhone from a computer, you need to make sure:
You are using the same account on the PC and iPhone.
There are stable and reliable network connections on your devices.
The music files don't exceed the storage limit of your account.
Ready? Let's see how to transfer music from PC to iPhone without iTunes.
To transfer songs from PC to iPhone via Dropbox:
Step 1. Download and install Dropbox on both your Windows PC and iPhone (at least on the iOS device).
Step 2. Sign in to Dropbox with the same account on your devices.
Step 3. Since you need to transfer music from computer to iPhone, go to upload the music files to the cloud storage from your PC:
If you have installed Dropbox, open the program and click "Upload files" to select the songs you want to transfer to upload.
If you don't install Dropbox on your computer, go to Dropbox.com and upload the items to Dropbox.
Step 4. Wait for Dropbox to sync music across your devices.
Step 5. When it has done, go to the Dropbox app on your iOS device and you will see the items synced from your Windows computer.
Step 6. Choose the songs and download them to the internal storage on your device.
How To Transfer Photos From iPhone To PC with iCloud
 |
| Photo KnowInsiders |
First, you need to enable iCloud Photo Library on your iPhone. Tap Settings, then Photos, then select iCloud Photos (or iCloud Photo Library, depending on your device).
Now, when you take a photo, it will be uploaded to iCloud (as long as you have Wi-Fi).
Second, you need to download the iCloud for Windows app onto your computer.
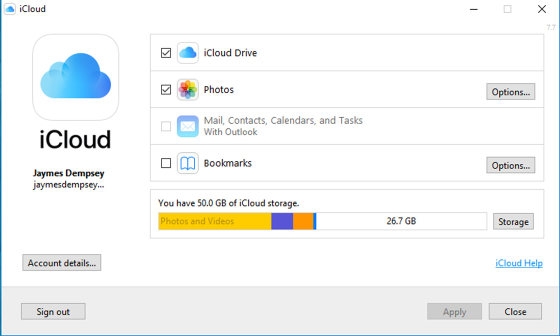
Install iCloud for Windows on your PC. Then sign in using your Apple ID (this is the same Apple ID you use for your iPhone App Store account).
Open the iCloud for Windows program on your computer.
Make sure you put a check mark next to Photos. Then tap the corresponding Options button.
 |
| Photo iphonephotographyschool |
Select the iCloud Photo Library option. Then select Download new photos and videos to my PC. If you want new photos and videos to automatically upload from your PC to your iCloud Photo Library, then check Upload new photos and videos from my PC.
Click Done. Then click Apply.
Any new photos that you take with your iPhone will now automatically download to your PC whenever you have Wi-Fi.
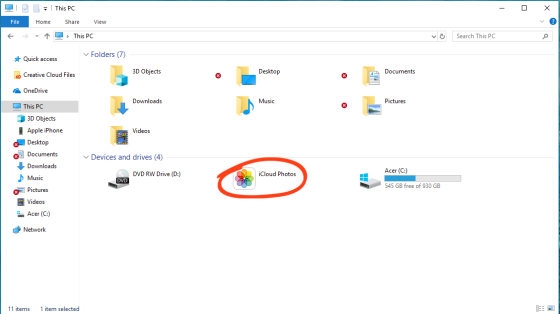
To retrieve photos that have been downloaded via iCloud, open your File Explorer (known as Windows Explorer on Windows 7 devices).
Click on This PC (or Computer on Windows 7 devices) on the left of the screen. Double-click on iCloud Photos.
 |
| Photo iphonephotographyschool |
Then double-click on Downloads. Here, you’ll be able to view your iCloud folders of photos.
On the left-hand sidebar, you can click to access your media by media type, or you can access your iPhone photo library albums.
Select any photos you wish to download to your computer. Then tap the Download icon (the cloud with a downward arrow) at the top of the screen.
Your photos will begin to appear in the Downloads folder on your PC. From here, you can drag your photos into the Pictures folder on the left of the screen.
How To Transfer Photos From iPhone To PC with Photo app
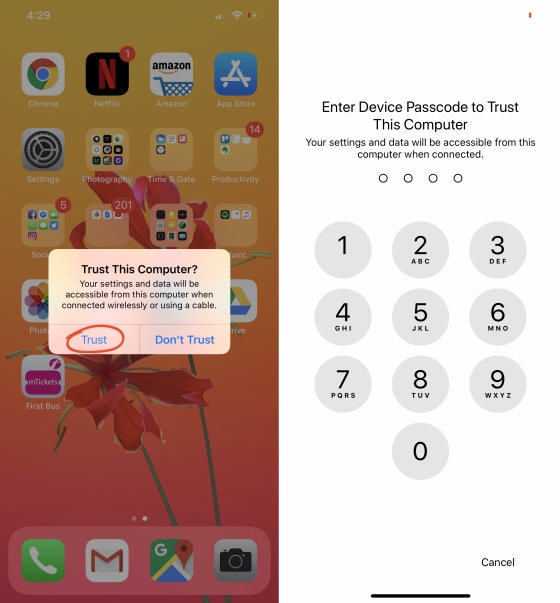
On your PC, open the Photos app. This can be accessed through the Start menu.
 |
| Photo iphonephotographyschool |
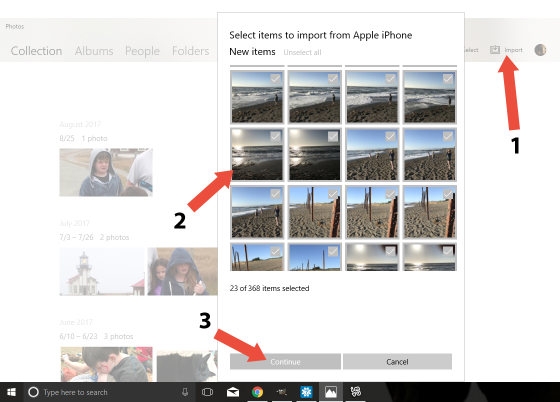
Once you’ve opened the Photos app, you should be given the option to import your photos from iPhone to PC. On a Windows 10 computer, this option will be in the top right corner of the Photos app. On a Windows 8 computer, you’ll need to right-click anywhere on the Photos app, and the option to Import will appear.
 |
| Photo iphonephotographyschool |
Click Import. Select the items you want to import.
If you’re using a Windows 8 computer, click Import again.
On a Windows 10 computer, click Continue, then click Import again. On some devices, you only have to click Import Selected instead of Continue > Import. Then your computer will immediately begin to import photos from iPhone to PC.
The files will begin to transfer from your iPhone to your PC.
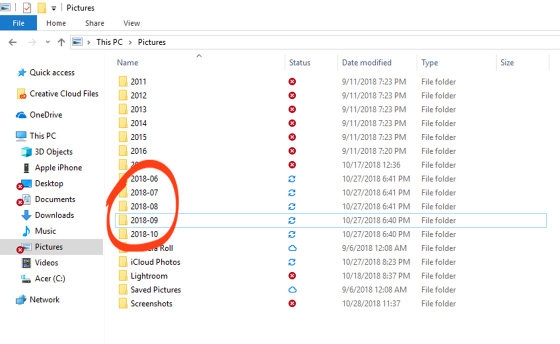
Once your PC has finished importing the photos, they can be found in folders within your Pictures folder. They will be automatically organized by date.
 |
| Photo iphonephotographyschool |
How to Connect Your iPhone to Your ComputerStart by connecting your iPhone to your computer with the USB cable that came with your iPhone. When you connect your iPhone to your computer, iTunes should launch automatically. If it doesn’t, chances are you plugged the cable into a USB port on your keyboard, monitor, or hub. Try plugging it into one of the USB ports on your computer instead. Select your iPhone in the iTunes source list. You see the Set Up Your iPhone pane, as shown here. Name your iPhone. This figure shows the name Lisa’s iPhone. Decide whether you want iTunes to automatically synchronize your iPhone and your contacts, calendars, e-mail accounts, and bookmarks. If that’s what you want, click the check box next to Automatically Sync Contact, Calendars, Email Accounts, and Bookmarks to make a check mark appear. Then click the Done button. If you want to synchronize manually, make sure the check box is unchecked and click Done. After you click the Done button, the Summary pane should appear. If it doesn’t, make sure your iPhone is still selected in the source list and click the Summary tab near the top of the window, as shown here. If you want iTunes to sync your iPhone automatically whenever you connect it to your computer, select the Automatically Sync When This iPhone Is Connected check box (in the Options area). Don’t select it if you want to sync manually by clicking the Sync button at the bottom of the window. |
 How To Convert Images To PDFs On iPhone and iPad How To Convert Images To PDFs On iPhone and iPad What should we do if we want to convert images into PDF files on iPhone or iPad? Don't worry. This article will show you the ... |
 How To Change Your Location On iPhone: Easiest Steps and Fake Location How To Change Your Location On iPhone: Easiest Steps and Fake Location Did you ever feel like spoofing your current location and letting applications installed in your app use fake location services? |
 How to Change the Safari Address Bar on iPhone How to Change the Safari Address Bar on iPhone Not a fan of the Safari address bar being on the bottom on your iPhone? Here's how to change its position as you see fit. |


