How To Take Good Photos With Your Smartphone: 12 Best Ways
 |
Your smartphone is always with you, a constant companion that can connect to the web to look up any tiny nugget of trivia, and generally keep you in constant contact with the outside world. It's one of the key items you grab before leaving the house, and the last time you (probably) turned it off was at the movie theater.
This also makes your phone your take-everywhere, shoot-anything digital camera. Just a few short years ago, making images and video with smartphones was a compromise, with poorer image quality but a heck of a lot more convenience than a good point-and-shoot camera.
But times have changed and phone cameras have gotten better and better. The latest models offer superior imaging and video to budget point-and-shoot cameras, and offer nifty software tricks to blur backgrounds, just like an SLR and f/2 or f/1.4 lens.
Check out these tips to get the best images you can get from your phone. But remember, even with the latest tech, phones aren't as versatile imaging tools as modern interchangeable lens cameras.
1. Start With a Good Camera Phone
| Photo: PCMag |
Smartphone camera quality has enjoyed a big leap forward in quality over the past couple of years. If you're using an older handset, chances are the camera isn't up to snuff. If camera quality is a priority when shopping for a new one, make sure you peruse our list of the top camera phones we've tested. But remember that you really can't go wrong with the latest Apple iPhone, Google Pixel, or Samsung Galaxy devices.
2. Set your camera's focus
Today's phone cameras automatically focus on the foreground of your frame, but not every picture you take on your phone has an obvious subject. To adjust where you want your camera lens to focus, open your camera app and tap the screen where you want to sharpen the view.
If you're taking a photo of something in motion, for example, it can be difficult for your camera to follow this subject and refocus as needed. Tap the screen to correct your phone camera's focus just before snapping the picture to ensure the moving subject has as much focus as possible. A square or circular icon should then appear on your camera screen, shifting the focus of your shot to all of the content inside that icon.
3. Focus on one subject
 |
| Photo: Instagram |
Many of the best photos include just one, interesting subject. So when taking a picture of one, spend some extra time setting up the shot. Some professional photographers say that the subject shouldn't fill the entire frame, and that two-thirds of the photo should be negative space — that helps the subject stand out even more.
But be sure you tap the screen of your smartphone to focus the camera on your subject — that'll help to ensure that it's focused and the lighting is optimized.
Pro Tip: Once you've taken your photo, you can use filters and apps to make the subject even more vivid, or to crop it to frame the subject correctly. The brightness, contrast, and saturation of the photo can also be adjusted accordingly — all from your phone.
4. Look for the Light
Smartphones have very bright lenses, but sensors are much smaller than you find in a premium compact camera with a 1-inch sensor like the Canon PowerShot G7 X Mark II. That gives them a distinct disadvantage in image quality in dim lighting. To get the best shots, look for opportunities where your phone's sensor can shine. If you're indoors, try to set up your shot so there's light falling on your subject—some window light will do more to improve your photos than a new phone or camera. It's always a better option to find good light as opposed to using your phone's underpowered LED flash.
5. Adjust Exposure
 |
| Photo: Getty Images |
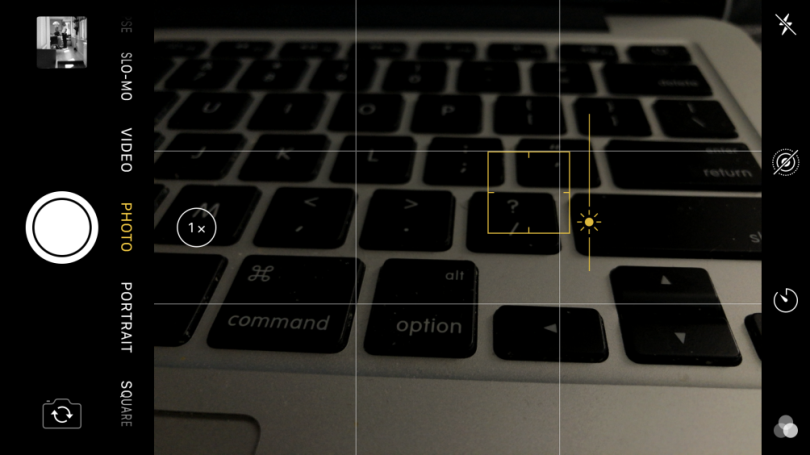
Smartphones are the modern point-and-shoot, but the apps that run their cameras typically offer some level of manual control. The most basic adjustment you can make is exposure—brightening or darkening a scene—and using it effectively can turn a bland image into a head-turner. Use it to brighten the shot of your fancy dinner to make it perfect for Instagram, or to darken shadows in a portrait for a more dramatic look.
The feature isn't always labeled the same. On an iPhone you'll want to drag the sun icon, to the right of the focus confirmation box, up to brighten an image or down to darken it. Android phones typically have the more traditional +/- icon for exposure adjustment.
6. Find different perspectives
 |
| Source: iPhone Photography School; Paul Octavious |
Taking photos from a unique, unexpected angle can make them more memorable — it tends to create an illusion of depth or height with the subjects. It also makes the image stand out, since most mobile photos are taken either straight -on or from a bird's eye view.
Try taking a photo directly upward and playing with the sky as negative space, like in the first photo below. Or, you can try taking it at a slight downward angle.
Pro Tip: If you take a photo and find the perspective is a little askew or tilted, use the SKRWT photo editing app to make the lines look clean and square.
7. Use leading lines
 |
| Source: Carlos Copertone |
In some photos, there's a line that draws the viewer's eye toward a certain part of the frame. Those are called leading lines. They can be straight or circulinear — think staircases, building facades, train tracks, roads, or even a path through the woods.
Leading lines are great for creating a sense of depth in an image, and can make your photo look purposefully designed — even if you just happened to come upon a really cool shape by accident.
8. Turn On Your Grid
Pro SLRs typically have framing grids in the viewfinder window to help you better square up shots and conform to compositional guidelines like the rule of thirds. (For more on composition and other photo basics, read our tips for basic photography, which apply as much to smartphones as they do to pro cameras.)
You can turn on the same thing in your phone's camera app. Adding a grid line gives you help in keeping the horizon straight and is a big plus for portraits in front of famous landmarks. With the notable exception of the Leaning Tower of Pisa, it's generally a good idea to keep upright structures perfectly vertical in your photos.
READ MORE: 10 Biggest Smartphone Companies in the World
9. Learn Your Camera's Features
The imaging capabilities of modern smartphone cameras are staggering. We've seen advances in computational photography that allow you to blur the background of images, mimicking the look of a wide aperture lens and big image sensor, and some handsets can also capture insanely slow-motion video.
Your phone probably has a good burst mode too, and it's never a bad idea to take a few images in a sequence to get the best one—just make sure not to post all of them. iPhone owners can check out Live Photos, which mix still images and video together.
10. Look for symmetry
 |
| Source: Eric Christian |
Symmetry can be defined as "a vague sense of harmonious and beautiful proportion and balance." And pictures that contain symmetry can be incredibly pleasing to the eye — it's also one of the simplest and most compelling ways to compose a photo.
In photography, symmetry usually means creating an image that can be divided into two equal parts that are mirror images of each other. That's a bit different than reflections — symmetry can be found "in the wild," as per the staircase picture, or you can set up your photo accordingly, like photographer Eric Christian did in the first photo below.
And remember — use those gridlines from tip #1 to line everything up perfectly.
11. Avoid zooming in
 |
| Source: Obama Pacman |
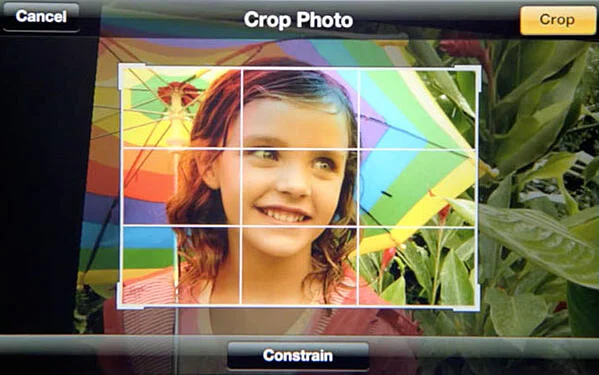
When you take a photo from a distance, it's tempting to zoom in on something specific you're trying to capture. But it's actually better not to zoom in — doing so can make the photo appear grainy, blurry, or pixelated.
Instead, try to get closer to your subject — unless it's a wild animal, in which case we would advise keeping your distance — or take the photo from a default distance, and crop it later on. That way, you won't compromise quality, and it's easier to play around or optimize a larger image.
12. Capture small details
 |
| Source: Eric Christian |
You may have heard the phrase, "It's the little things." Sometimes, that also applies to photos. Close-up images that capture small, intricate, and delicate details can make for really compelling visual content. Keep an eye out for textures and patterns like peeling paint, a gravel road, or a tile tabletop.
Pro Tip: Use the "sharpen" tool in your favorite photo editing app to (conservatively) sharpen the details of your photo. You might also download the Camera+ app and use its Clarity filter, which is what The Wall Street Journal's Kevin Sintumuang calls the app's "secret sauce — it adds pro-camera crispness to almost any shot."
 How To Make Your Smartphone Battery Last Longer: 10 Simple Tips to Try How To Make Your Smartphone Battery Last Longer: 10 Simple Tips to Try Phone battery can easily be damaged after a long period of time, and the article below will give you helpful tips on how to keep ... |
 Top 10 Cheapest Smartphones In The World 2021/22 Top 10 Cheapest Smartphones In The World 2021/22 With modern technology developing everyday, smartphones have become more and more affordable to many people all over the world. In the article below, we will ... |
 How To Keep Your Smartphone From Damage: 9 Simple Ways How To Keep Your Smartphone From Damage: 9 Simple Ways Your smartphone is one of the most precious possession in your bag, and you will not want it to get damaged or scratched. To learn ... |
 What is the First Smartphone In The History What is the First Smartphone In The History Smartphones have been very popular nowadays, with many updated version and modern technology that creates more and more designs. But do you know what is ... |

