How To Convert Images To PDFs On iPhone and iPad
 |
| How To Convert Images To PDFs On iPhone and iPad. Photo igeeksblog |
To convert images into PDF files on iPhone, we can use many different ways, such as using shortcuts in iPhone to create PDF files from images automatically, or using applications to convert images into PDF files.
What is an image file?
Image file types and formats are divided into two main different categories: raster image files and vector image files.
Let’s take a closer look at each category.
Raster Image File Formats
The most common image formats for the web (JPEG, GIF, and PNG) are all under the raster category.
Raster image file types display static images where every pixel has a defined color, position, and proportion based on their resolution (for example 1280×720).
Since they’re static, you cannot efficiently resize the images, the original design and pixels will simply get stretched to fill the extra space. This ends up creating a blurry, pixelated, or otherwise distorted image.
The vast majority of the photographs or images you see on the internet use a raster image format.
Vector Image File Formats
SVG, EPS, AI, and PDF are examples of vector image file types.
Unlike the static raster image file formats, where each design shape and color is tied to a pixel, these formats are more flexible.
Vector graphics instead use a system of lines and curves on a cartesian plane, scaled in comparison to the total area, not any single pixel.
This means you can endlessly enlarge the original image resolution without any loss in quality or distortion.
What is a PDF file?
PDF stands for "portable document format". Essentially, the format is used when you need to save files that cannot be modified but still need to be easily shared and printed. Today almost everyone has a version of Adobe Reader or other program on their computer that can read a PDF file.
READ MORE: How to Convert Publisher File to PDF: Best Ways and Simple Steps
How to convert images to PDFs on iPhone and iPad: Method 1
 |
| Photo goovypost |
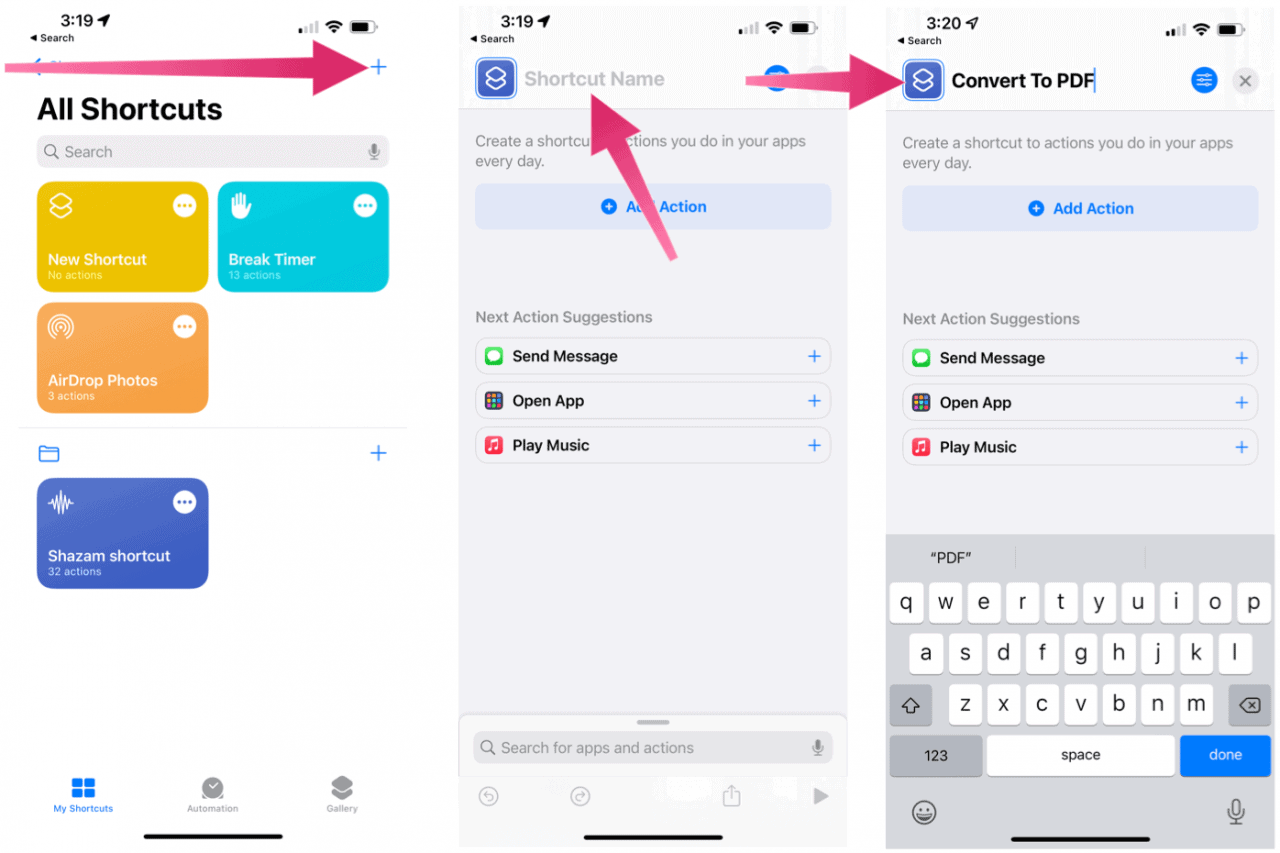
1.Open the Shortcuts app on your Apple mobile device.
2.Next, tap the + icon in the top right of the app.
3.In the box, add a Shortcut Name.
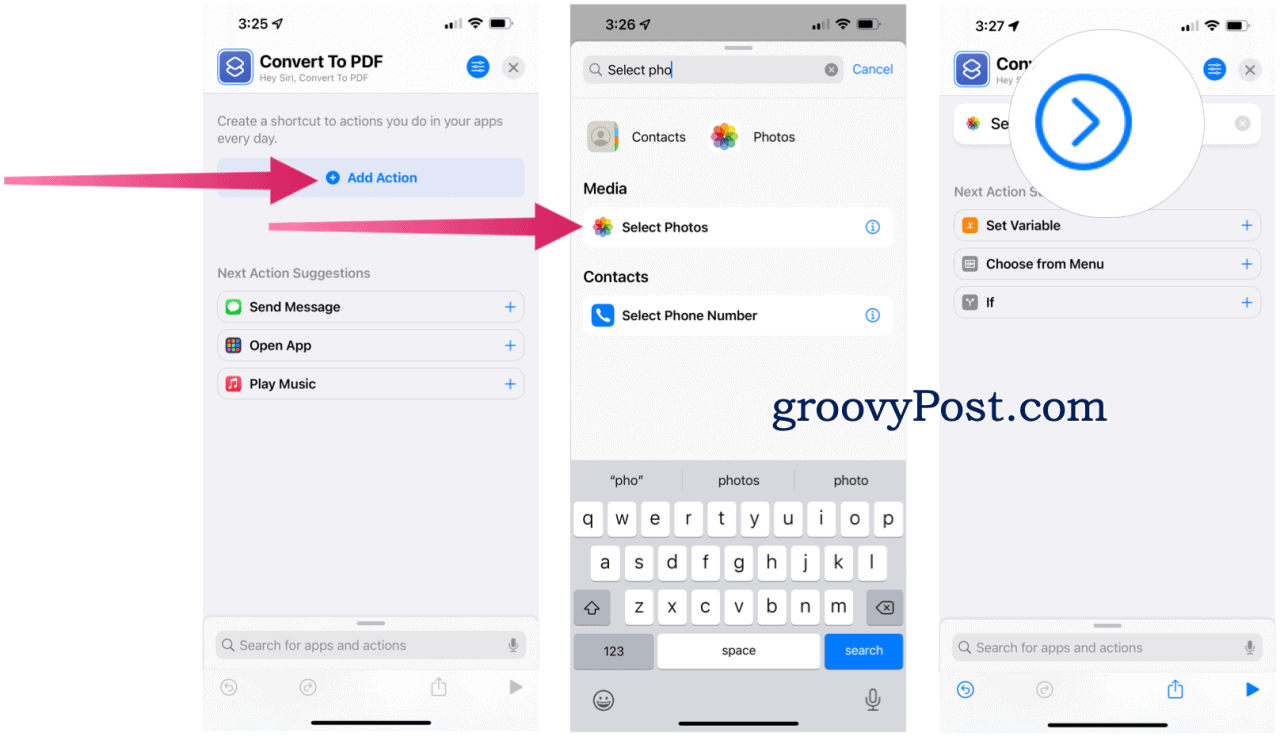
4.Tap Add Action.
5.Convert image to PDF
6.Type Select Photos in the search box.
7.Choose Select Photos under Media.
 |
| Photo goovypost |
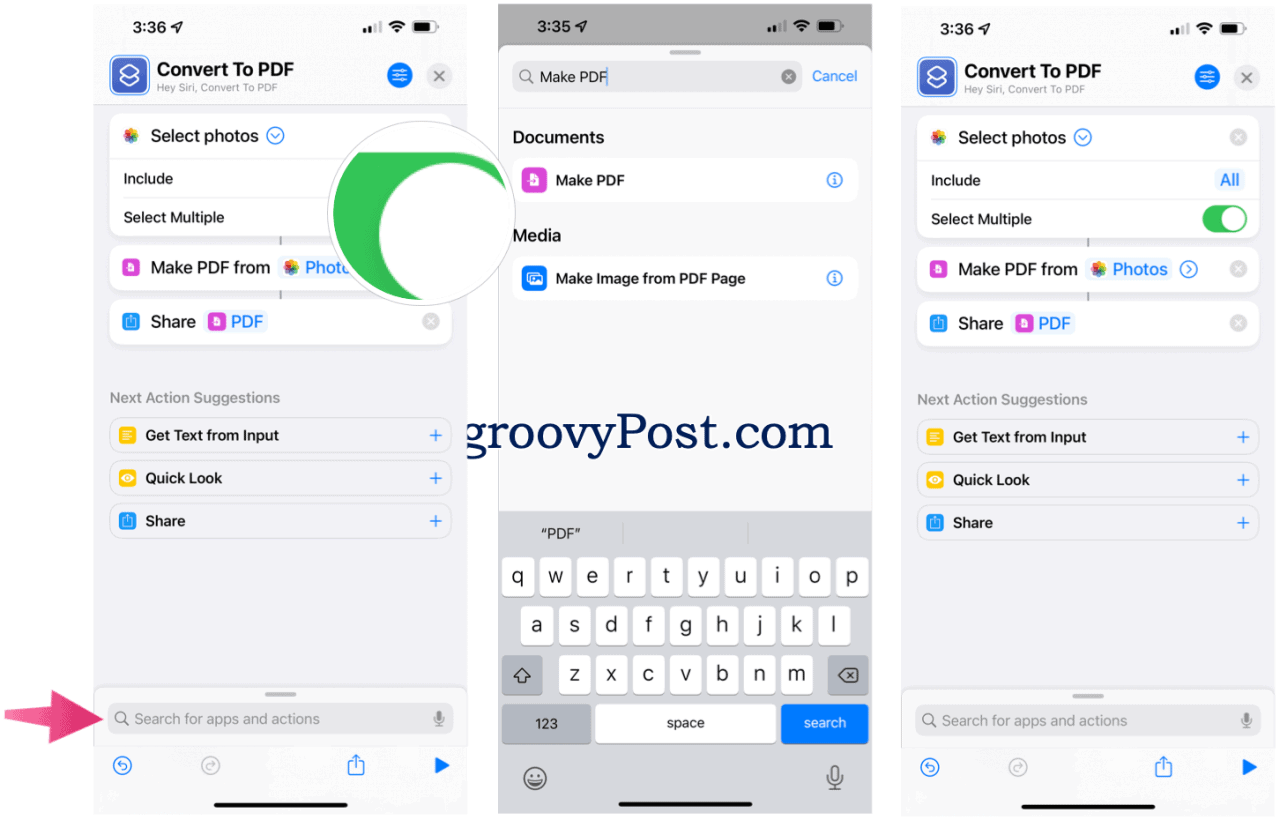
8.Select the right-facing arrow next to the words Select Photos.Shortcuts add photos
9.Tap the Select Multiple toggle icon.
10.Type Make PDF in the search box.
11.Choose Make PDF from the list.
12.Type Share in the search box.
 |
| Photo goovypost |
13.Choose Share from the results.convert image to pdf
14.Tap the Settings icon at the top right.
15.Toggle on Add to Home Screen.
16.Tap Add.
You’ll now see a Convert to PDF icon on the iPhone Home screen.
| Photo goovypost |
Running the Shortcut
Now it’s time to run the created Shortcut to convert images to PDF on your mobile device.
Tap on the Convert to PDF icon on the Home screen, which brings up the Photos app.
Choose the photos(s) to convert.
Select Add at the top right.
Choose a selection from the available options in the pop-up menu. In the example below, we want to covert three images, so we should select Show All 3 or Always Allow.
Next, tap Save to Files.
Choose the location to send your newly created PDF. You can also use the share sheet and send the PDFs via AirDrop, Messages, and Mail.
Method 2: Using Photos app
The Photos app on your iPhone and iPad offers two ways to convert images to PDF format. The first method requires using a simple gesture while ‘printing’ a photo, while the second one involves sharing the image to the Books app.
NOTE: You can also combine multiple images and convert them into a single PDF file. However, the order in which they will show up within the PDF will be determined solely by how they appear within the Photos app itself (oldest to newest). You can circumvent this problem by using the Files app (mentioned further below).
1. Photos App — Pinch Out Gesture
This method doesn’t require you to print a photo. Instead, you must perform a Pinch Out gesture within the Print Options screen. Surprisingly, this action will convert the image to the PDF format, after which you can either share it with your contacts, transfer to another app, or save to local storage.
Step 1: Open the Photos app, and then visit the album that contains the photo that you want to convert. After that, long-press the photo thumbnail and tap Share on the context menu.
If you want to select multiple photos, enter selection mode (tap Select at the upper-right corner of the screen). Then, pick the items that you want to convert, and finally, tap the Share icon.
Step 2: Tap Print on the Share Sheet. On the Printer Options screen that shows up next, perform a Pinch Out (or Zoom In) gesture. The photo will be converted to the PDF format immediately. If you had multiple images selected, all items would be converted (and combined) automatically.
Step 3: Tap the Share icon. You can then either share the PDF or save it locally (tap Save to Files).
That was pretty simple, now wasn’t it? Well, the next method is even easier.
2. Photos App — Copy to Books
Sharing photos to the Books app is another super-easy way to convert them to PDF format. This method saves converted files automatically, and you can access them on other iOS devices if you have iCloud syncing turned on for the Books app.
Step 1: Open the Photos app, and then long-press the picture that you want to convert. On the context menu, select Share.
Once again, if you want to convert multiple items, enter selection mode, pick the photos that you want to convert, and then tap the Share icon.
Step 2: On the Share Sheet, tap Books on the upper row. The image or images will be converted automatically, and the PDF file will appear in the Library section of the Books app.
NOTE: If you don’t see the Books option, swipe to the right of the Share Sheet, and then tap More to add it.
You have a range of actions that you can then perform. You can view the PDF, rename it, perform annotations and markups, and even share it with other apps and contacts.
| How to Convert Multiple Photos to PDF PDF Expert lets you easily turn multiple images into a single PDF file. Here’s how to do it: On your iPhone: Launch PDF Expert. Tap ... at the top right. Tap Select. Select the files you wish to convert and merge. Tap More at the bottom right. Tap Merge to PDF. On your iPad: Open PDF Expert. Tap ... at the top right. Tap Select. Pick the files you wish to convert and merge. Tap Convert to PDF on the sidebar. |
Method 3: Turn a Photo into PDF File Using Printer Option on iPhone
Interestingly, you can also use the built-in printer option to convert an image into a PDF file on your iOS or iPadOS device. Follow the steps below to learn how it works:
 |
| Photo beebom |
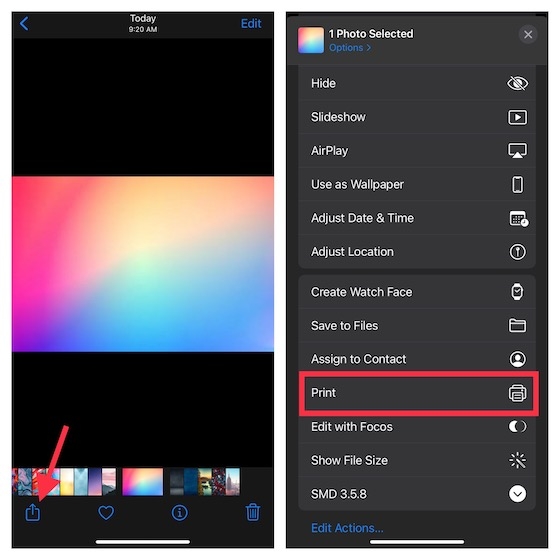
1. Open the Photos app on your iPhone and select the image you want to convert to a PDF document. Then, tap on the Share button at the bottom left corner and choose Print in the share sheet.
 |
| Photo beebom |
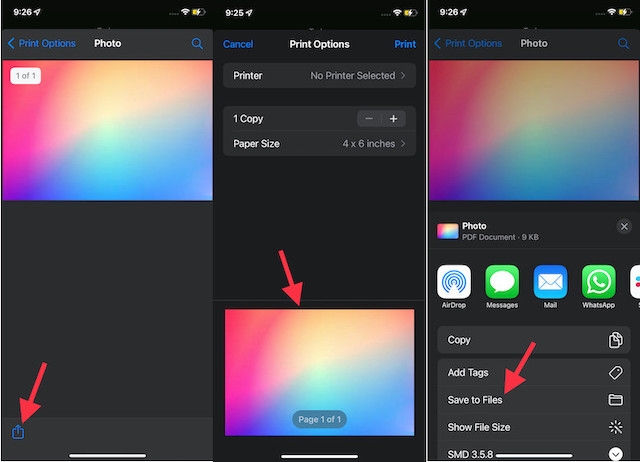
2. Now, pinch out (using your fingers) on the photo preview to turn the image into a PDF file. Yeah, that’s what you have to do to convert the image into a PDF. It’s that easy. Once the image has been converted, tap on the Share button and share it via iMessage, your favorite messaging app, email, or save it to the Files app depending on your needs.
Method 4: Use Third-Party Image to PDF Converters on iPhone and iPad
Having tried a few image to PDF converters, we found a couple of apps that are more efficient in converting images to PDF files on iOS. These are:
Photo to PDF Converter and Scanner (Free), and
Photos PDF: Scanner Converter (Free, $4.99 for full version)
The process of converting pictures into PDFs using these apps is similar and rather easy. For the purpose of this tutorial, we will demo the steps using the PDF Converter and Scanner.
1. Open the PDF Converter and Scanner app on your iOS device. After that, tap on the Photo tab at the bottom of the screen and select the image. Once you have selected the images, tap on Done at the top right corner of the screen.
2. Now, tap on the ‘Next‘ button at the top right corner of the screen. After that, choose the desired margin, orientation, and size. Then, hit Done at the top right corner of the screen and save the file to the desired location.
READ MORE: How To Convert iPhone Pictures to JPEG: Step-By-Step Guide
Using Other Shortcuts on iPhone
Some Apple Shortcuts run best as a widget, which you activate directly through the app or from your device’s notifications. Others are ideally suited for use on an Apple Watch. To use a Shortcut using your voice, you’ll be asked during the install process to record a phase. Then, moving forward, you activate the Shortcut by saying, “Hey Siri,” followed by the phrase.
Most Shortcuts are found directly in the Gallery section of the Shortcuts app. You can also install Shortcuts by tapping a provided link from a supported device. Once you’ve created a Shortcut, it becomes accessible across all of your supported devices.
You’ll find links for every recommended Shortcut below. Tap Get Shortcut for the ones you want to get started, then tap Add Shortcut or Add Untrusted Shortcut, depending on whether a third party created the Shortcut.
 Easy Steps To Convert A Word Document Into A PDF And Save It As A QR Code Easy Steps To Convert A Word Document Into A PDF And Save It As A QR Code In our daily work, there are many times that we need to convert from a Word document into a PDF file for convenient use. You ... |
 The Simpliest Ways to Convert a PDF to a Google Doc With or Without Formatting The Simpliest Ways to Convert a PDF to a Google Doc With or Without Formatting Keep reading the article below to learn how to convert PDF to Google Doc with or without formatting in best and easest ways. |
 How to Convert PDF to Image Files: Best Methods and Simpliest Ways How to Convert PDF to Image Files: Best Methods and Simpliest Ways PDF and image files are two familiar format, but how do we convert from one to another? This guide will help you with it, along ... |


