How to Change the Background Color in Photoshop
 |
| Change the Background Color in Photoshop. Photo: |
Changing the background color of your product photo allows you to repurpose photos and add pop and color to your shots. With just a few steps, you can remove a plain white background and replace it with a unique, eye-catching — and on-brand — color.
You can also take this a step further by automating the background-changing process using Photoshop actions, allowing you to change the background color of multiple product photos at a time.
How to Change Background Color in Photoshop
Step 1 – Open Image
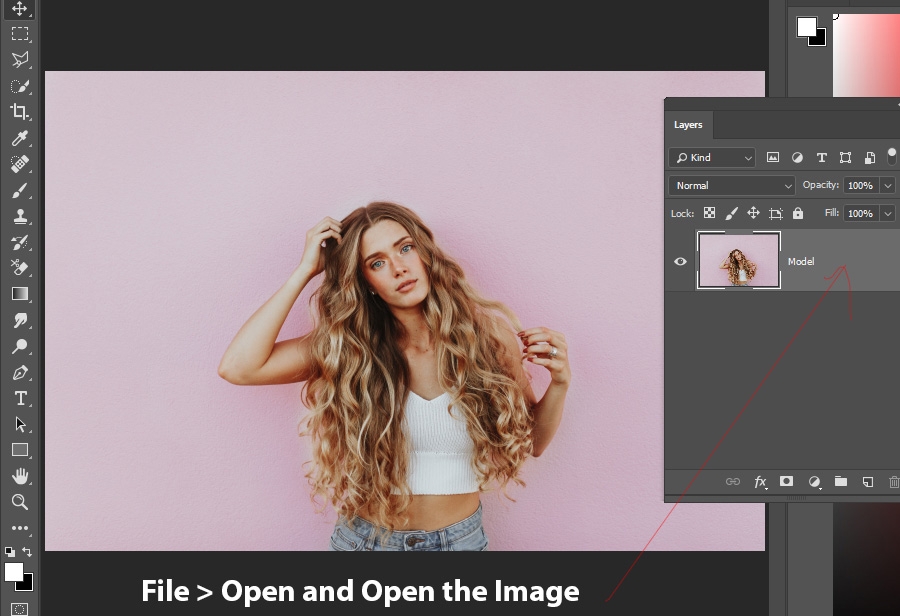
Open image in Photoshop and I am using a model image from Unsplash and you can download the same here. This technique works well if you have a solid color background such as your subject against a clean wall, or having a simple solid background as our model has.
Go to File > Open and open the image in Photoshop.
 |
| Photo: psdstack |
Step 2 – Create Selections
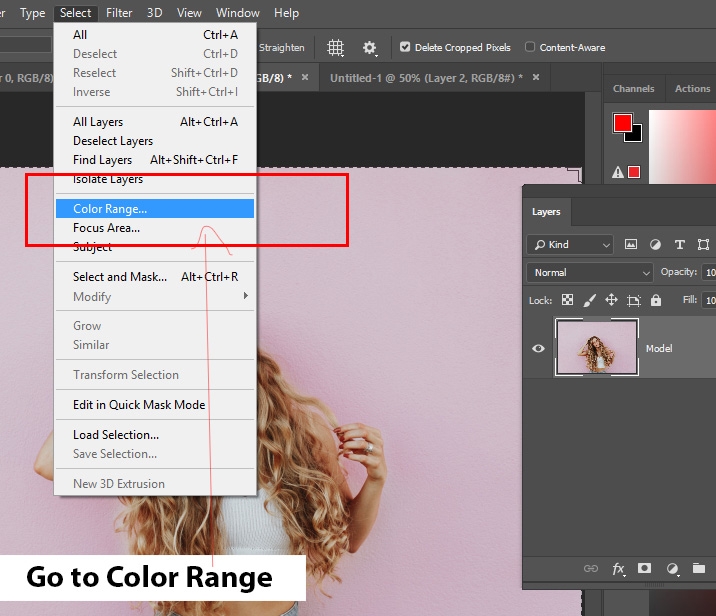
Since the background is really simple and we have only one color to select, considering that in my mind, I chose Color Range to make selection. If you want to learn more about Color Range you can follow my in-depth tutorial on Color Range here.
Go to Select > Color Range.
 |
| Photo: psdstack |
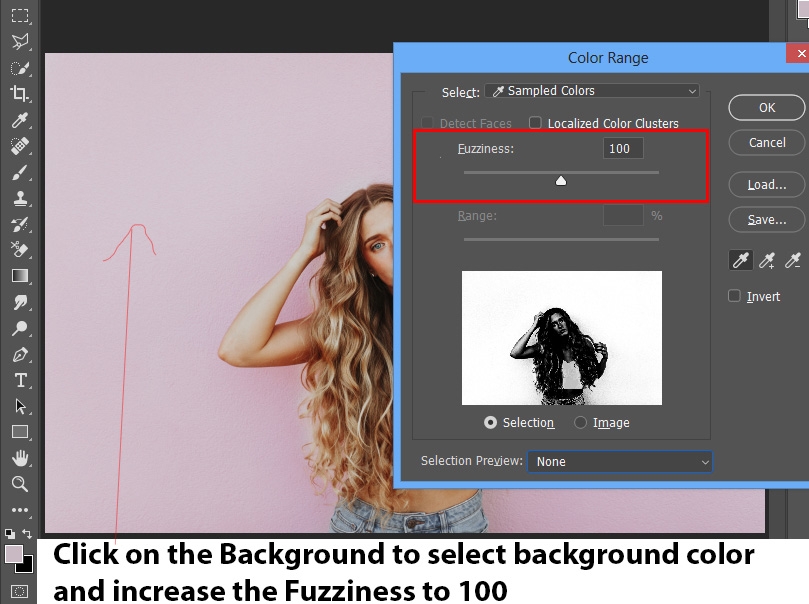
1. In the Select Color Range dialog box just click on the background color to sample and select it.
2. Set the Fuzziness to 100% to tell Photoshop to select the color pixels that match with the sampled color or near the sample color. This will make an accurate selection based on the sampled color.
 |
| Photo: psdstack |
Now press OK to create a selection around the model:
 |
| Photo: psdstack |
Step 3 – Change Background Color
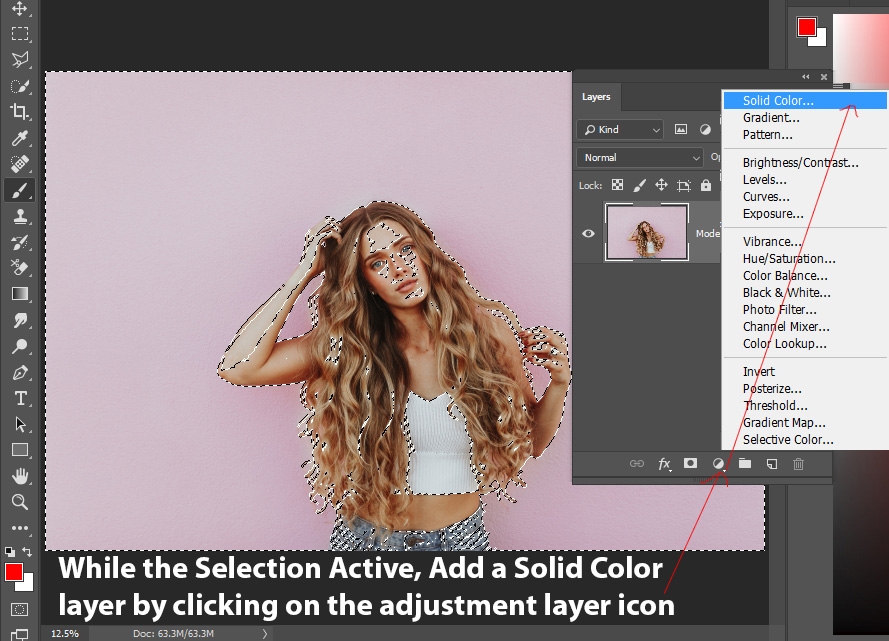
Now we’ll change the background color using a Solid Color Fill Layer. Click on the new adjustment layer icon at the bottom of the layer or go Layer > New Adjustment Layer > Solid Color.
Make sure you add this adjustment layer while the selection is active as it will load the selection in the layer mask of the adjustment layer.
 |
| Photo: psdstack |
Pick any color that you like and change the background color:
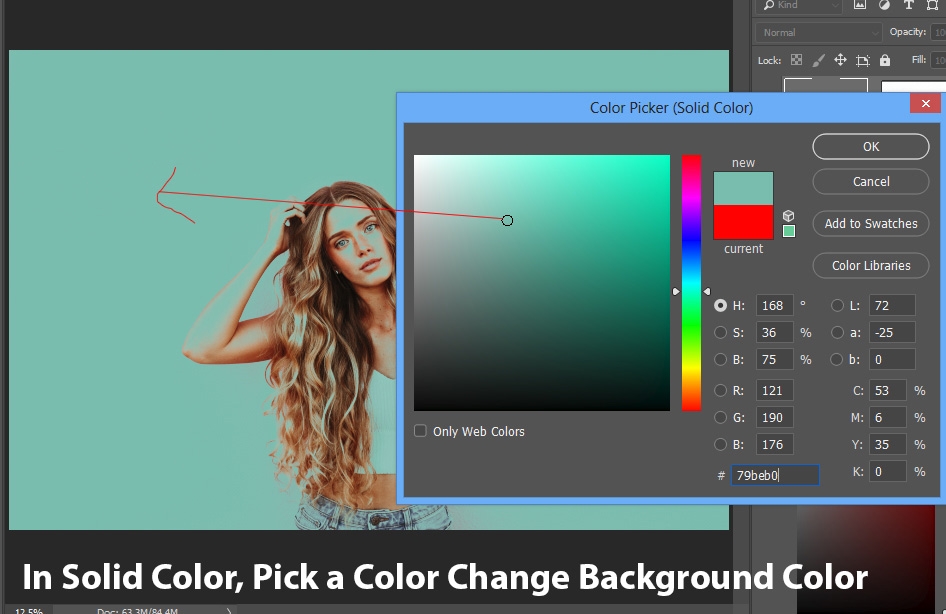 |
| Photo: psdstack |
Change the blending mode of Solid Color to Color Blend Mode. This will blend the color more naturally on the background.
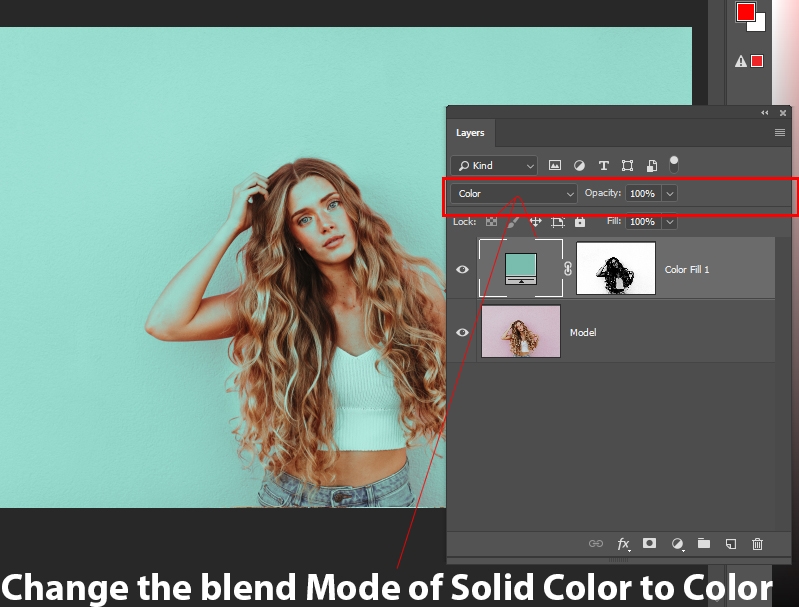 |
| Photo: psdstack |
Step 4 – Fine-Tune Layer Mask
The Select Color range did a pretty good job with the initial selection process but it’s not accurate. You can see we have some color visible on the model face, hands, and clothes. We don’t want that and to fix this we’ll fine-tune the results of the layer mask.
 |
| Photo: psdstack |
Select the mask of Solid Color adjustment layer, mask the effect of Solid Color using a soft round black brush. You can see in the below image where you exactly need to paint.
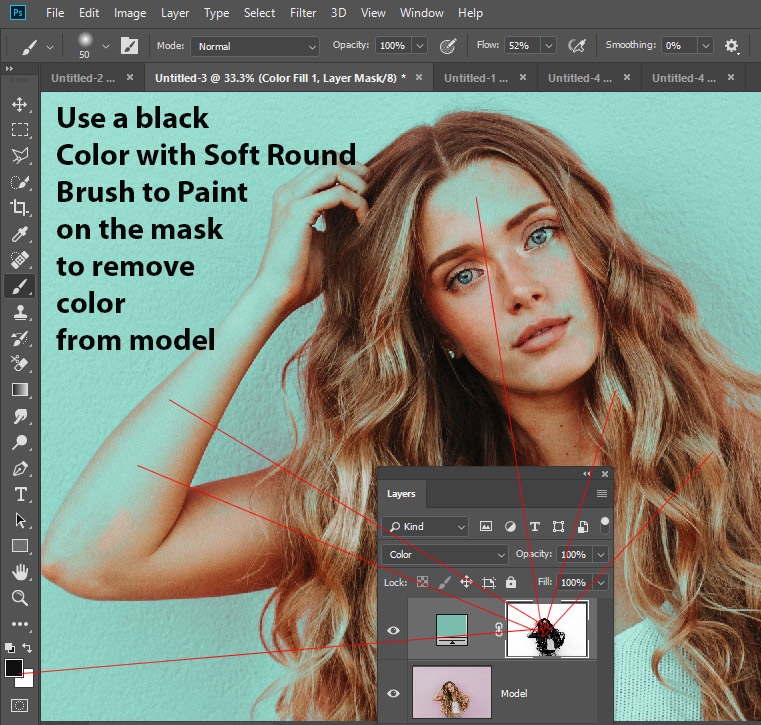 |
| Photo: psdstack |
Here you can see we have removed the color from the model:
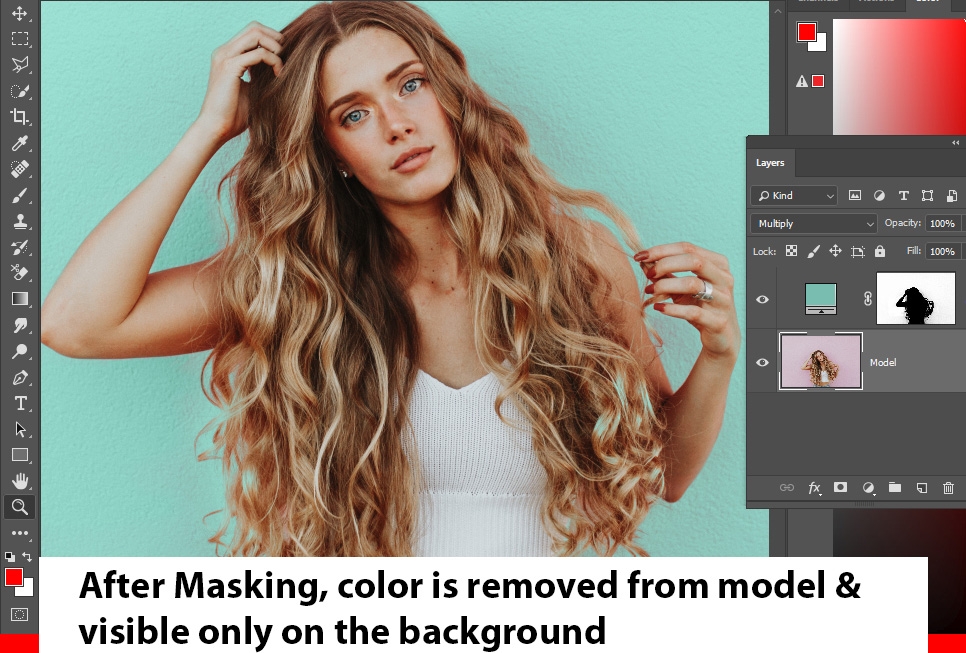 |
| Photo: psdstack |
You can compare the results before and after fine-tuning results:
 |
| Photo: psdstack |
Step 5 – Create Multi-Color Background
Now you have changed the color of background completely but if you want you can even create a multi-color background as well. It’s much easier than you think.
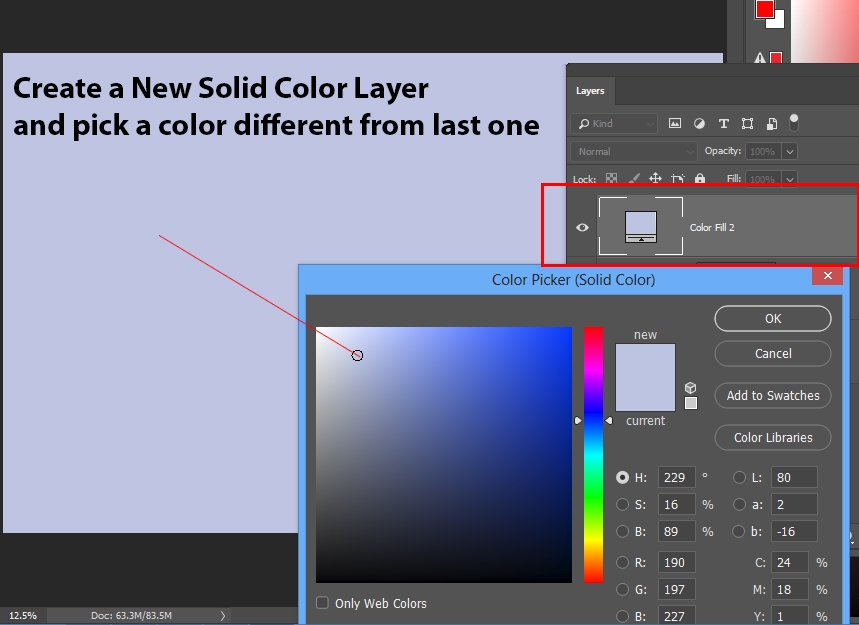
To create a multi-color background, create a new Solid Color adjustment layer by selecting Layer > New Adjustment Layer > Solid Color.
You can see I’ve chosen a different color this time.
 |
| Photo: psdstack |
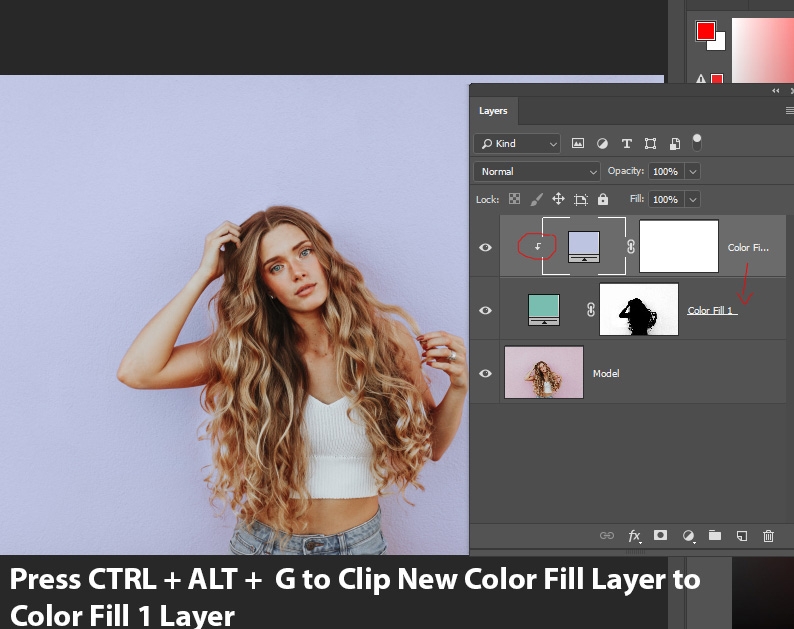
Now clip the newly created solid color layer to the existing solid color layer by pressing CTRL + ALT + G. This will make sure Solid Color 2 will be visible through the layer mask of Solid Color 1.
That simply means it won’t be visible on the model and will be visible only on the background.
 |
| Photo: psdstack |
Now make a random selection of your choice, you can use Polygonal Lasso Tool (L) or Rectangular Marquee Tool (M) to create a selection of your choice.
 |
| Photo: psdstack |
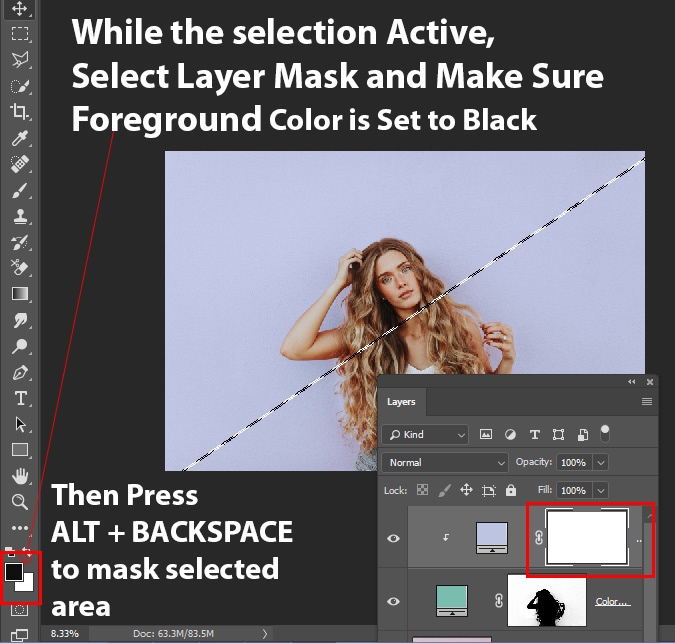
Now we’ll load the selection in the layer mask of solid color 2 layer. To do this, select the layer mask of Solid Color, change the foreground color to black by pressing (D) on the keyboard and now press ATL + BACKSPACE to fill the layer mask with black color.
This will make half of the layer visible and making the color visible on the second half of the layer.
 |
| Photo: psdstack |
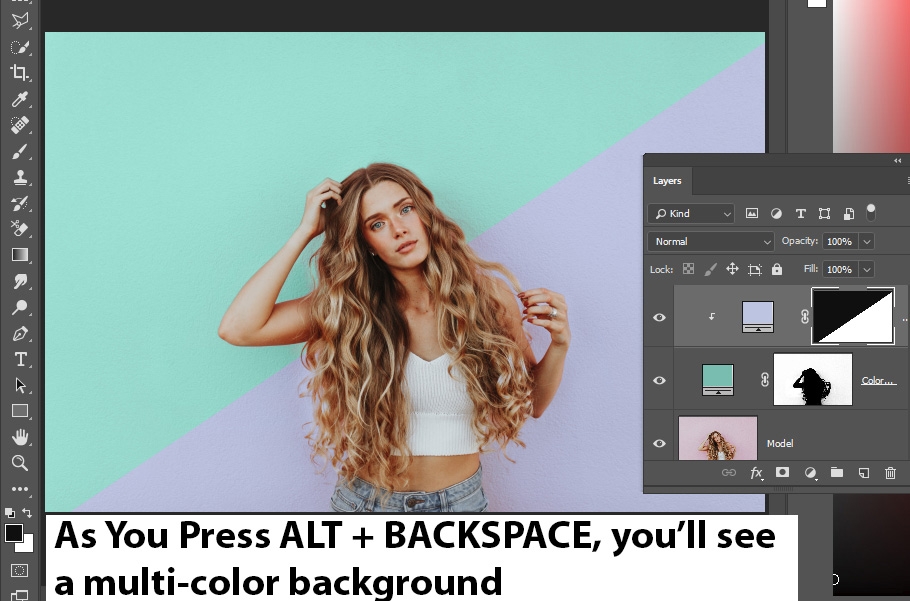
As you press ALT + BACKSPACE you’ll see a multi-color background. You can even inverse the layer mask results by pressing CTRL + I to swap color from one half to another half.
 |
| Photo: psdstack |
Step 6 – Smoothing Edges
Since I used Polygonal Lasso Tool (P) to create a selection and by doing so you can see we have a very hard edge separating colors from each other.
We have to smooth edges to make them look natural otherwise it won’t look good.
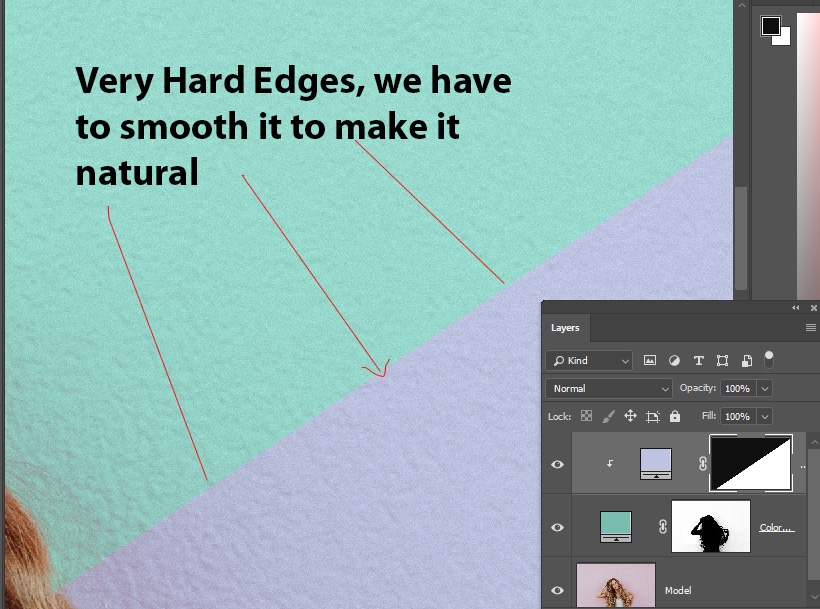 |
| Photo: psdstack |
Right-Click on the layer mask of Solid Color layer and choose Select & Mask.
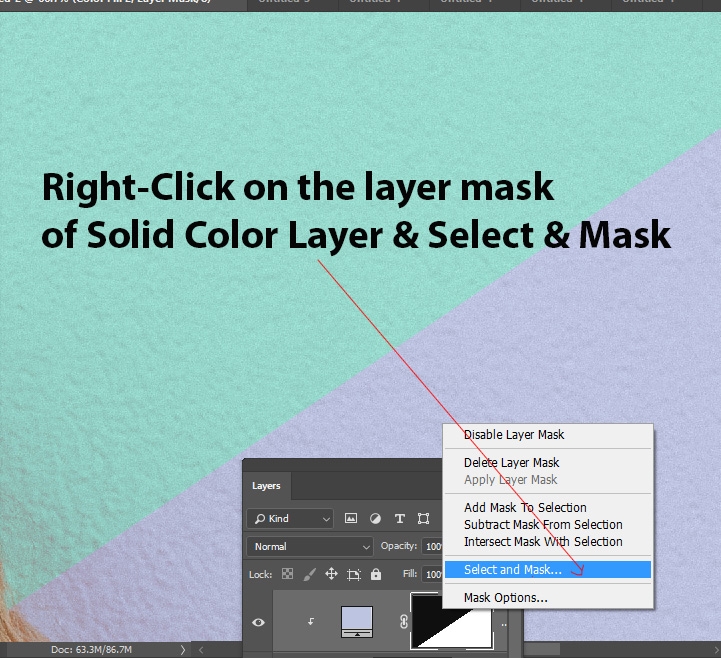 |
| Photo: psdstack |
In the Select & Mask Dialog, head over to the Global Refinements Section and start increasing the Feather Value until you start seeing smoothness on the edges.
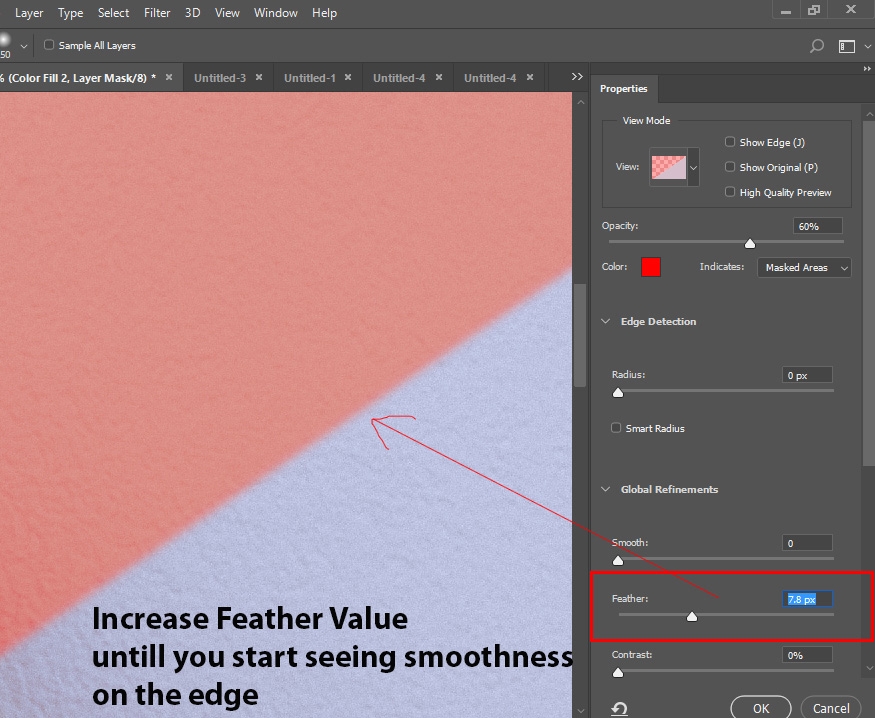 |
| Photo: psdstack |
Here you can see the edges has a softness now:
 |
| Photo: psdstack |
Here are the Final Results:
 |
| Photo: psdstack |
I added another solid color layer and using masking I added another color on the background:
 |
| Photo: psdstack |
Step 7 – Change Background Color At Any Time
If you like this “Oh, I don’t like the color, I want to change it with another color”, it is super-easy to do. All you have to do this, double-click on the Solid Color Layers and choose a different color from there to change the color at any time.
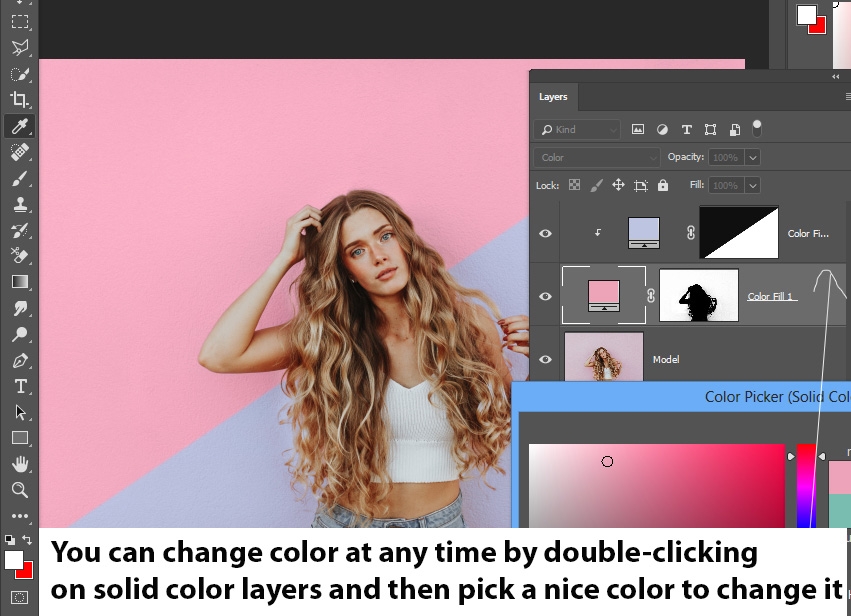 |
| Photo: psdstack |
Change the Background Color in Existing Images
Before you can change the color of the background in Photoshop you need to select it. Here are a few ways to do it, whether you're working on Windows or macOS:
Use the Magic Wand Tool
The Magic Wand tool is quick and dirty and works best when there are stark differences between the foreground and background, but it can work rather well if you're short on time or patience. To do so, select the Magic Wand tool from the left-hand menu (it's the fourth one down and looks like a wand). Then, hold Shift and select the different parts of the background you want to change the color of.
Use the Lasso Tool
If the magic wand is a bit too heavy-handed or not nuanced enough to select all of your background, the lasso tool can be helpful. There are three you can leverage for the same purpose. Select and hold the third-option in the left-hand menu to be given a choice. The standard lasso requires drawing around the background by hand; Polygonal Lasso will let you draw defined, straight lines; Magnetic Lasso will stick to existing lines and edges.
When you’ve finished drawing around your background, either connect back to the starting point to finalize it, or press Ctrl+Click. If you’re using a tablet running Windows 10, pressing and holding on the screen will give you the option to right-click, which opens a contextual menu with additional functions. Select the one you need, then tap for the same function.
Use the Masking Tool
If you want a super precise way of selecting the background of an image, you can use the masking tool. It's the tool second-from-bottom in the left-hand menu. Select it, then use a paintbrush or similar tool to "paint" your selection. This can be combined with the above methods to fine-tune an existing selection. You should see the areas you've selected appear in red. When you've happy with your selection, select the masking tool again to see your selection in dashed lines.
| Tips: If the background is much larger than the foreground when making a selection with any of the above methods, select the foreground instead, then press Ctrl+Shift+I to invert your selection and highlight the background. |
Now that you've selected the background, it's time to change its color. You can do so in a couple of different ways, depending on what color you want the background to be:
Change Hue
Press Ctrl+U to bring up the Hue and Saturation menu. Use the Hue slider to tweak the hue of your background. It will maintain the same lighting levels as before, but the overall color palette will change.
| Tip: If you would rather have a more uniform color to the background, you can first remove it, then add it back in before adjusting the hue. To do so, press Ctrl+Shift+U to turn the image to grayscale, then open the Hue and Saturation menu as before. Select Colorize to add color back into the background, then use the Hue slider to adjust its color. |
Paint Over It
If you would rather have a blank color as your background, you can simply paint over the one you have already.
1. On Windows and macOS, press F7 to open the layers window.
2. Select New Layer to create a new layer. It's the second icon from the right.
3. Select Fill Tool from the left-hand menu. It looks like a paint bucket and is called the Paint Bucket Tool in some versions of Photoshop.
4. Use the color palette at the base of the left-hand menu to select your background color, then simply select within your selection to create a blank color.
| Tip: If you would prefer a gradient effect in your background, select and hold Fill Tool to give you the option of the gradient bucket, then select and drag within your selection to create a gradient color for your new background. |
Changing the Background Color of a Photo using Object Selection Tool
This tool makes it easy to select a single object or part of an object in an image—for example, people, cars, furniture, pets, clothes, and more.
 |
| Photo: offshoreclippingpath |
You simply draw a rectangular region or a lasso around the object; the Object Selection tool automatically selects the object inside the defined region.
The tool works better on well-defined objects than on regions without contrast.
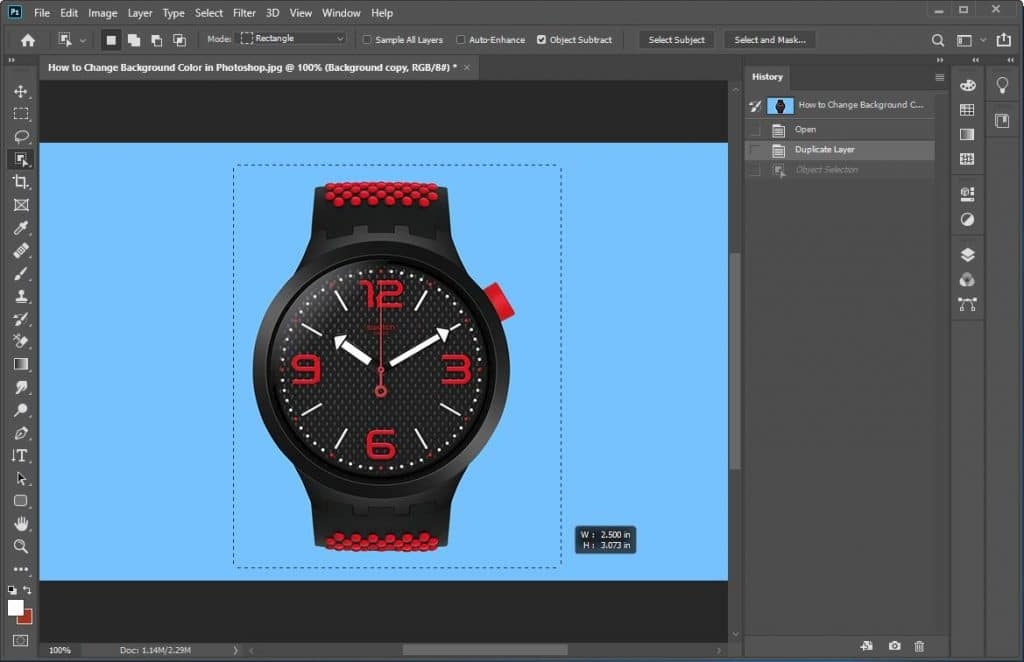
Step 1: Select the subject
Draw a rectangle around the subject.
 |
| Photo: offshoreclippingpath |
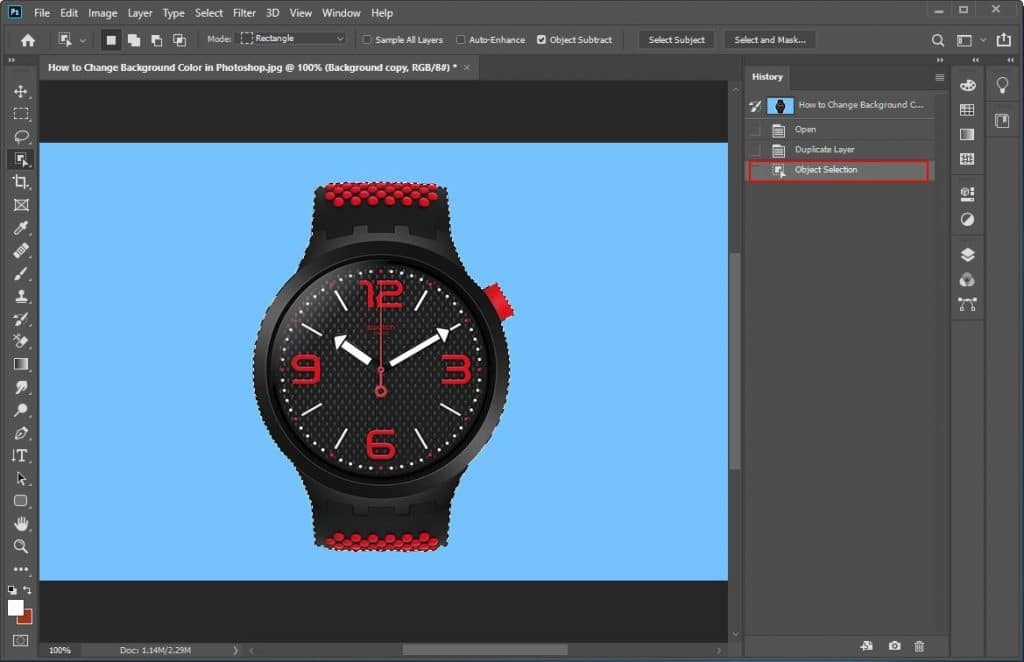
The Object Selection tool does an excellent job of selecting the subject.
 |
| Photo: offshoreclippingpath |
So now we have the subject of the image selected and we are satisfied with the result. The next step is to change the background to white.
Step 2: Invert the selection
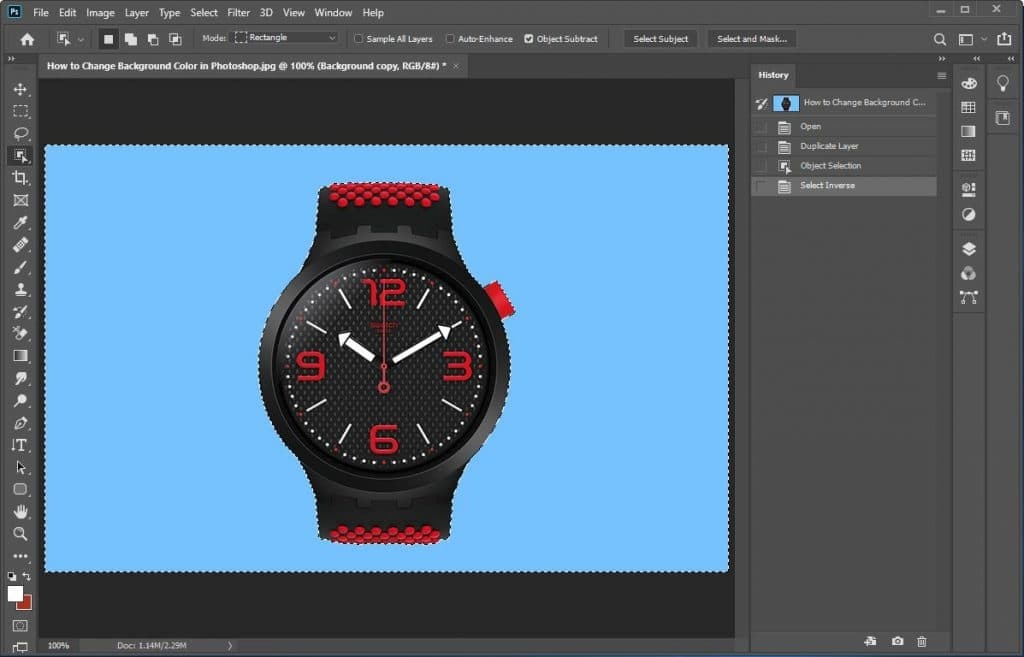
Since the subject is selected, we need to invert the selection so that the background is selected.
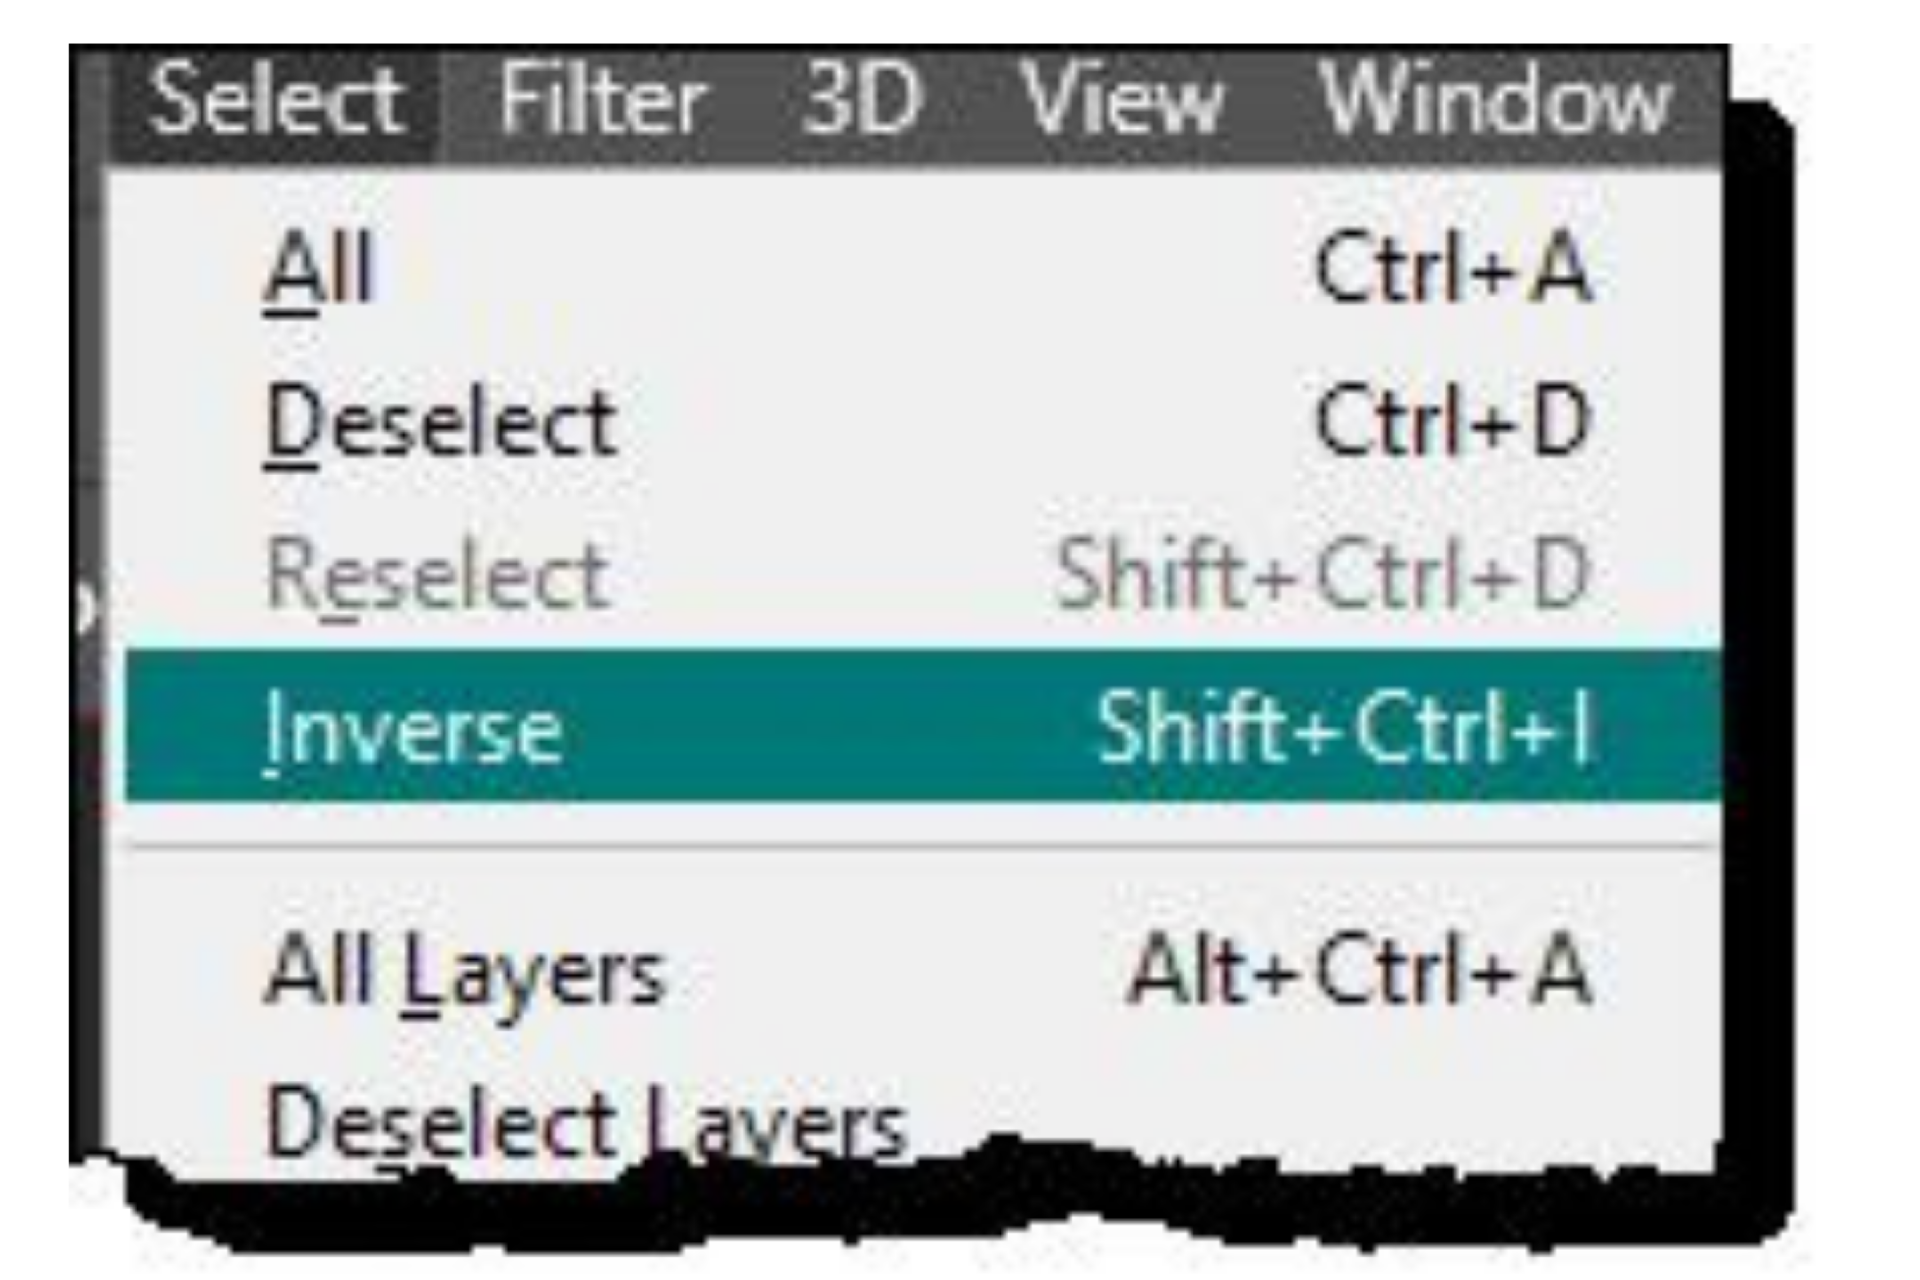
Step 3: Click inverse menu
From the Select menu, click the Inverse menu option.
 |
| Photo: offshoreclippingpath |
Now the background is selected as you can see by the running ants running around the image border.
 |
| Photo: offshoreclippingpath |
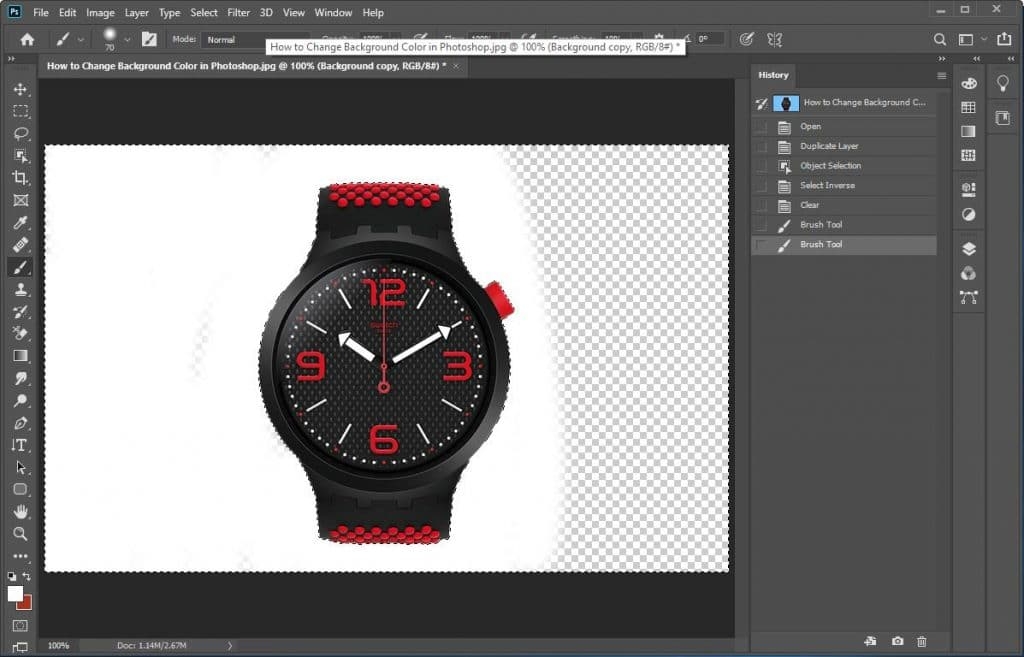
Step 4: Press delete key
Press the Delete key and the background is now removed (note the checkerboard pattern that shows the background is gone).
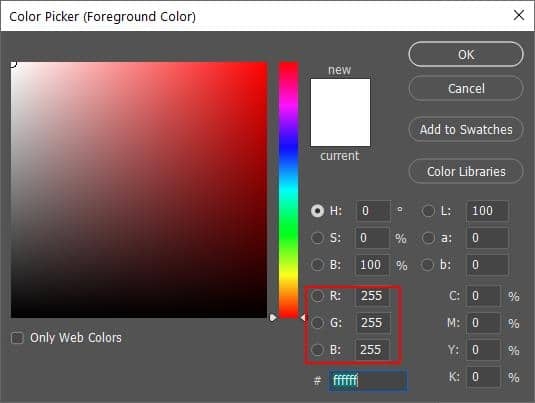
Step 5: Open color picker
Click on the Foreground color in the left-hand toolbar.
 |
| Photo: offshoreclippingpath |
Step 6: Select color
Select white as the foreground color. The RGB values for white are 255,255,255.
Step 7: Select brush
Select a large brush and make sure the Foreground color is white.
Step 8: Start brushing
Start brushing over the image to change the background to white.
 |
| Photo: offshoreclippingpath |
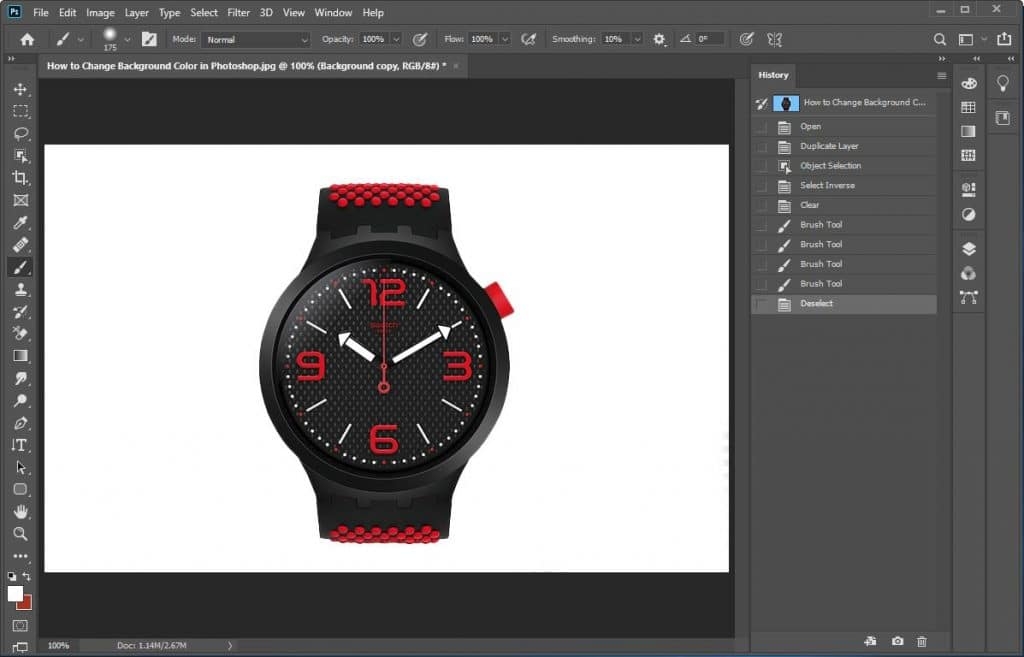
Step 9: Click deselect
From the Select menu, click the Deselect menu option when finished.
 |
| Photo: offshoreclippingpath |
Here you see the image now with a white background.
For more interesting news of KnowInsiders, check out right below!
 How to Change Email Address on Facebook With Easy Steps How to Change Email Address on Facebook With Easy Steps Facebook allows you to maximize experience including changing your primary email address. If you haven't known how to change, don't miss this article. |
 How To Change Your Location and Local Stations In YouTube TV How To Change Your Location and Local Stations In YouTube TV There are many ways to change your location and local stations in Youtube TV. Follow our simple guides! |
 How To Change Your Region On Netflix With Simple Steps How To Change Your Region On Netflix With Simple Steps What should we do if Netflix in our region is restricted. We have several ways to change Netflix region with VPNs and without VPNs. |


