4 Simple Ways to Rotate Your Laptop’s Screen on Windows
 |
| How to Rotate Your Laptop’s Screen on Windows With Simple Ways Knowinsiders.com |
| Table Of Content |
Most laptop or PC applications work perfectly well in landscape mode. But occasionally, the screen’s position can hinder your productivity, especially if you want to work with or display information in a tall and thin window.
Maybe you’ve plugged in an external display and your primary screen has gone haywire as a result or perhaps you’re trying to look at a vertical infographic holistically instead of chunk by chunk. If your screen isn’t set up properly, it can make your tasks more difficult to complete. So how do you go about rotating your PC screen in Windows?
Keep reading to learn how to rotate your screen manually, enable or disable the auto-rotation feature, and how to use keyboard shortcuts to easily flip your PC screen.
What is Windows?
Windows may refer to any of the following:
Microsoft Windows (also referred to as Windows or Win) is a graphical operating system developed and published by Microsoft. It provides a way to store files, run software, play games, watch videos, and connect to the Internet.
Microsoft Windows was first introduced with version 1.0 on November 10, 1983. Over a dozen versions of Windows were released after that, including the current version, Windows 10.
Editions of Windows
Starting with Windows XP, Microsoft has published various editions of Windows. Each of these Windows editions has the same core operating system, but some editions have additional features, at an additional cost.
The two most common editions of Windows for home computers are Windows Home and Windows Professional.
Windows Home
Windows Home (also called Win Home) is the basic edition of Windows. It provides all the fundamental functions of Windows, such as connecting to the Internet, browsing the web, watching videos, using office software, and playing video games. It is the least expensive edition of Windows, and it comes preinstalled on many new computers.
Windows Pro
Windows Professional (also called Windows Pro, or Win Pro) is an enhanced Windows edition, for power users, and small to medium sized businesses. It includes all the features of Windows Home, plus the following:
Remote Desktop - allows you to remotely control another Windows computer connected to the Internet.
Bitlocker - Microsoft's integrated file encryption.
Trusted Boot - provides encryption of the boot loader, protecting the computer against rootkits.
Hyper-V - a Windows hypervisor for running virtual machines, equivalent to third-party software like VirtualBox.
Windows Sandbox - provides a lightweight, sandboxed Windows 10 instance. You can use this isolated "Windows within Windows" environment to safely run suspicious or untrusted software. Windows Sandbox requires a Windows Insider build of Windows 10 Pro or Enterprise.
Group policy management - Administrators can define group policies, for managing multiple Windows users in a business or organization.
Support for more than 128 GB of RAM.
Greater Windows Update installation options, including more flexible scheduling and postponement for up to 35 days.
Business editions
Windows Professional for Workstations and Windows Enterprise provide advanced features for professional studios and large businesses. For more information, refer to the side-by-side comparison in the official Microsoft Windows business edition comparison chart.
Why would you need to rotate your screen on Windows?
Whether you’re at your office or at home, there are times when it makes sense to look at your projects or other virtual information in a vertical format. Maybe you’re a graphic designer working on a poster and you need to get a better idea of what a portrait view of your subject will look like. Or maybe you regularly create spreadsheets that make sense only using a vertical screen orientation.
Horizontal orientation is the default, of course, and it’s also the standard you’ll use for your everyday web browsing, surfing, and other common tasks. But when those particular situations arise where you need to switch up your perspective, we’ve got the steps you can follow below to show you how to flip your screen.
What Are The Different Methods To Rotate Your Laptop’s Screen On Windows?
Method 1: Rotate your screen with Windows keyboard hotkeys
 |
| Photo: Techlicious |
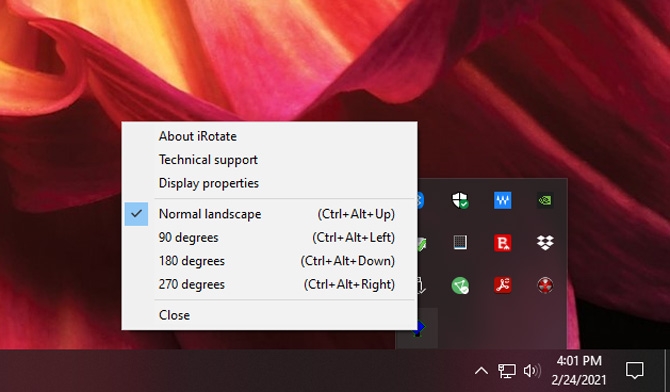
Windows 10 has numerous native keyboard shortcuts, including the ability to rotate your display 90, 180 or 270 degrees. Pressing Ctrl + Alt with any arrow key (right/left/up/down) will rotate the entire screen in the direction of the arrow key. This can be very useful when you need to quickly rotate your screen back and forth while watching videos in various orientations.
The arrow shortcuts, though, only work with machines using integrated Intel graphics on your CPU. If you have an Nvidia card, for example, the latest Nvidia drivers don’t support the arrow shortcuts. However, you can get around this limitation with a handy little free applet called iRotate, whose sole purpose is to restore these rotation hotkeys. Once installed, use the same Ctrl + Alt + Arrow key (right/left/up/down) combo to rotate the screen. iRotate also creates a taskbar icon with simple rotation controls.
Amazingly, though the iRotate app hasn’t been updated since 2008 when Windows Vista was still in fashion (was Vista ever in fashion?), it still works perfectly for Windows 10.
In Windows 10, you can use the direct way to flip screen and that is using the keyboard combination. But before you do, make sure the Hot Keys feature has been enabled. This way is only available for some PCs with the Intel graphics drivers.
Step 1: Right-click on the empty area on the desktop and choose Graphics Options.
Step 2: Go to Hot Keys and enable it.
Step 3: Press Ctrl+Alt+Arrow to rotate your computer screen.
- Ctrl + Alt + Up Arrow: return the screen to normal landscape mode
- Ctrl + Alt + Down Arrow: rotate the screen upside down (180 degrees)
- Ctrl + Alt + Left Arrow: rotate the screen 90 degrees to the left
- Ctrl + Alt + Right Arrow: rotate the screen 90 degrees to the right
| Must-Know general Windows shortcuts You can find the full set of Windows shortcuts on Microsoft.com broken out by operating system, but these are the important ones. Shortcuts when editing documents Ctrl + A — Select all items in a document or window Ctrl + C — Copies selected text or item Ctrl + X — Cuts selected text or item Ctrl + V — Pastes text or item on clipboard to your cursor location or designated file location. Ctrl + D — Delete selected text or item Ctrl + Z — Undo something Ctrl + Y — Redo something Ctrl + B — Turn on or turn off bold Ctrl + I — Turn on or turn off italics Ctrl + U — Turn on or turn off underline Shift with any arrow key — Select more than one item in a window or on the desktop, or select text within a document Ctrl + Shift with any arrow key — Selects blocks of text by paragraph. Keep holding down first two buttons and each time you hit the arrow key successively more paragraphs are highlighted. Ctrl + Shift with End key — Selects all text from the cursor to the end of the document. Ctrl + Shift with Home key — Selects all text from the cursor to the beginning of the document. Ctrl + Right arrow — Move the cursor to the beginning of the next word. Ctrl + Left arrow — Move the cursor to the beginning of the previous word. Ctrl + Down arrow — Move the cursor to the beginning of the next paragraph. Ctrl + Up arrow — Move the cursor to the beginning of the previous paragraph. Ctrl + either the plus (+) or minus (-) signs — Zooms in or out. Ctrl + S — Save a document. Ctrl + P — Print a document. Windows key + the period (.) key — Opens the Emoji panel Shortcuts for navigating the desktop, apps and settings Ctrl + Shift + Esc — Opens the task manager. Ctrl+plus (+) or Ctrl+minus (-) — Zoom in or out of a large number of items, like apps pinned to the Start screen Alt + Tab — Switch between open apps (except desktop apps in Windows 8) Windows logo key +Tab — Cycle through open apps (except desktop apps in Windows 8) Shift + Delete — Delete the selected item without moving it to the Recycle Bin first Windows key + D — Pulls up or hides the Desktop. Windows logo key + L — Lock your PC or switch users Windows logo key + M — Minimize all windows Windows logo key + Shift + M — Restore minimized windows on the desktop Ctrl + Alt with any arrow key — Rotate entire screen in direction of arrow key. Helpful for viewing photos or videos that aren't right-side up. Windows 11 shortcuts Windows logo key + A — Open Quick Settings (Bluetooth, WiFi, Airplane Mode, Battery Saver, Brightness, and more) Windows logo key + C — Open Chat from Microsoft Teams Windows key + H — Launch voice typing Windows key + K — Open Cast from Quick Settings Windows logo key + N — Open notification center and calendar Windows logo key + S — Search for any file or an app installed on your computer Windows logo key + W — Open Widgets Windows logo key + Z — Open the snap layouts Windows 10 shortcuts Windows logo key + A — Access the Action Center menu where you can view your notifications and access commonly used settings like Wi-Fi and Bluetooth Windows logo key + I — Access Windows Settings Windows logo key + C — Open Cortana in listening mode Windows logo key + S — Search for any file or an app installed on your computer Windows 8 shortcuts Windows key + C – Opens the Charms bar, the menu that pops out from the right of your screen that gives you quick access to Search, Share, Start, Devices and Settings. If you use this shortcut within an app it will open app-specific commands. Windows key + F — Open the Search charm to search files Windows key + S — Opens the Search charm to search everywhere (including your files, settings and the Web). Windows key + H — Opens the Share menu for the app you’re using. Windows key + I — Opens the Settings charm, which includes often-used functions such as Volume, WiFi Networks and Power. Windows key + X — Calls up a menu of advanced system tools, such as the Control Panel, Command Prompt, Task Manager and File Explorer. Windows key + tab — Lets you toggle between all the apps you have open. Alt + F4 — Closes an app you’re using. Windows key + the period (.) key — Snaps or docks the app you’re using to the right or left 20% of your screen. Press once for right alignment, twice for left alignment and three times to go back to full screen. |
Method 2: Rotate your screen with Windows Display Settings
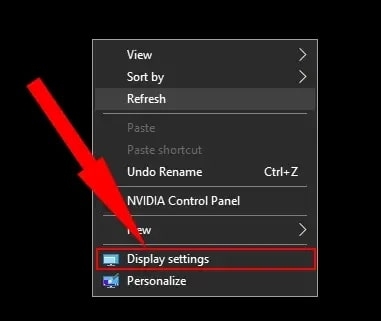
If you want to permanently rotate your screen because your monitor is in portrait mode, the best way to do that is through Windows Display Settings. To get to Display Settings, either right click on your desktop and select Display settings or type “display settings” in Windows Search. From there, you can choose your display orientation – Landscape, Portrait, Landscape (flipped) or Portrait (flipped).
You can flip or rotate your screen in the Display Settings in Windows.
1. Right-click a blank area in the Windows desktop and click Display Settings in the context menu.
 |
| Photo: Business Insider |
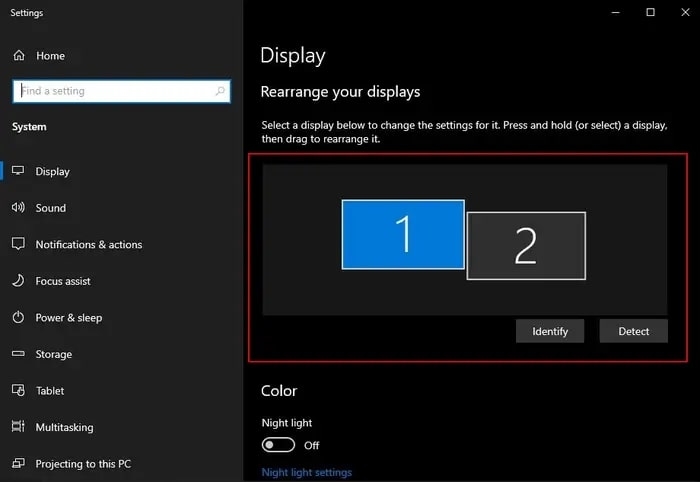
2. On the Display page, if you have more than one monitor installed, choose the display you need to rotate.
 |
| Photo: Business Insider |
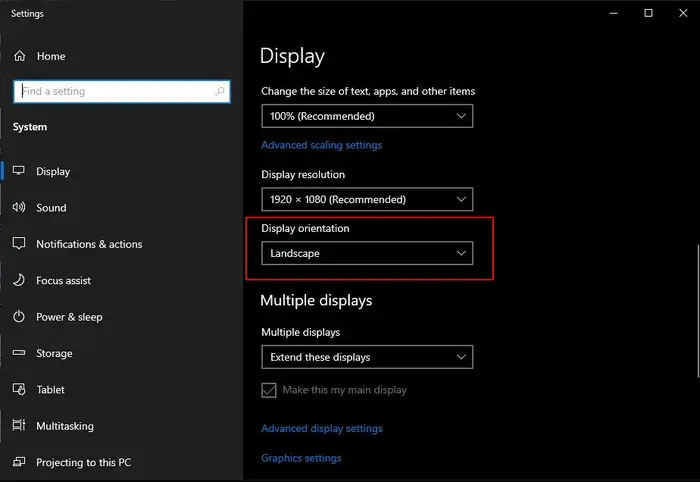
3. Click the Display orientation drop-down and choose the rotation you need. You can choose Landscape, Portrait, Landscape (Flipped) or Portrait (Flipped).
 |
| Photo: Business Insider |
4. If you accidentally choose the wrong one, press the Escape key to revert to the way it was before. If you like the change, click Keep Changes.
Quick tip: Another way to open the Display Settings is to click the Start button, click the Settings icon, and then choose System.
How to change or update your auto screen rotation feature
Similar to your mobile device that can flip or change your screen orientation automatically as you turn it, some convertible PCs and tablets can do the same. However, sometimes this feature can be a nuisance. It definitely isn’t ideal for all situations. Luckily, it’s straightforward to change, update, or disable the auto-rotation feature. In fact, there are multiple ways to do so.
Note: Auto-screen rotation is only found on those computers that have a built-in accelerometer and gyroscope sensors. Windows uses this type of hardware to evaluate your screen’s current orientation.
Enable or disable screen rotation using Action Center
1.Open up the Action Center or press Windows key and the “A” key at the same time
2.Click on the “Rotation lock” button to toggle on or off
1. Can’t see the button? Simply press the Expand option in the top-left portion of the Quick actions area
1.If the Action Center still doesn’t show you the option, then your PC either doesn’t support the feature or you need to manually add the button by using Settings > System > Notifications & actions > Add or remove quick actions, and then add the Rotation lock switch button
2.If the Rotation lock is grayed out, it’s possible that your device has an external device such as a removable keyboard attached or your convertible PC is in laptop mode. To change this, take away the keyboard or change the convertible to tablet mode
Enable or disable screen rotation using the settings
1. Open Settings
2. Click on Display
3. Under the Scale and layout area, change the Rotation lock on or off
Method 3: Using Control Panel
Control Panel (works for Windows 7)
Control Panel is the place where you can view and change your laptop settings. This is different in Windows 10 and Windows 7 devices. We have given below methods to rotate the laptop screen for both operating systems.
For Windows 8/Windows 10:
If the Display Settings method didn’t work for you, there is another method that you can use to rotate your laptop screen that is via Control Panel. This method is very easy and will work for Windows operating systems like Windows 8, and Windows 10. Here’s how to do it:
You can easily rotate the screen of your PC by using the Control Panel. But beware, it will be awfully hard to turn it back to normal as not only the orientation will change but also the mouse functions.
So make sure you acknowledge the risk before rotating your laptop screen using Control Panel.
1. Press the Windows key or click on the Start button.
2. Search for “Display” and click on the ‘Change Display Settings’ option from it.
3. Finally, go to the orientation tab and rotate the screen in any direction you want.
For Windows 7:
If you are using Windows 7, you can go to Control Panel > Appearance and Personalization > Display > Screen Resolution and change the Orientation to rotate the screen
Method 4: How to Rotate a Laptop or PC Screen Using AMD/Intel/NVIDIA Control Panel
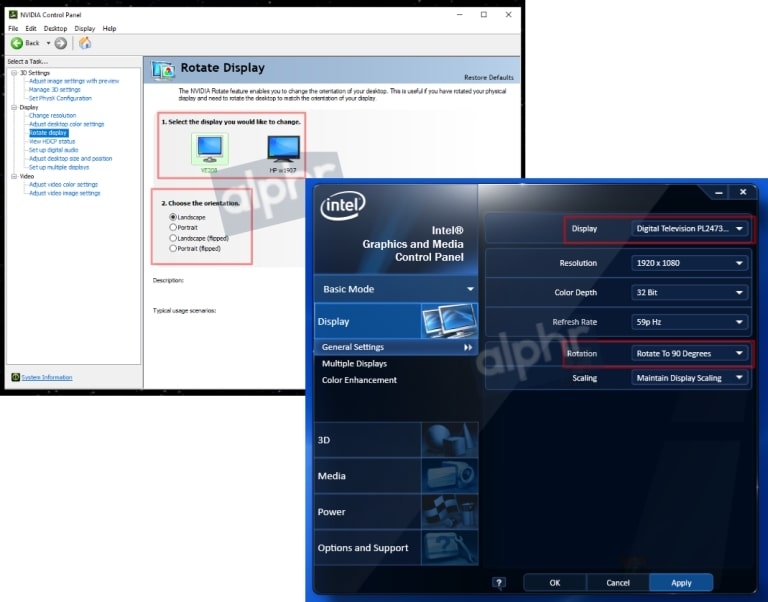
If your PC has an Nvidia graphics card, you can use the Nvidia Control Panel to permanently change display rotation. Go to Display -> Rotate display in the left menu and then choose your orientation – Landscape, Portrait, Landscape (flipped) or Portrait (flipped). Other manufacturer's graphics cards may have a similar feature.
1. Right-click the Windows desktop, select your graphics card’s Control Panel or right-click the GPU’s System Tray icon.
2. Find the “Display” or “Desktop” menus to locate the rotation option for your selected monitor. The exact location varies from one manufacturer to another.
 |
| Photo: Alphr |
3. Adjust rotation as desired. Some control panels automatically change it, while others require you to click “Save” or “Apply.”
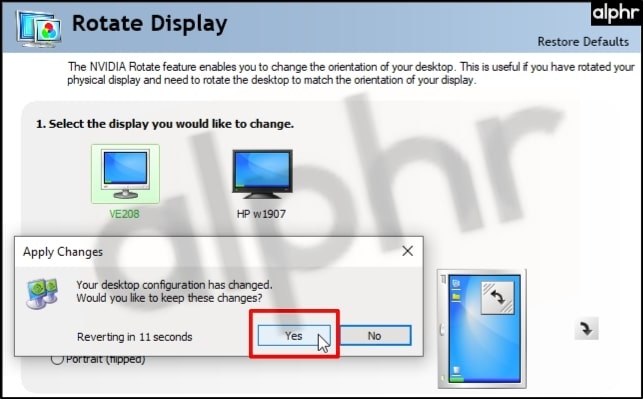
4. A confirmation appears while the screen gets rotated, asking you to confirm changes.
 |
| Photo: Alphr |
 How to Change Your IP Address on iOS, Windows, Chrome and More How to Change Your IP Address on iOS, Windows, Chrome and More Changing IP addresses can be difficult with some people who are new to computers or phones, but it will be made easier with this guide ... |
 Simple Tips to Change Recycle Bin Storage Settings in Windows Simple Tips to Change Recycle Bin Storage Settings in Windows Any time you delete a file in Windows, it goes straight to the Recycle Bin. How to change recycle bin storage settings in Windows? |
 Top 10+ Best Windows 11 Apps You Must Install Right Now Top 10+ Best Windows 11 Apps You Must Install Right Now Windows 11 has been developing many new tools and technique that helps with normal daily tasks, and these apps for Windows 11 are the best ... |
 Top Easy and Essential Shortcuts On Computer Keyboards You Should Try Top Easy and Essential Shortcuts On Computer Keyboards You Should Try Compared to reaching for the mouse or navigating a menu, a single keyboard shortcut shaves a moment off your task. That's why it's important to ... |


