Easy Ways to Improve Your Gmail Inbox Right Now
 |
| Easy Ways to Improve Your Gmail Inbox Right Now |
Gmail is among the biggest email services in the world. Launched in April 2004, Gmail reached an impressive 1.5 billion monthly active users in 2018.
In April 2019, Google announced that Gmail would natively support email scheduling, and the feature became available on desktop and mobile about a month later. Gmail’s feature is perfectly easy to use, and it has a range of applications for scheduling work and personal messages. Maybe you’re trying to talk to someone in a different time zone, nag someone about an event, or you just want to remind your future self about something.
Here are some stats to show the state of email usage in the workplace:
- The average person spends 28 percent of their week reading and responding to email.
- Only 38 percent of the average inbox is considered important and relevant.
- An email interruption requires 64 seconds on average for a person to recover from and return the work.
- Limiting email access can greatly reduce levels of stress.
Your Gmail account has a lot of different customization options. Some of these options let you do things like adjust the way your email is displayed or change the application’s behavior, while others provide some cosmetic adjustments.
As you can see, email can hinder productivity and even hurt your health. This is why improving Gmail for yourself is so important.
Get Gmail to prioritize your messages
If you haven’t set up tabs in Gmail, now’s the time to do it. Click the cog icon (top right in the web interface) and then choose Configure inbox to choose which categories show up on the screen. Gmail will try and guess which messages are important, and you can help it along by clicking the importance marker to the left of any truly significant conversation.
What’s more, you can drag emails between tabs to teach Gmail how to sort your messages in the future based on type or sender. How is this helpful for reaching inbox zero? Well, you can ignore the less important categories (Social, Updates) in your inbox until the end of the day, then spend a few minutes managing and processing all these messages in bulk.
Set up your own filters
Filters are one of the key ways you can organize your incoming messages automatically. Click the down arrow in the search box at the top of the screen to set up some search terms. Then click Create filter… to set it up. You can also create new filters from the drop-down message available next to each message (choose Filter messages like this).
If you’ve got multiple email addresses coming into your Gmail account, for example, you can mark messages sent to other addresses as less important. Another option is to immediately archive certain emails and mark them as read—they won’t appear in your inbox, so less work for you, but they will still be available via search if you need them.
Activate the unread message icon
| Photo: Solve Your Tech |
Alternatively, if you're dead set against desktop notifications, but want to keep an eye on the status of your inbox whilst working in other tabs, there is another solution.
Go to Gmail Settings, then under the "Advanced" settings in the "General" menu, scroll down to see your "Unread message icon" options.
If you enable this, your Gmail favicon will show how many unread messages you have waiting for you as a teeny tiny number.
Create an Email Signature
This Gmail feature is no secret, but if you’re not using it, you should be!
No matter who you are speaking with in your profession, your email signature is the perfect place to include your social media profiles, your company website, and more information that people need to know.
To create or edit your signature, go to Settings, click the “General” tab, and scroll down to “Signature.” Simple as that.
 Gmail Storage Full: How to Clean Up and Save Some Space Gmail Storage Full: How to Clean Up and Save Some Space Use Gmail long enough, and your free storage will buckle under the weight of modern digital life. With Google's free storage space ending for Google ... |
Take advantage of read, unread, and snoozed messages.
I decided to include read, unread, and snoozed messages in one line item because they’re all fairly straightforward. We’ll start with reading and unread messages, another binary indicator you can use to get information about an email at a glance. As you likely already know, all new emails will be “unread” by default, indicated by bold font.
You can mark an email unread either by opening it, or by selecting “Mark as read” with the ellipses at the top of the desktop app.
Create a group email list
 |
| Photo: Business Insider |
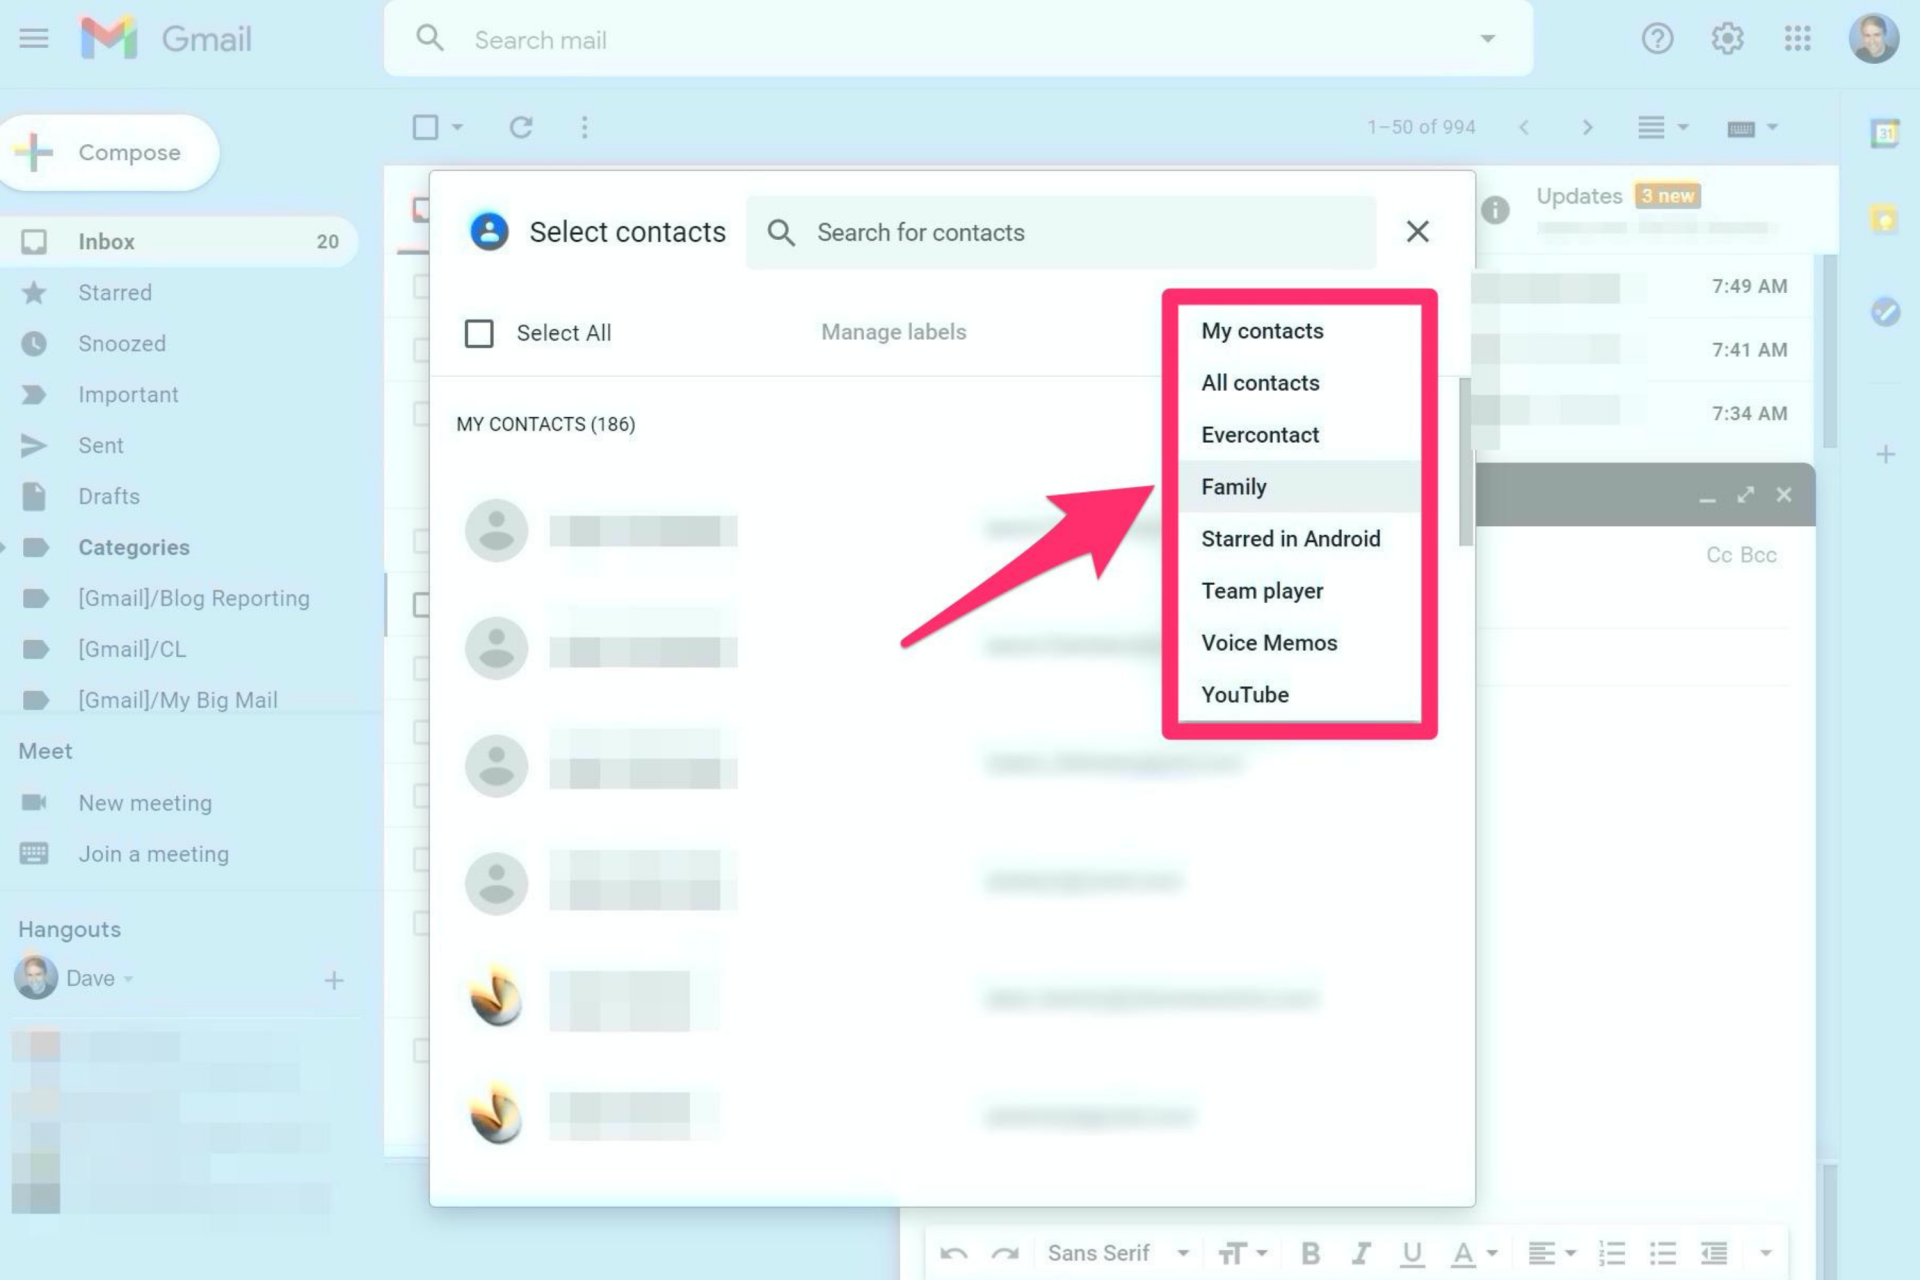
This is a handy tool to really save you some serious time if you often email the same group of people. There is a way to set up a list of email addresses into one group that you can customize the name of.
To do this, you need to go to Google Contacts. Look at the left-hand side of the screen to find the "Labels" menu. Click on "Create label" and give it a name that is easy to remember.
Now you can drag and drop contacts into that label from the list on the right.
Now, when you're composing an email, start typing the name of the label you've created in the "To" field and you'll see your label pop up as a suggestion. Simply click on it to add the entire group as a recipient.
Add more stars
While we’re on the subject of using visuals to quickly organize and assess the nature of your emails, let’s talk about stars. As I referenced earlier, stars are another kind of marker, next to the chevron-shaped “importance markers” Google uses to indicate importance levels by default.
Before I dig into the details of how to use the star system, I encourage you to enable more types of stars. By default, you can only use this as a binary system; like importance chevrons, they can only be toggled on and off. But if you head to the Settings menu, under the General tab, you can turn on multiple stars of different colors (and other symbols, used the same way your stars are).
If you’re new to the system, you might go with Gmail’s recommended 4-star system, but if you’re feeling adventurous, you can turn them all on at once.
Unsubscribe from everything you can
Gmail has a built-in unsubscribe feature to quickly get yourself off newsletter and notification lists you don’t want to be on. You should see an Unsubscribe link up in the header of any compatible message. Essentially, Gmail is just scanning messages for “unsubscribe” links and making them easier for you to find right up at the top.
To begin with, this takes more time than normal, but you’ll be amazed at the amount of time you can save by being ruthless with your subscriptions—all those seconds clicking the Delete button really add up. For something even more comprehensive, you can make use of an unsubscribe service that works with Gmail. Unroll.me is one of the best, and also lets you combine multiple incoming messages into a single newsletter.
How to Activate “Undo Send”
 |
| Photo; Forbes |
Have you ever accidentally sent an email too soon? Sent an email to the wrong recipient? Misspelled the recipient's name?
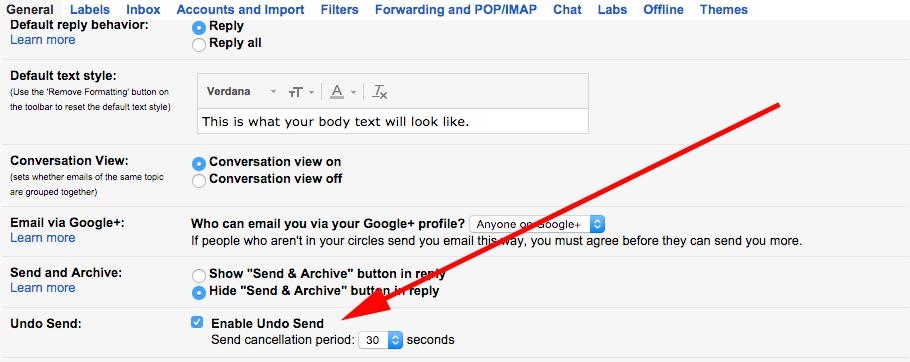
The list goes on and on. Fortunately, in Gmail’s settings, you can toggle on an option to “unsend” emails for up to 30 seconds after it’s been sent.
This can be a lifesaver. Instead of going into a panic over a typo or misspelling you catch after hitting "send," you have between five and 30 seconds (whichever timeframe you prefer) to make some changes and resend it good as new!
How to Schedule an Email in Gmail
The obvious first step is to compose the email you need to send. Once the email has a recipient listed, the message can then be scheduled. You will notice that there is a drop-down menu next to the Send button at the bottom of the email window. Click it and choose Schedule send. Mobile users can access this option in the three-dot menu.
A pop-up box appears with several quick scheduling times if you want the email sent out tomorrow morning, this afternoon, or tomorrow night.
If none of those work, choose Pick date & time so you can pick a specific date on the calendar. You can specify the exact time and even schedule it for a different year.
On desktop
1. Go to Gmail and log in to your account, if necessary.
2. Click the Compose button on the top left of the screen.
3. Draft your email. When you're finished, click the down arrow next to Send. Click Schedule send.
4. Click one of the options suggested by Gmail, or set a custom to send date and time by clicking Pick date & time.
On mobile
1. Open the Gmail app.
2. Tap the Compose button on the bottom-right of the screen.
3. Draft your email. When you're finished tap the More icon at the top-right of the screen. Tap Schedule send.
4. Tap to select one of the options suggested by Gmail, or set a custom send date and time by tapping Pick date & time.
How to View and Cancel Scheduled Emails
 |
| Photo: cloudhq |
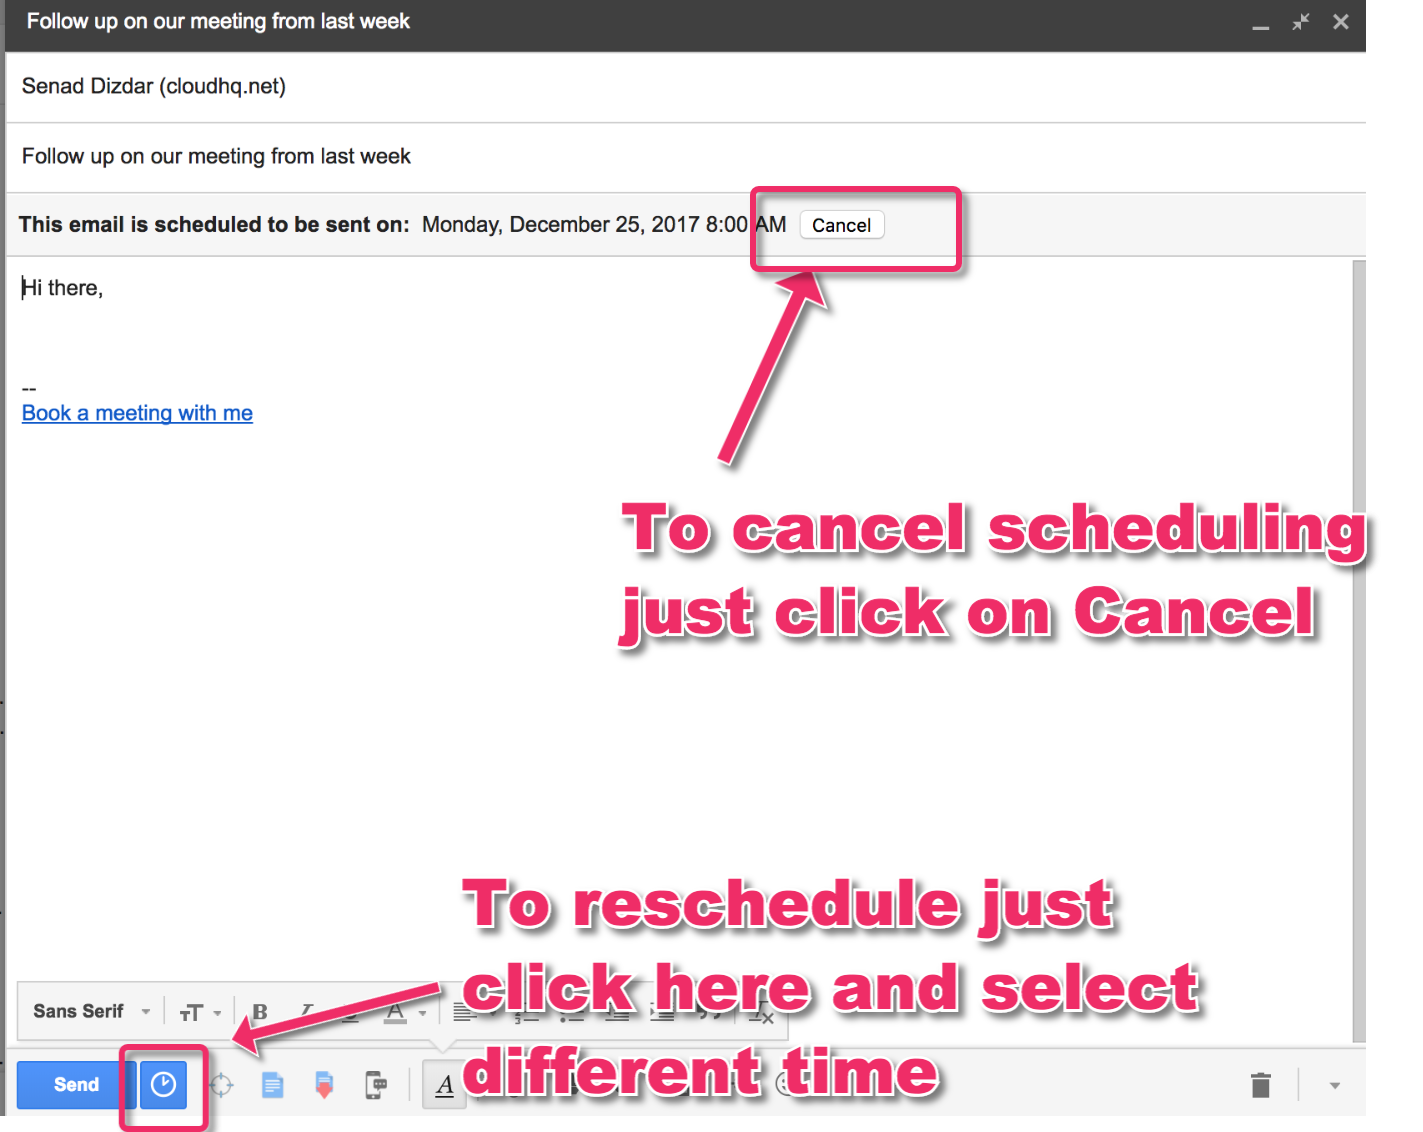
Once you choose a time and date, the email will immediately be scheduled. A new Scheduled folder will become visible in Gmail, displaying how many scheduled emails you have pending. Open this folder to see all your scheduled emails with dates showing when they will be sent out.
On Desktop
1. Go to Gmail and log in to your account, if necessary.
2. On the left panel, click Scheduled.
3. Click on the email you want to view or edit.
4. Click Cancel send.
5. Make edits to your email, then follow the steps from the first section of this article to schedule send the email.
On mobile
1. Open the Gmail app.
2. Tap the menu icon on the top-left of the screen, then tap Scheduled.
3. Tap the email you want to view or edit.
4. Tap Cancel send.
5. Tap the email again (it is now a draft) to open it. Make edits to your email, then follow the steps from the first section of this article to schedule send the email.
Use Auto-Advance to speed through your inbox
If you receive a high volume of email that can be dealt with quickly, activating auto-advance is a great way to speedily work through your new emails.
This feature will automatically show you the next conversation instead of taking you back to your main inbox view after you delete, archive, or mute a conversation.
To activate this, head to your settings, then the "Advanced" tab under "General", and toggle it on.
Archive! Don’t Delete
Each G Suite user can store up to 30 GB of content for free (compared to 15 GB with G Suite free edition or individual consumer accounts). This storage is shared between Gmail, Google Drive, and Google Photos. With so much space, archiving emails usually beats deleting, but what’s the difference?
Deleting gets rid of a conversation forever. Archiving, on the other hand, gets conversations out of your way but leaves them searchable for later, no matter how much time passes.
Plus, as mentioned above, archiving puts labeled messages "away," out of your inbox but properly sorted into relevant labels.
Types of Inbox LayoutsThe best part about Gmail is how flexible it is for every user. You don’t need to settle for the default experience. You can tailor mostly every part of your Gmail experience. One of the most important parts of your experience is your inbox layout. There are five different ways you can lay out your inbox view in Gmail. 1. DefaultThis is how your Gmail inbox is displayed if you don't make any adjustments. Your incoming messages are automatically sorted into several different tabs, which you see at the top of your inbox. This is a great option if you want Gmail to automatically sort your messages as they come in. You can pop into each individual tab as needed and move messages to other tabs if you want. 2. Important FirstThis option is super simple. At the top of your inbox, you will see messages filed under "Important." Below that section, you will see another section for "Everything Else." For example, this is what it looks like when you collapse each of those labels. You can customize how many messages display for each label. For example, if you only want 10 important messages to populate, select that option in the Settings > Inbox section. This helps you quickly prioritize messages as they come in, which is a cool productivity hack. 3. Unread FirstThis is a similar layout to the Important First option. It simply separates your inbox into two sections: "Unread" is at the top, followed by "Everything Else" below that. 4. Starred FirstAgain, this is the same concept. But this is best if you're manually starring messages and conversations as important within your inbox. With this layout, those starred conversations are in the top section of the inbox, followed by the "Everything Else" section. 5. Priority InboxThis is how you can break your layout up into multiple sections. As you can see, you can fully customize each inbox section and dictate how many messages you want to show up. Additionally, you can choose display options for specific labels you created. Once you have your inbox layout set in a way that best suits your needs, you're ready to dive into some kick ass Gmail hacks and tips. |
 How To Recall An Email in Gmail on iPhone, Android and Web How To Recall An Email in Gmail on iPhone, Android and Web There are a thousand reasons that you would need to call back an email in Gmail. But how to recall an email in Gmail on ... |
 Schedule in Gmail: Tool to Send Email Messages Later Schedule in Gmail: Tool to Send Email Messages Later It's easy to schedule send an email on Gmail if you want to compose an email, but schedule it to send at a later time. |
 Gmail Storage Full: How to Clean Up and Save Some Space Gmail Storage Full: How to Clean Up and Save Some Space Use Gmail long enough, and your free storage will buckle under the weight of modern digital life. With Google's free storage space ending for Google ... |


