How to Take Screenshot on Surface Pro Devices: Top 7 Simple Ways
 |
| Screenshot on Surface Pro. Photo: KnowInsiders |
The thin, light, and compact nature of Surface Pro devices like the Surface Pro X makes them some of the best Microsoft Surface PCs for mobile use, and since they're convertible, they can be used as tablets. To make the Surface Pro's tablet experience as smooth as possible, Microsoft has traditionally included several tablet-style features with them over the years. One of these is a screenshot shortcut that allows you to save an image of what's on your screen.
About Surface Pro
The Surface Pro is a first-generation 2-in-1 detachable of the Microsoft Surface series, designed and manufactured by Microsoft. The device ran a 64-bit version of the Windows 8 Pro operating system with a free upgrade possibility to Windows 8.1 Pro, and eventually also Windows 10. Initially announced as Surface for Windows 8 Pro on June 18, 2012, at a Los Angeles event, Microsoft later renamed the device to Surface Pro, and launched it on February 9, 2013.
| Hardware The Surface Pro shares a lot of its design traits with its lower cost counterpart, the original Surface hybrid tablet, announced on the same day. Both have the dark VaporMg coating over the same magnesium body and a 10-point multi-touch enabled 10.6 inches (27 cm) screen with crack resistant Gorilla Glass. The Wifi is 802.11 a/b/g/n. However, the resolution on the Surface Pro is higher and is 1920x1080, and the screen has a Wacom digitizer for pen input. Surface Pro runs a dual-core 1.7 GHz Intel Core i5-3317U CPU, with a Turbo Boost frequency of up to 2.6 GHz with a built-in Intel HD Graphics 4000. It has 4 GB of memory and a 64 or 128 GB solid-state drive. Unique to the Surface and Surface Pro is the kickstand which can be flipped out from the back, propping the device up. The kickstand comes out of the devices at a 22 degree angle, the same angle the edges of the device are angled at. Along the right side of the device, the Surface Pro has a micro-SD card slot on top (with support for cards up to 200 GB), followed by the power port, and near the bottom, a Mini DisplayPort to connect a number of external displays. The bottom of the device (dubbed the "accessory spine") contains the cover port to attach a Touch Cover or Type Cover. In addition to the magnetic attachments, the cover port on the Surface Pro contains a pogo pin connector. Unique to the Surface Pro, compared to the Surface tablet, is the addition of power connectors for compatibility with the Surface Power Cover. The left side of the 2-in-1 contains a full-sized USB 3 port, the volume rocker, and the audio jack. The power button is on the top of the device. On the front and back of the device are two 720p Lifecam cameras, and inside is a 42 Watt-hour battery. Other sensors include an ambient light sensor, accelerometer, gyroscope, and compass. |
How to Take a Screenshot on Surface Pro Devices
Method 1: Take a Screenshot without a keyboard
 |
| Photo: top-password |
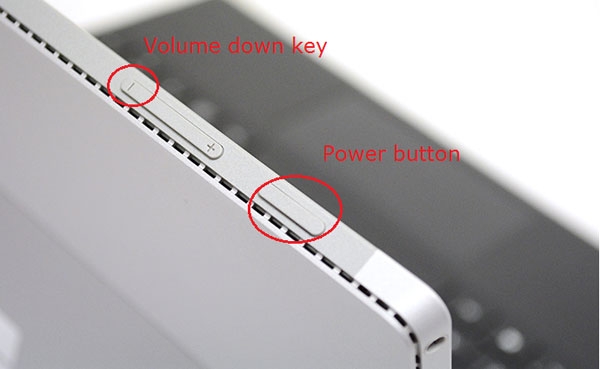
You don't need a keyboard to screenshot on a Surface Pro, but the process depends on whether you have a recent Surface Pro or an older model.
If you have a new Surface Pro, such as a Surface Pro 7 or Surface Pro X, taking a screenshot is similar to how you would take a screenshot on a phone:
1. Press and hold the Power button and the Volume Up button at the same time.
2. After a moment, the screen will flash and your screenshot will be captured.
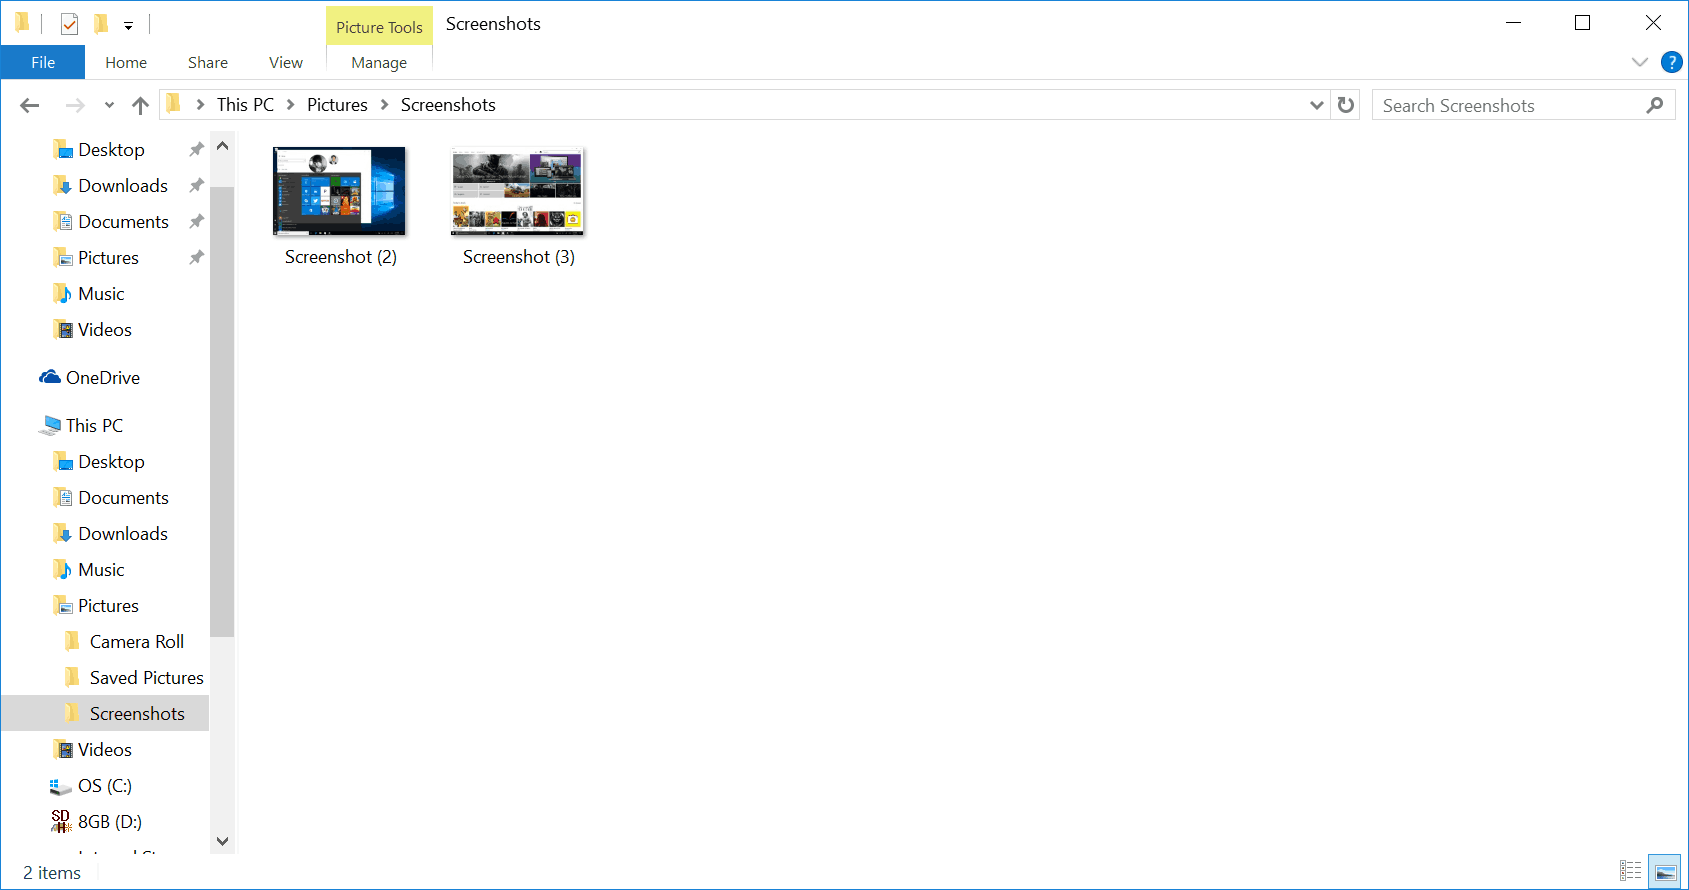
3. The screenshot is automatically saved in the "Screenshots" subfolder in the Pictures folder on your tablet.
If you have an older Surface Pro — a Surface 3 or earlier — you'll need to use a slightly different technique:
1. Press and hold the Windows logo button on the tablet and the Volume Down button at the same time.
2. After a moment, the screen will flash and your screenshot will be captured.
3. The screenshot is automatically saved in the Screenshots subfolder in Pictures on your tablet.
 |
| Photo: surfacetip |
While you are pressing the "Power + Volume down" key, the screen dims briefly, it means the screen is recorded and the picture is saved to the Screenshots folder. The default location where the screenshots are saved is here: C:UsersPicturesScreenshots
Method 2: Use PrtScn on Pro keyboard
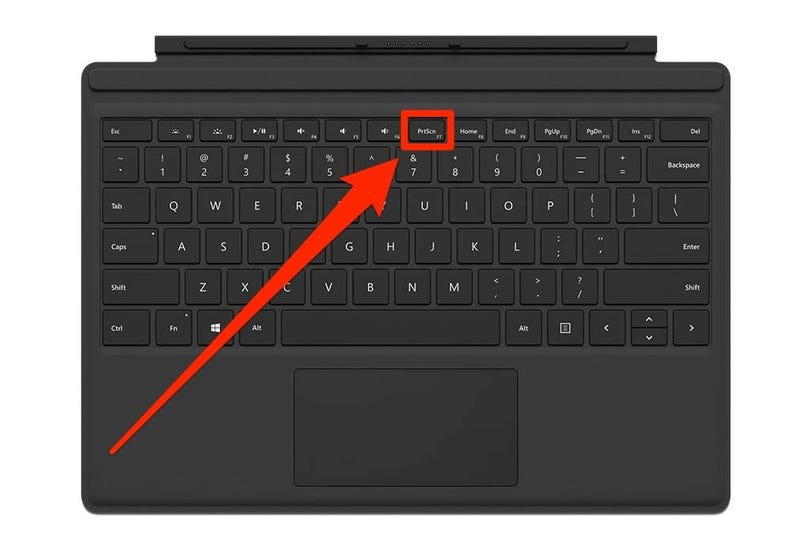
If you're using your Surface Pro with a Surface Type Cover, you can use the same method to take a screenshot as you'd do with any Windows computer: using the Print Screen button.
The Print Screen button is labeled "PrtScn" and is found in the top row, to the left of the Home button. Press the PrtScn button to copy a picture of your entire screen to the clipboard — you can then paste the picture into a program like Paint, and save it from there.
 |
| Photo: Businessinsider |
The PrtScn button actually has a number of different functions — using keyboard combos, you can screenshot specific windows or just a portion of the screen.
Method 3: Press "Windows + PrtScn" keys on type cover
 |
| Photo: top-password |
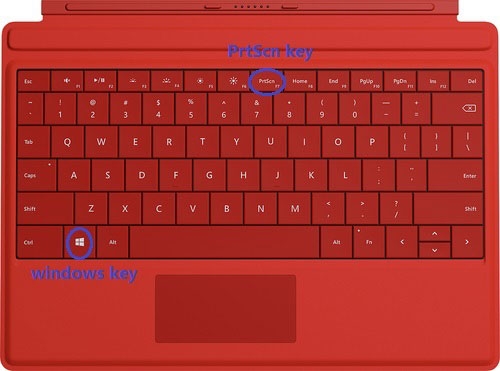
First of all, check the FN key on your Type Cover to make sure that its light is off. Hold down the Windows key and then press the PrtSn key. This will capture your Surface screen and place the resulting screenshot in the same Screenshots folder under the Pictures library.
Method 4: Press "Alt + PrtScn" keys on type cover
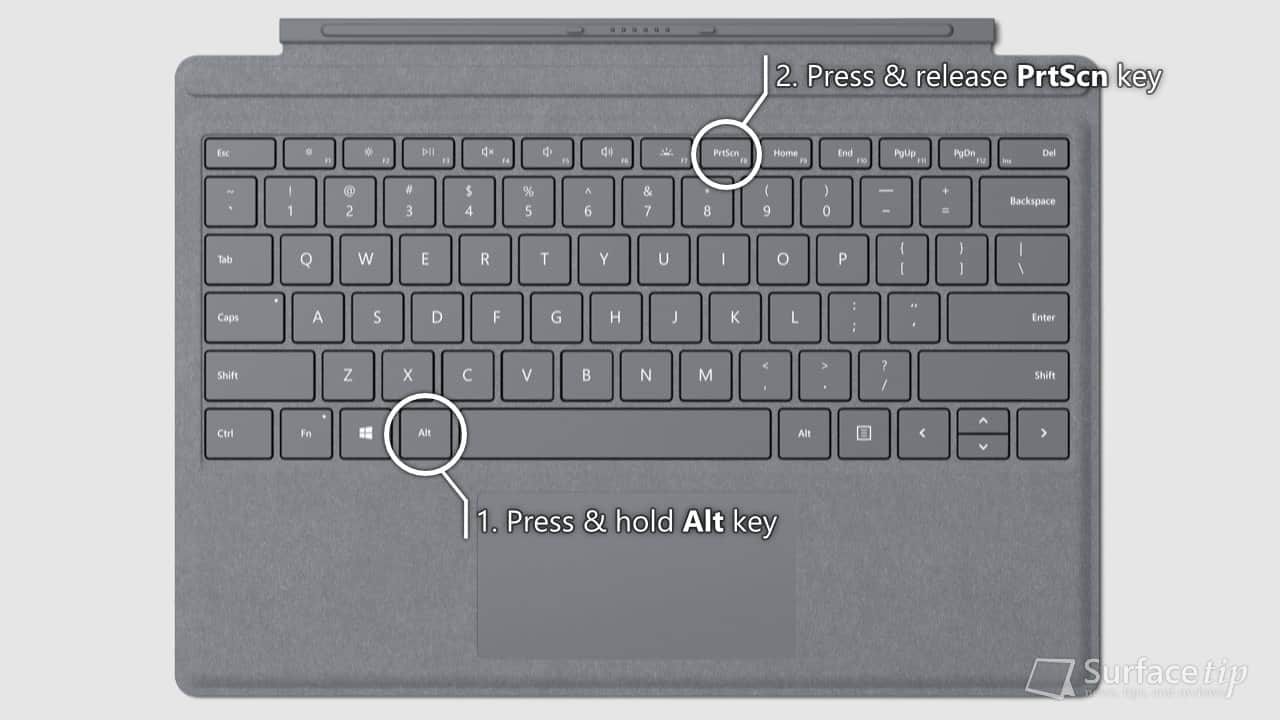
If you only want to capture the active window instead of the whole screen, hold down "Alt" key and then press "PrtScn" keys on type cover. The picture will be saved to OneDrive as described on Way 2.
 |
| Photo: surfacetip |
Method 5: Screenshot on Surface Pro with Pen
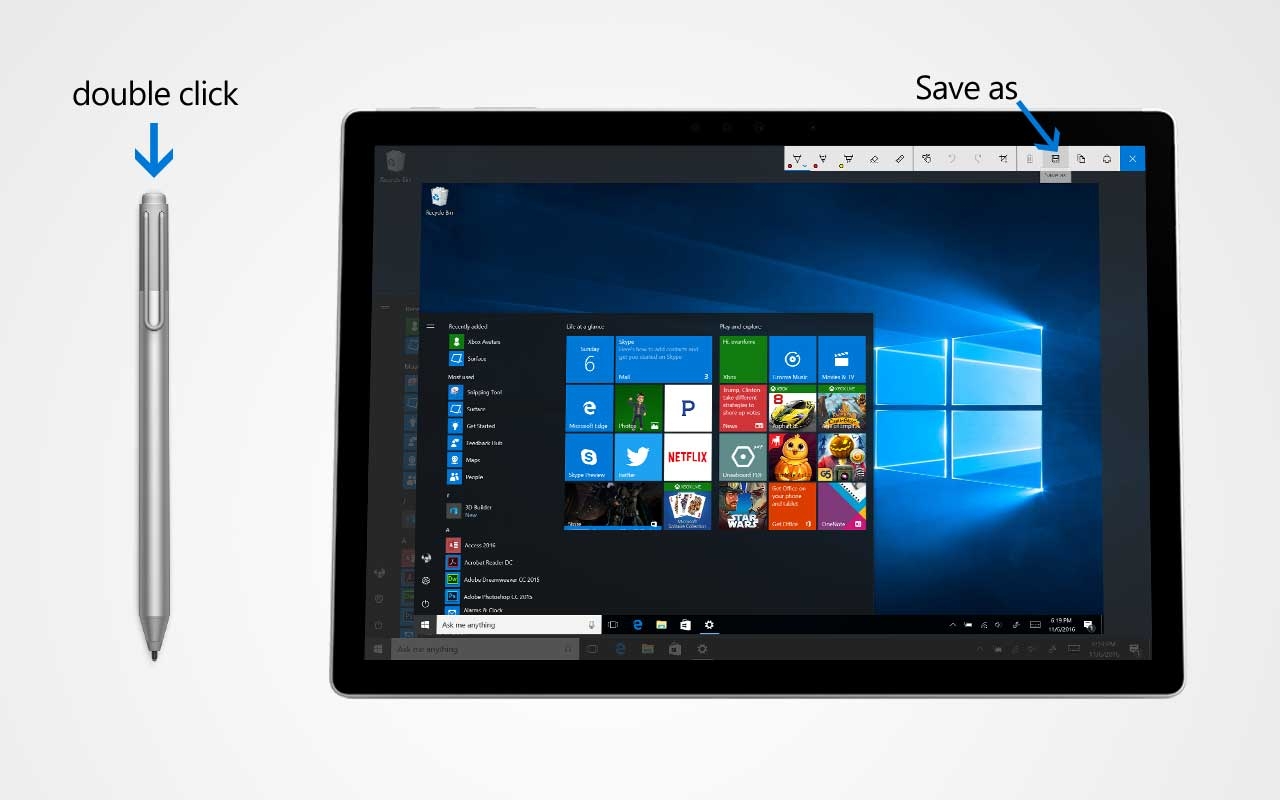
Surface Pen has been developed and getting much better functions in Windows 10. In Windows 10 anniversary update, there is a new feature called Screen Sketch. This function will capture the device’s screen and pop up with tools for drawing, cropping, and others.
You can take a screenshot by using the Surface Pen with this function. To activate the screen sketch function
1. Double-click the eraser button on the top of your Surface Pen.
2. Now you can edit, crop, and save the screenshot by click on the “Save as” button on the top right of the screen.
 |
| Photo: surfacetip |
Method 5: Use Windows Snipping Tool
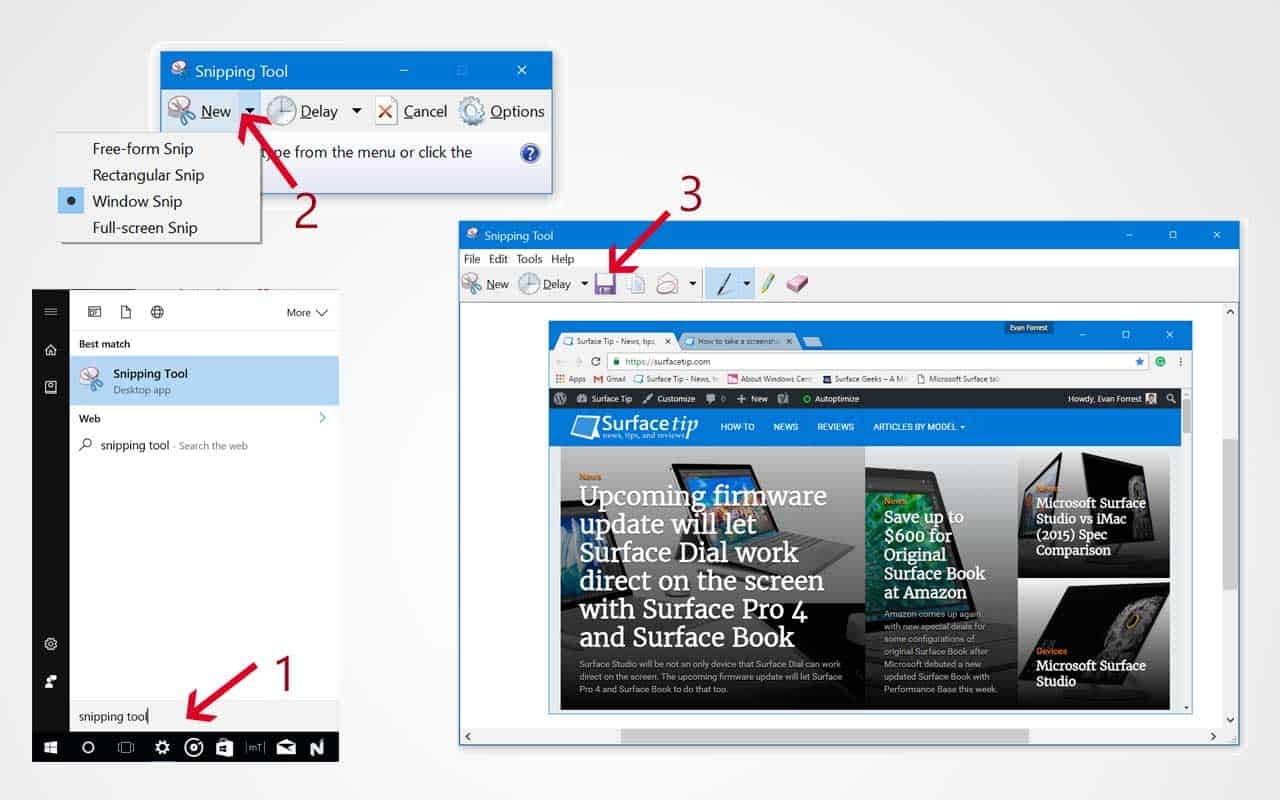
In Windows, there is a built-in screenshot program called Snipping tool that has more controls and functionalities than the above methods. To open this tool:
* Open the Start menu and type “Snipping Tool”, or you can type into Cortana textbox directly.
* You can also open this tool by opening the Start menu and locate the Snipping Tool under the Windows Accessories folder.
 |
| Photo: surfacetip |
When you launched the tool, you can take a screenshot in 4 ways such as Full desktop, specific program windows, any size of a rectangle shape, and any form you draw manually.
After you select an area you want to take a screenshot of, it will display in a new window. You can draw or highlight on the screenshot before saving them. This tool allows you to save the screenshot as a JPEG, PNG, GIF, or HTML file as your desire.
Method 6: Windows Snip & Sketch tool
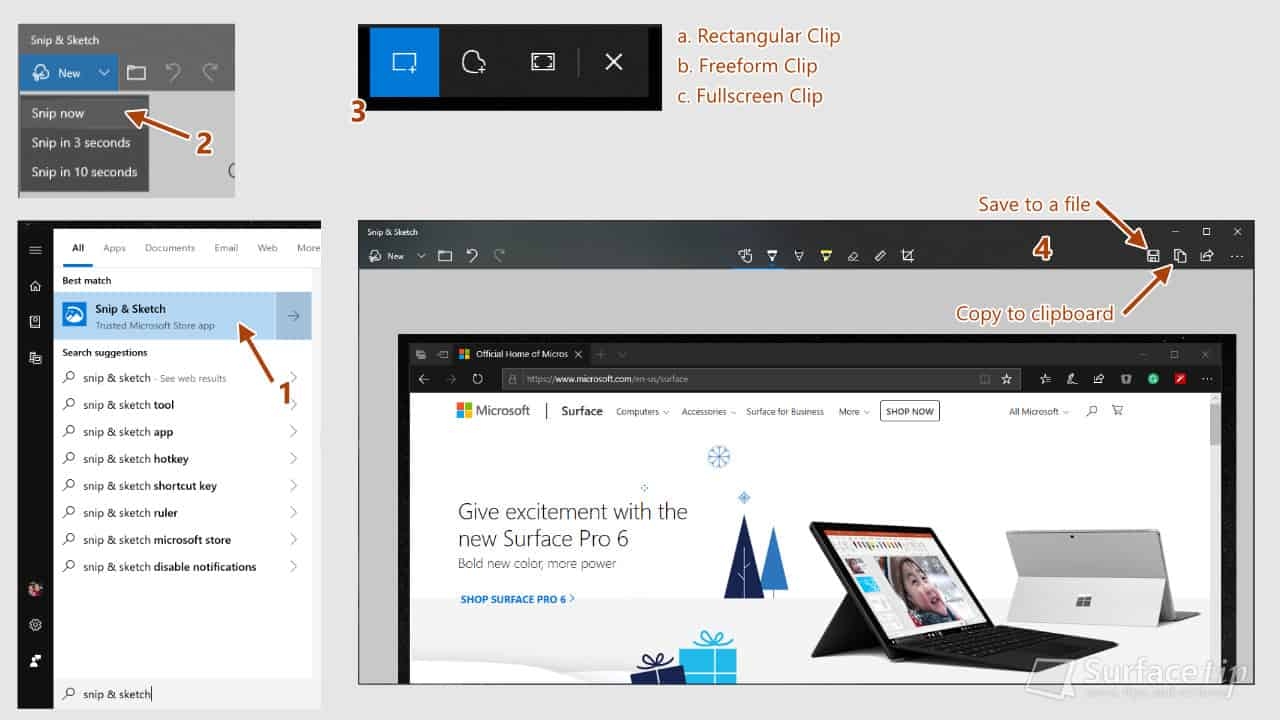
In recent Windows 10 Updates, Microsoft has introduced a new modern tool called Snip & Sketch that allows you to quickly annotate screenshots, photos and other images with your pen, touch, or mouse and save, paste or share with other apps. To take a screenshot with this tool:
 |
| Photo: surfacetip |
1. Open the Start menu and type “Snip & Sketch”, or you can type into Cortana textbox directly. You can also open this tool by opening the Start menu and locate the Snip & Sketch app.
2. When the tool launched, click New, and click Snip now.
3. Select an area you want to capture.
4. The captured image will appear in a new Snip & Sketch window. At this point, you can annotate, draw, or highlight whatever you want on the screenshot.
5. Click Save icon to save the screenshot to a file. Or click the Copy icon to copy the screenshot to the Windows clipboard so you can paste it elsewhere.
Method 7: Use keyboard shortcuts
 |
| Photo: surfacetip |
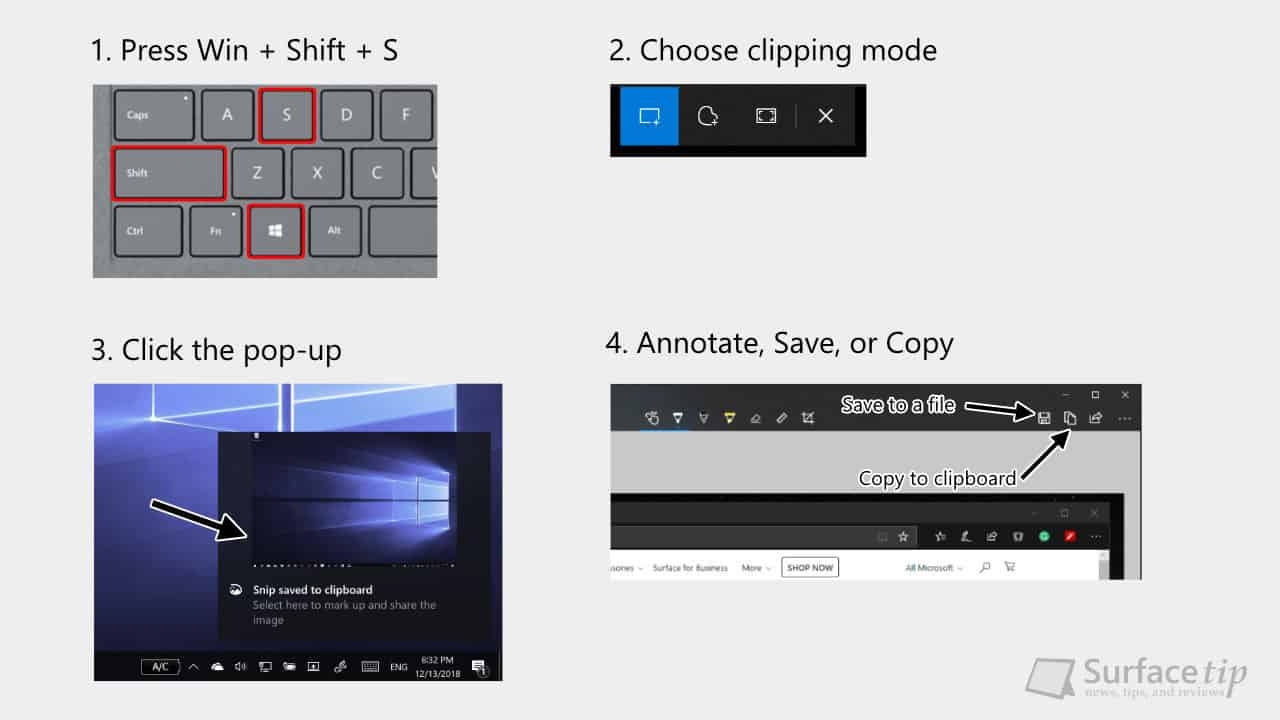
There is another quick way to activate the Snip & Sketch tool by using Windows 10 shortcut keys. To do that:
1. On your keyboard, press and hold the Windows key & Shift key and then press and release the S key.
2. It will launch the Snip & Sketch tool with the screen clipping mode, so you can select and capture any area you want immediately.
3. Now you can annotate, draw, or highlight the screenshot within the tool.
4. Click the Save icon to save the screenshot to a file. Or click the Copy icon to copy the screenshot to Windows clipboard so you can paste it elsewhere.
For more interesting news of KnowInsiders, check out right below!
 How to Screenshot on Apple Watch and Where to Find How to Screenshot on Apple Watch and Where to Find Taking a screenshot is a quick and easy way to capture your watch display, and this process is also a piece of cake for the ... |
 How to Take Screenshot in Opera: Top 4 Easiest Mothods How to Take Screenshot in Opera: Top 4 Easiest Mothods Opera's new update provides a new screenshot feature. Check out right below the detailed instruction on how to screenshot on Opera right below! |
 How to Screenshot on Samsung Galaxy S20, S20 Plus and S20 Ultra How to Screenshot on Samsung Galaxy S20, S20 Plus and S20 Ultra Whether a new or existing Samsung Galaxy S20 device owner, one of the first things you'll want to be aware of is how to take ... |


