How To Draw A Rose: Step By Step Guides
 |
| How To Draw A Rose: Step By Step Guides, Easiest Ways |
If you are a beginner and have just started to learn how to draw, sketching a rose might not be an easy task with the complexity and structures of the flower. It will take more than one try to get it right, so don’t worry, we are here to help you through this step-by-step guide that will help you understand how to draw a rose perfectly.
Understanding the anatomy of a rose
A rose is a woody perennial flowering plant of the genus Rosa, in the family Rosaceae, or the flower it bears. There are over three hundred species and tens of thousands of cultivars. They form a group of plants that can be erect shrubs, climbing, or trailing, with stems that are often armed with sharp prickles. Their flowers vary in size and shape and are usually large and showy, in colours ranging from white through yellows and reds. Most species are native to Asia, with smaller numbers native to Europe, North America, and northwestern Africa. Species, cultivars and hybrids are all widely grown for their beauty and often are fragrant. Roses have acquired cultural significance in many societies.
Rose plants range in size from compact, miniature roses, to climbers that can reach seven meters in height. Different species hybridize easily, and this has been used in the development of the wide range of garden roses.
 |
| Photo: CLIP STUDIO PAINT |
Flowers
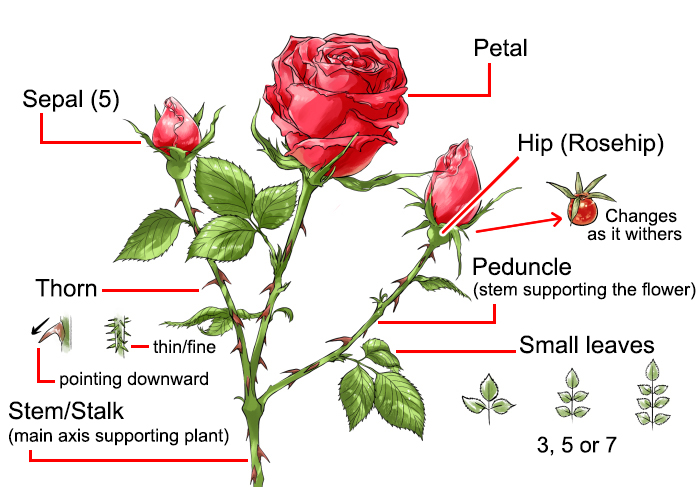
Although flower is the term most often used for the showy portion of a rose plant, this structure is technically known as the corolla.
Petals
The corolla is made up of petals, whose number determines whether the rose is classified as single, semidouble, double, or very double.
A single flower has just one row of petals—usually 5 petals but as many as 12. A rose with 13 to about 25 petals in two or three rows is said to be semidouble. A rose with more than 25 petals, in three or more rows, is called double. A very full flower having more than 45 to 50 petals in numerous rows is known as very double.
You will sometimes see the term quartered, especially in reference to old garden roses. A quartered flower is one whose petals open in such a way that when viewed from above, the rose appears to be divided into distinct quadrants.
With some roses a solitary bloom appears at the top of the flowering stem; these are usually referred to as one-to-a-stem roses. When multiple flowers appear on a stem, the grouping is known as a spray or a cluster.
Sepals
Flowers open from flower buds, which are initially covered by green leaf-like sheaths known as sepals. Collectively, the sepals and the bulbous structure below them—the calyx tube —are known as the calyx. As a flower opens, the sepals turn down and may eventually be hidden by the flower. Some sepals are small and plain; others are large and frilled. A rose has five sepals. Species roses also have five petals above the sepals.
Stamens
When a flower has fully opened, thin filaments called stamens become visible in the center of the flower, which is called the disc. Stamens, the male reproductive portion of the flower, release pollen from parts at their tips called anthers. The stamens of roses are usually yellow, although sometimes they are red or maroon. The total number of stamens depends on the species of rose. No rose plant has fewer than five stamens, but this number can be much higher.
Pistils
The female portion of the flower, the pistil, is located at the center of the stamens. Only its topmost portion, the stigma, can be seen. Hidden below it is the style, a slender tube that leads to the ovary, where seeds form if fertilization takes place. Seeds develop from ovules, egg-like objects that are borne on structures called carpels within the ovary.
Hips
Once a rose has been pollinated—either by its own pollen or by pollen from another rose—the ovary swells and a seed-bearing fruit called the hip forms after the flowers fade. Although hips are found in some form on all roses, they are largest and most striking in old garden and shrub roses. The hips of these roses are often bright red or orange, with a characteristic pear, oval, or urn shape. So distinctive are the hips of many roses that experts can often identify the variety by its hips alone.
Canes
The main branches of rosebushes are known as canes. These arise from the crown, the point where the canes are joined to the root shank.
Shank
The main stem of the rootstock rose. The ‘preferred’ roses has been grafted onto the top of the shank. (On roses that have been budded [grafted] to more vigorous root systems, the point where the canes are grafted to the roots is called the bud union; the bud union functions as the crown.)
Bud Union – the area between the roots and the stems where the bud of the desired variety was grafted onto the rootstock.
Roots
There are two types of roots.
- The ‘anchor’ roots are thick and strong, they hold the rose bush upright while it is growing. They also store nutrients during the winter season.
- The ‘hair roots’ are the feeder roots. Their main job is to absorb the nutrients in the soil as they become available.
Basal break
A new cane that arises from the crown or the bud union is often called a basal break. These new canes are the way the rose renews itself. Sometimes mistaken for the ‘sucker’ cane which does not emerge from the bud union.
Stems
Stems are growths emanating from the canes and terminating in flowers. Roses produce stems of differing lengths, depending on their class. For example, most hybrid teas have longer-than-average stems, making them good for cutting. Both canes and stems are usually covered by red or green thorns (also known as prickles), although some roses are thornless. Thorns vary in size, shape, and number. They can be so distinctive that they alone can be used to identify certain roses.
Leaf
Roses have compound leaves, which are made up of several leaflets. Most modern roses have five-leaflet leaves except in the area near the flower, where three-leaflet leaves usually appear instead. Old garden roses may have seven, nine, or even more leaflets. The top leaflet, called the terminal leaflet, is attached to the rest by a small stem known as a petiole; the other leaflets have stalks known as petiolules.
Stipule
The base of a leaf has a winglike appendage known as the stipule.
Auricle
The tip of the stipule is known as the auricle.
New stem growth emanates from a bud eye in the leaf axil, the point at which a leaf joins the stem. The part of the stem between the highest leaf and the flower is known as the peduncle, sometimes referred to as the neck. Peduncles are generally thornless and soft wooded, and vary in length and thickness according to variety. Often, a small leaflike structure known as a bract appears partway down the peduncle.
Prepare Essential Drawing Materials and Tools (according to The Virtual Instructor)
1. Quality Drawing Pencils
 |
| Photo: FeltMagnet |
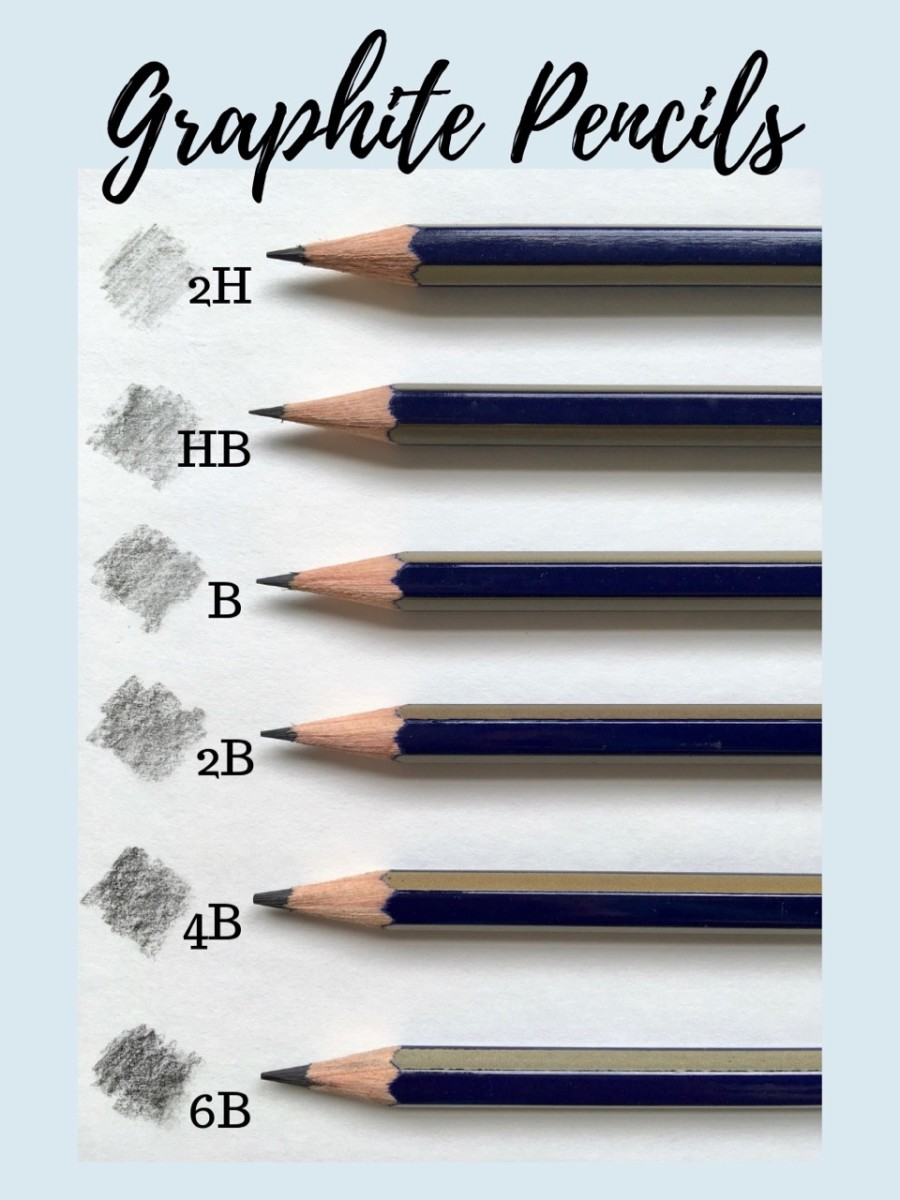
Pencil sets usually come packaged in nice tins and can be great because they often include the full spectrum of graphite grades. Many sets include pencils with harder graphite (9H) through softer graphite (6B). Harder graphite makes lighter marks and keeps a sharp tip longer, while softer graphite makes a darker mark, but needs constant resharpening. These sets give the artist the ability to work with many different values and varieties of mark.
2. A Sketchbook
 |
| Photo: SamBeAwesome |
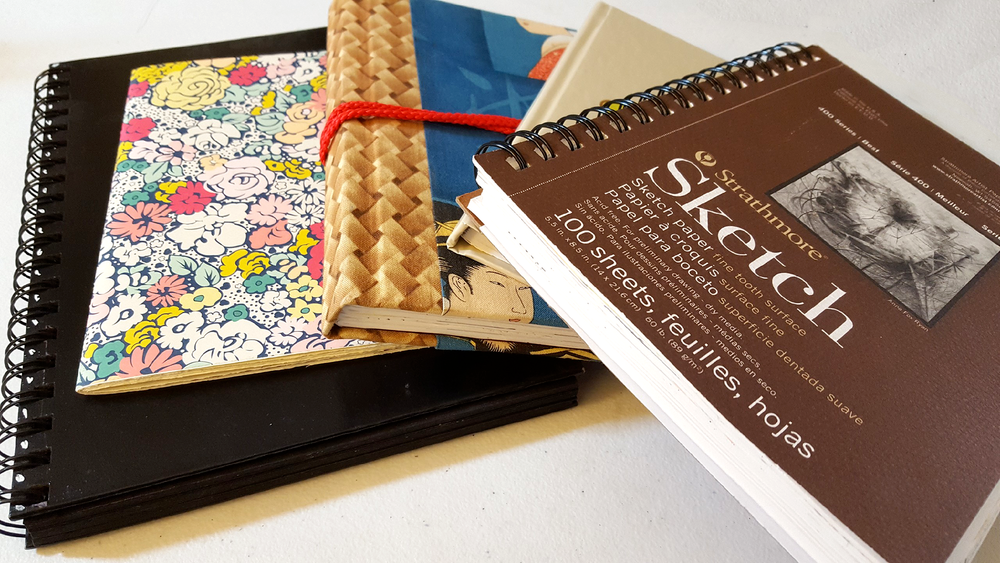
An active sketchbook is the artist’s “exercise”. It is the “hard work” that goes into the development of the artist and it is the breeding ground for innovative, artistic ideas. Though the sketchbook may never be seen by the world, it is the often driving factor in successful artworks and successful artists.
Since a sketchbook is recommended for daily practice, it is important to choose one that is durable and has plenty of pages for all of your ideas.
3. Quality Drawing Surfaces
1. The “Tooth” – The “tooth” of the surface is the texture of the paper. The texture of the paper plays a role in how the drawing material is accepted on the surface. Heavier textures will produces lines that may appear “broken”, while smoother textures will produce smoother lines and gradations of value. Some artists will prefer heavier textures while others will prefer a smoother surface
2. Paper Weight – The weight of the paper refers to how much a ream (500 sheets) of that paper weighs. For most papers, the weight of the paper will be directly related to the thickness of the paper. (It should be noted that some papers may have a heavier weight but actually be thinner.) For example, 80 lb. paper will typically be thicker than 60 lb. paper, while 100 lb. paper will be heavier than 80 lb. paper.
3. Acid Free – Paper that is “acid free”, without going into all of the technical details, will stand “the test of time”. This paper is will not yellow over time and is more resistant to fading that can occur when exposed to UV light.
 |
| Photo: Unsplash |
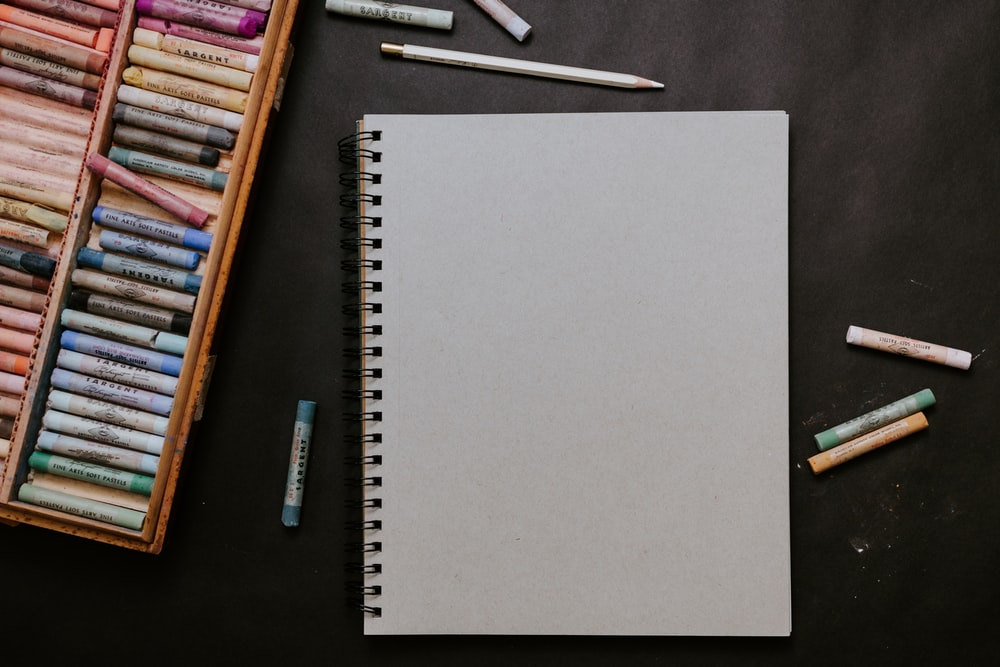
Drawing Paper – Medium tooth paper that is suited for drawing with a variety of drawing media including graphite, charcoal, and colored pencils. There are ton of options for drawing papers, but Strathmore papers are recommended.
Charcoal paper – Heavier tooth paper that is lightweight – almost semi-transparent. Excellent for creating texture
Bristol Paper – Smooth tooth paper that is heavier (think cardstock). This paper is quite rigid and is excellent for creating smooth gradations of value or detailed line work with ink.
4. Variety of Erasers
 |
| Photo: DIYs Guide |
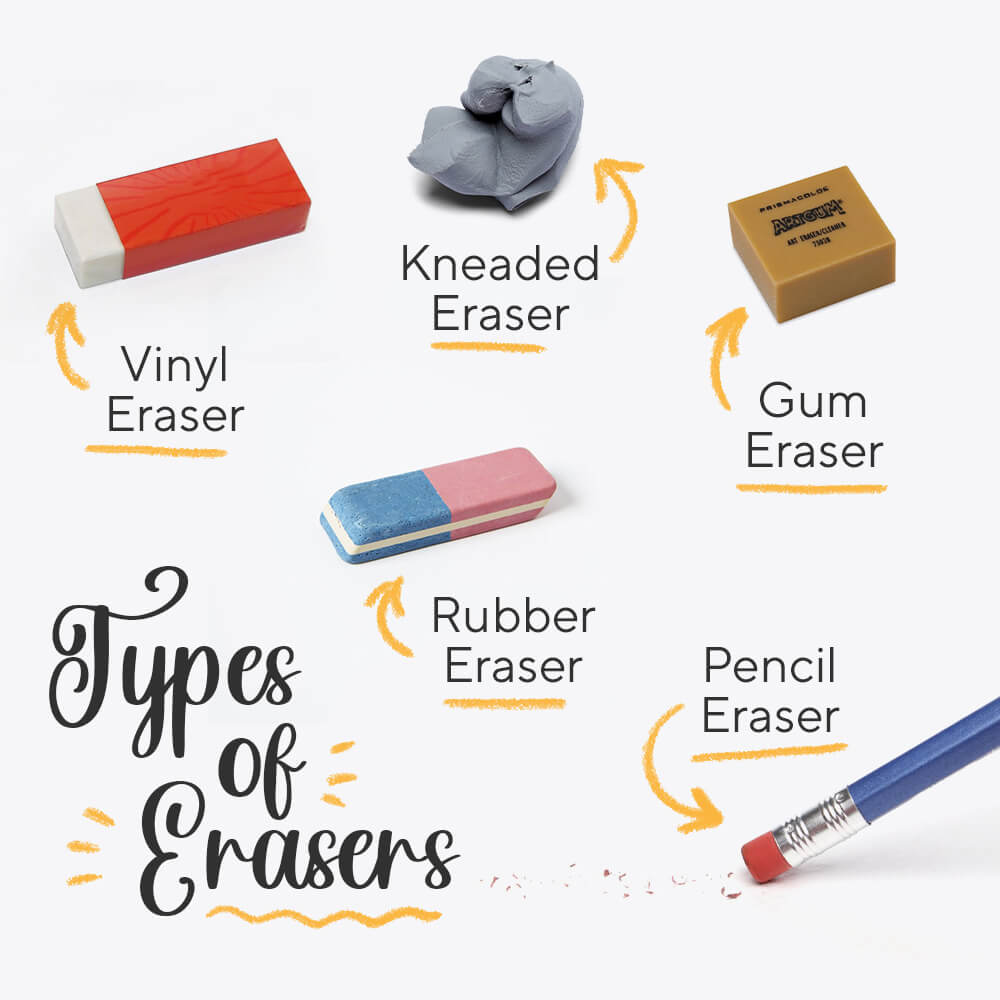
Rubber Eraser – Your standard eraser for erasing graphite. This eraser uses friction to remove any material from the surface.
Kneaded Eraser – This eraser lifts material from the surface, instead of using friction to remove it. It can be pulled and fashioned into different forms to create specific marks. This eraser gets dirty over time, but can be cleaned by pulling and “kneading” it.
Gum Eraser – “The Crumbler”. This eraser is great for removing media from surfaces that are sensitive to tearing. A gum eraser removes the medium through friction, but crumbles as it does so – preserving the surface.
Vinyl or Plastic Erasers – This eraser is the toughest of the bunch. It can erase almost anything. But be warned – this eraser can tear the paper if you’re not careful.
5. A Good Pencil Sharpener
 |
| Photo: The Gentleman Stationer |
Electric Pencil Sharpeners: Electric pencil sharpeners can vary in price and the old saying, “you get what you pay for” is true for what you get here.
A quality electric pencil sharpener will sharpen your pencil without eating it all up.
Electric pencil sharpeners are nice to have for a quick sharpen of the pencil, but should not be used with colored pencils. The waxy binder found in colored pencils can build up within the blades of the sharpener, ruining the device.
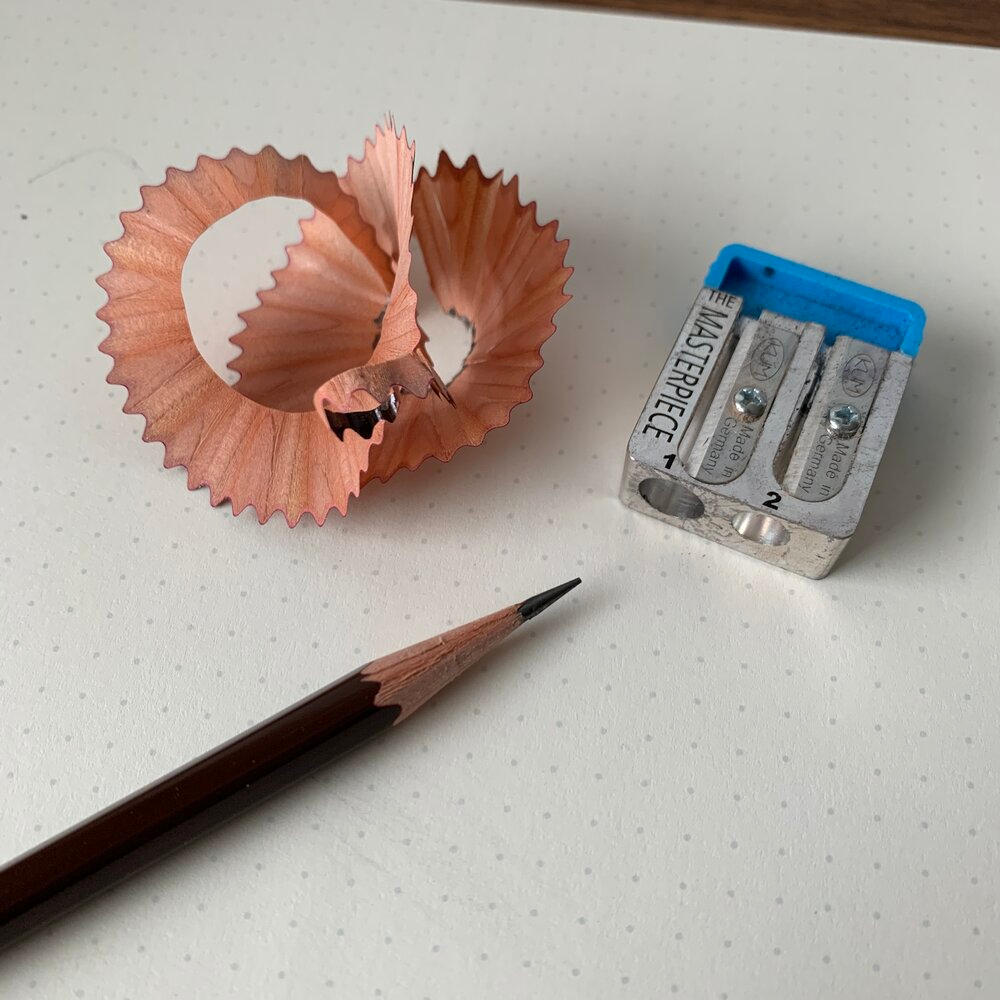
Manual Pencil Sharpeners: While an electric pencil sharpener has its appeal, a manual pencil sharpener will do for most of us.
Like electric pencil sharpeners, the manual varieties come in different forms. My favorite is a simple, handheld metal sharpener. It’s a cheap and easy solution that is portable and easily replaced. Remember, if you’re sharpening colored pencils, then a manual pencil sharpener is what you should be using.
6. Quality Colored Pencils
 |
| Photo: Amazon.com |
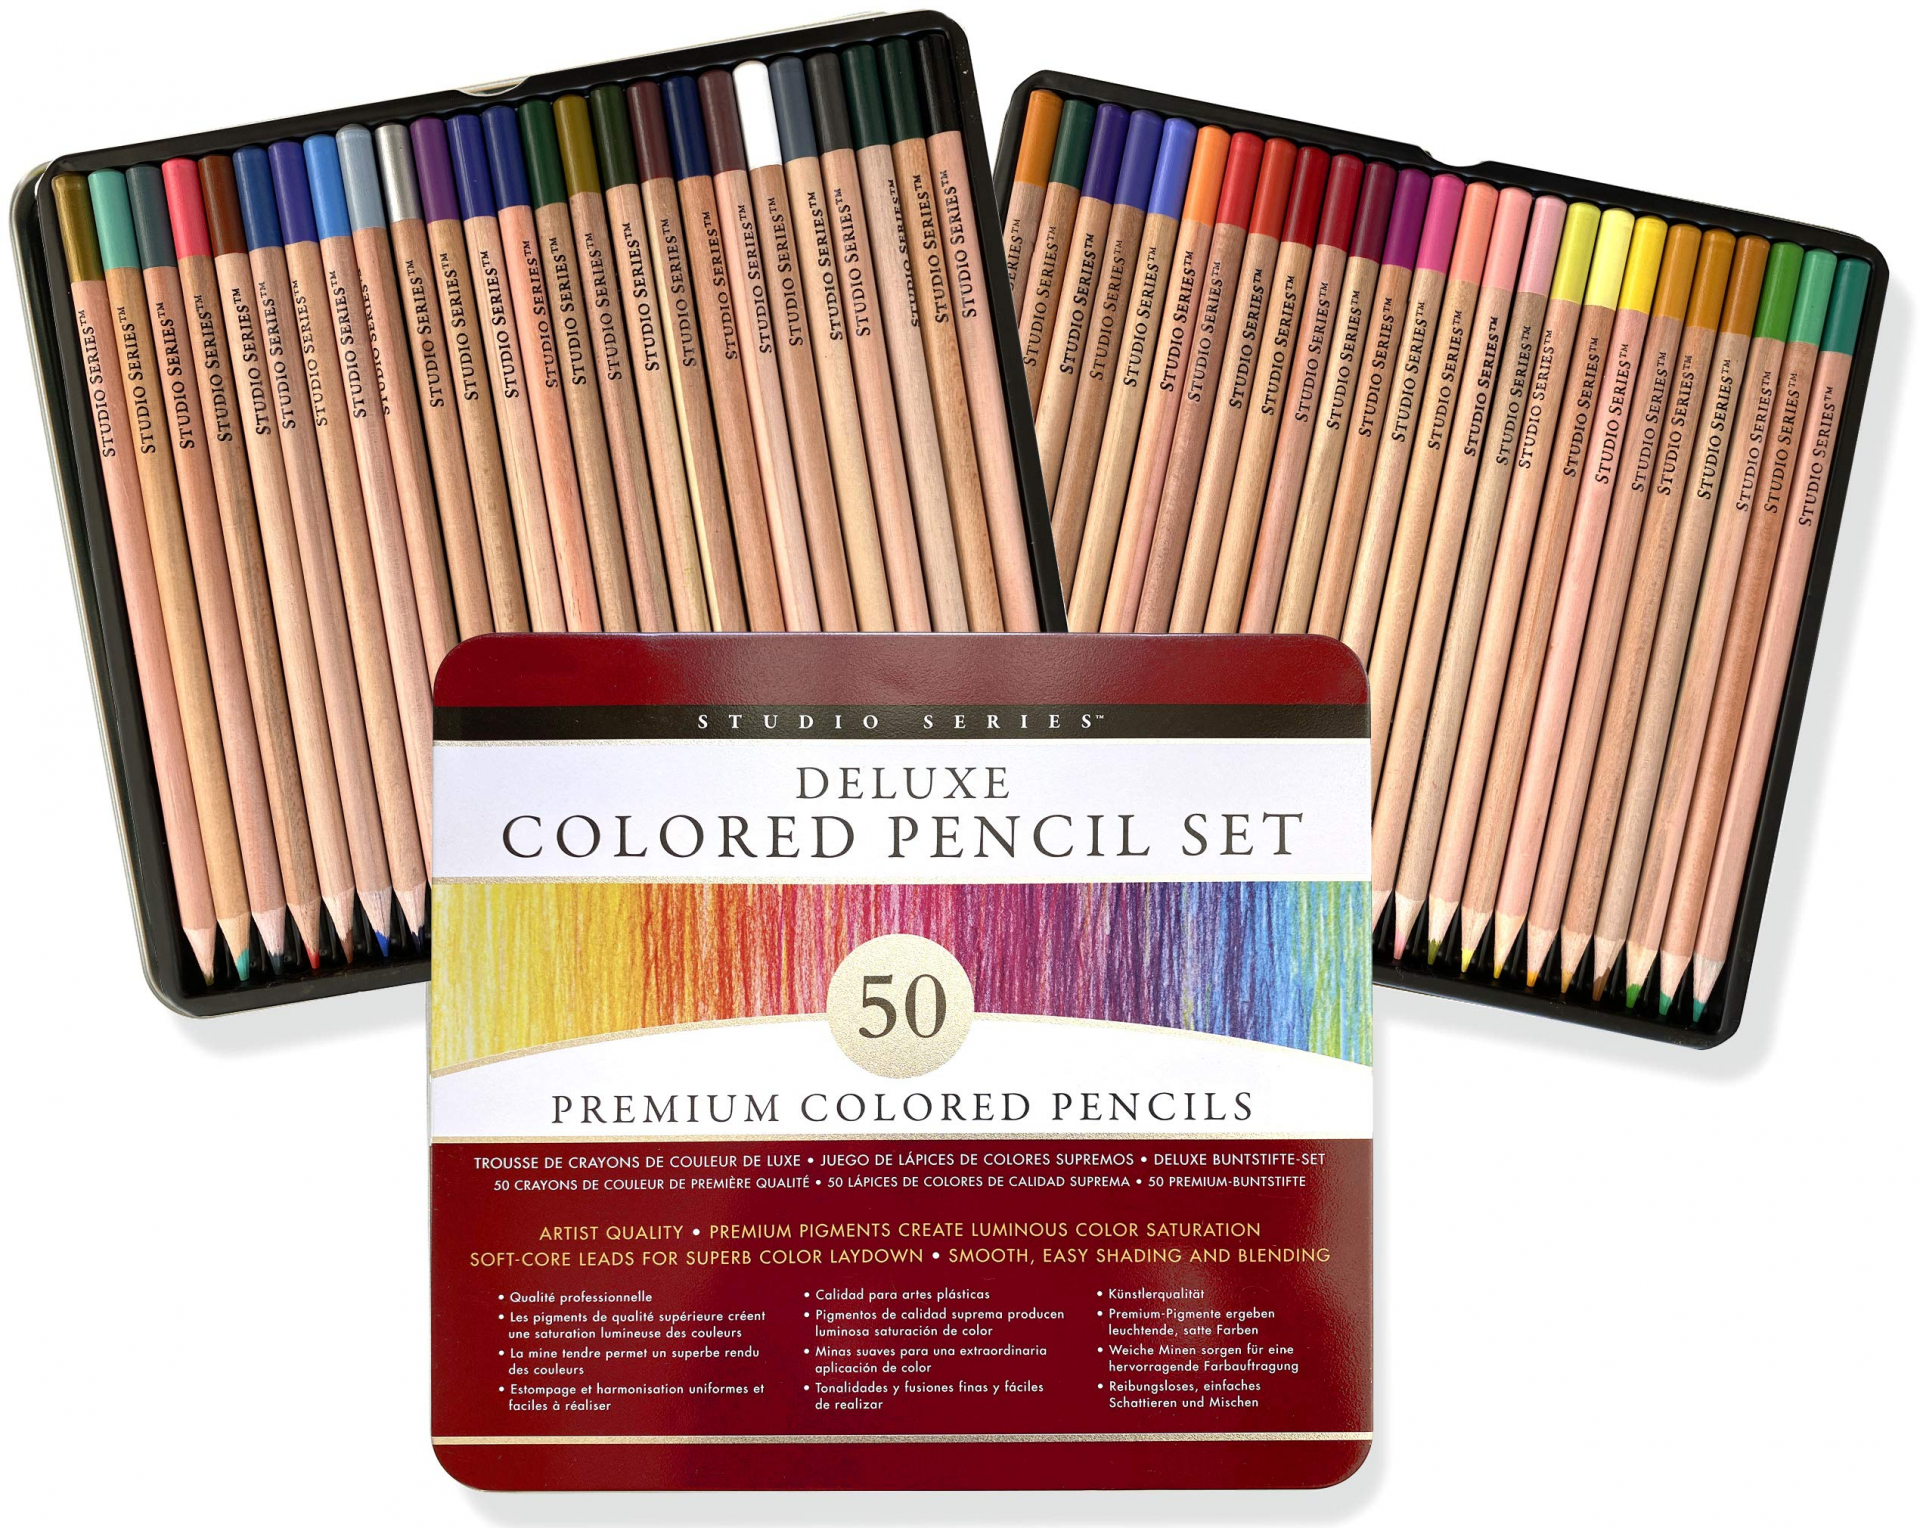
Colored pencils are everywhere. You can buy them just but anywhere. But this doesn’t mean that every colored pencil brand out there will get the best results. Quality matters and so does the type of colored pencil that you choose.
Prismacolor Premier
Prismacolor wax-based Premier pencils are soft and buttery, allowing the artist to layer colors to build up a solid application that often compares to a painting. Some people complain that they break easily and they do. But this is due partly to the soft core of the pencil which is also why they are so easy to use and build up on a surface.
Faber-Castell Polychromos
Faber-Castell’s Polychromos pencils are oil-based and behave slightly differently from wax-based pencils. These pencils require several layers to build up depth in color, but the results are fantastic. They’re expensive, but well worth the investment if colored pencils are your medium of choice.
Caran D’ache Luminance
Luminance pencils are wax-based, premium pencils. They layer nicely and are a little harder than Prismacolor Premier, meaning they break less often. These pencils are, in my opinion, the brightest colored pencils. So if you plan on working on darker surfaces, these pencils may be your best bet. They are expensive, so consider it an investment if you decide to go this route.
How to do: Rose drawing from the top (HowJoyful’s tutorial)
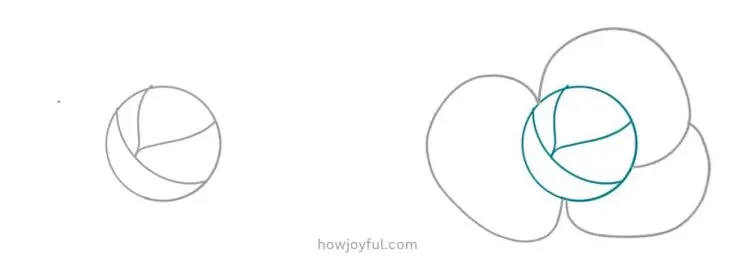
Step 1: For the final rose, we will start with a circle and draw a moon-like shape tilted towards one side. then from the center draw a V-like shape having one side bigger than the other. Then draw a petal on one side, continue with another on the upper edge, almost divided in 3, but instead of drawing them next to each other, the last two will intertwine.
 |
| Photo: Howjoyful |
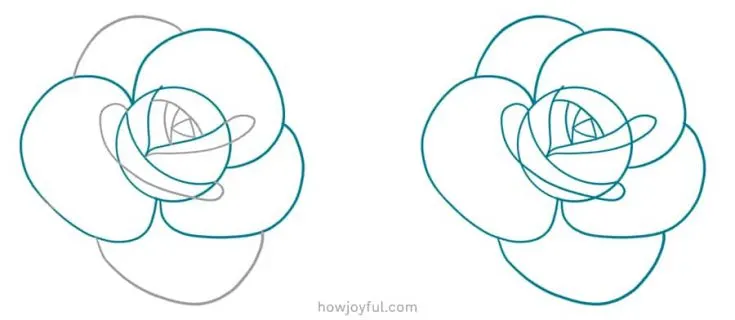
Step 2: Now add the upper and lower petals to finish the outer shape. For the inside, add an outer-round shape to the lower part of our moon and to one of the sides as shown below. This will be the guideline for the head of the Rose. Use the technique we learned in the first rose to create the very center portion.
 |
| Photo: Howjoyful |
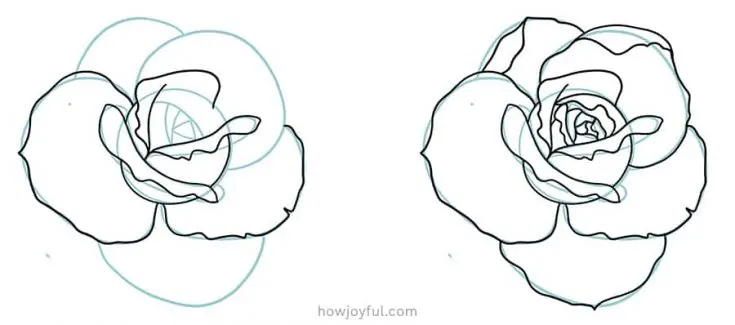
Step 3: To make the rose as organic and realistic as possible, use uneven lines on the edge while making the final lines, as we did with the previous rose, make little indents in the center-top of the outer petals. Follow the example below to finish up the drawing of the head of the flower.
 |
| Photo: Howjoyful |
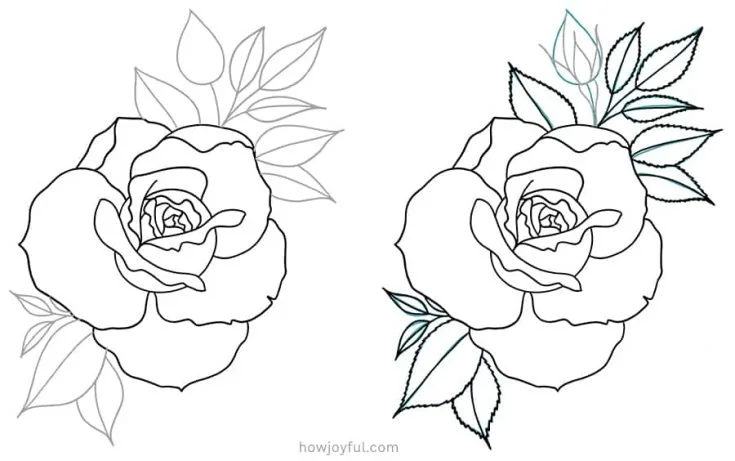
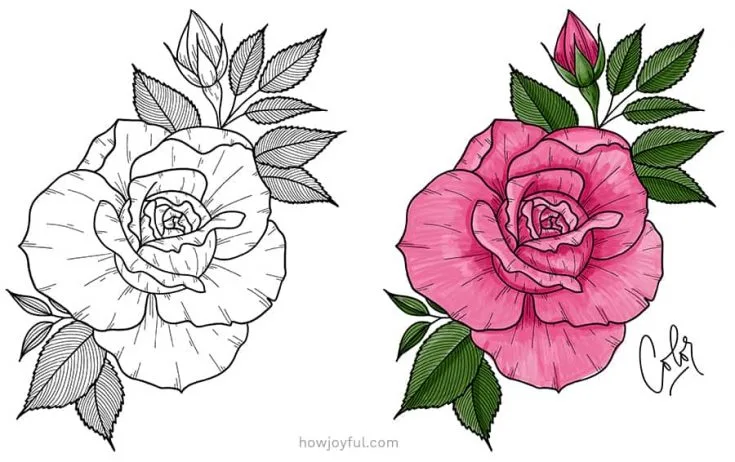
Step 4: After inking the flower, draw leaves on both sides of the rose just as we did with the previous flowers. This time we are also adding a bulb, for this we will start with a leaf shape with a round bottom. Once the guidelines are ready, ink the leaves and add tooth-shaped edges. For the bulb draw guides as shown below dividing the bulb in three to accommodate for the sepals. Divide the top towards the side to show two petals.
 |
| Photo: Howjoyful |
Step 5: Use thin lines to create texture on the leaves and details on the head of the flower, check where the petals would naturally fold and add lines there.
 |
| Photo: Howjoyful |
How to draw a rose from the side: Easiest Step by Step Guide (HowJoyful’s tutorial)
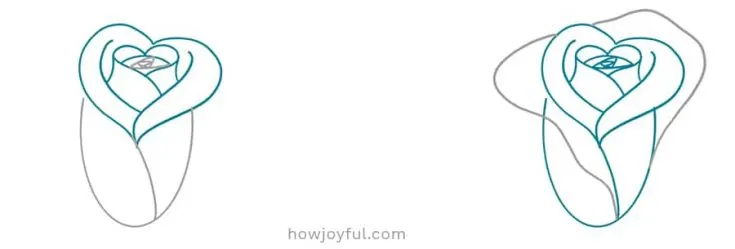
Step 1: We are going to start by drawing a small and wide heart shape. This will be the center of the bulb of the rose. After that, we will draw another heart, but this time longer and less wide. We will also place the top center of the heart off to the side, this way it will have a more organic look to the center instead of a perfectly symmetrical one.
 |
| Photo: howjoyful |
Step 2: Now we will define the center petals, starting from the center of the bigger heart. We will follow the side edge of the heart. For the opposite side, we will start a little above the center point and mirror the first stroke. After that, we will draw lines from the small heart down as shown below and another across the heart in a curve motion.
 |
| Photo: howjoyful |
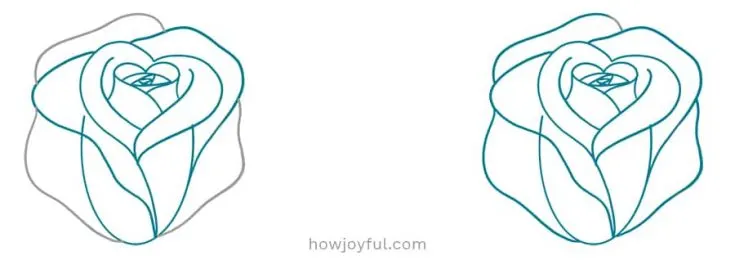
Step 3: Next we will draw an elongated ellipse and continue the line from the bottom of the bigger heart until it touches the bottom ellipse line. And just like on the first round rose, we will make lines for the center of the rose. After that, we will start with the outer petals, for the first one, we will start at the bottom point of the oval and draw an uneven line, make sure you go below the top of the bigger heart to give it a more fluid look.
 |
| Photo: howjoyful |
Step 4: For the second outer petal, we will draw uneven shapes on both sides and also on the top, the goal is to make an overall symmetrical flower head. This shape will be the guide that we will use to ink the rose, we will use more organic lines, especially on the edges, to give it a more petal-like look.
 |
| Photo: howjoyful |
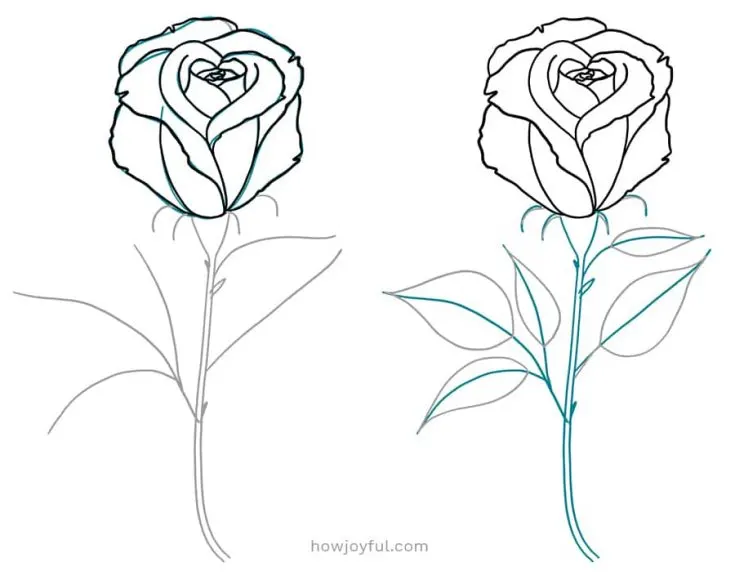
Step 5: Add little intents to the top-center of the petals that are completely open, this makes a cute detail and makes it look a little more realistic even though we are using simple shapes. After that, we can start sketching the stem, sepals, and peduncle.
 |
| Photo: howjoyful |
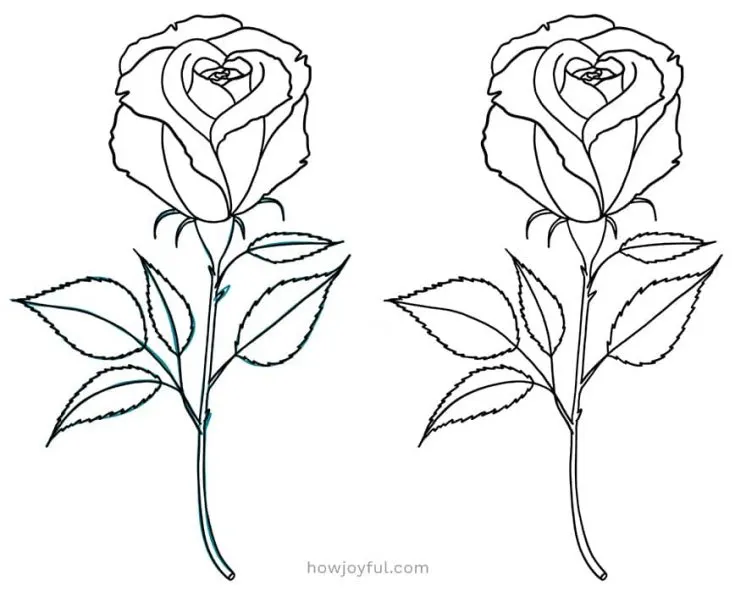
Step 6: Ink the final rose or just use a softer pencil to make the lines thicker and bolder. Erase or get rid of the guides before adding the final details.
 |
| Photo: howjoyful |
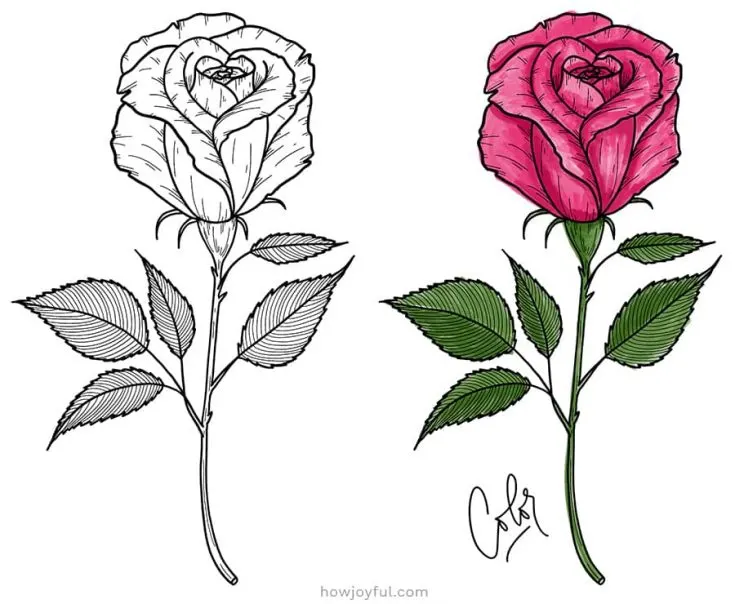
Step 7: Use thinner lines to create texture in the leaves and details in the rose by following the natural shape of the petals and what would be shaded in the rose. Finish the drawing by adding color, and use a hot pink color instead of the classic red rose. And for the leaves, use two shades of green.
 |
| Photo: howjoyful |
Tips to practice perfect rose drawing
1. Get sketching
 |
| Photo: Jessica Isabel |
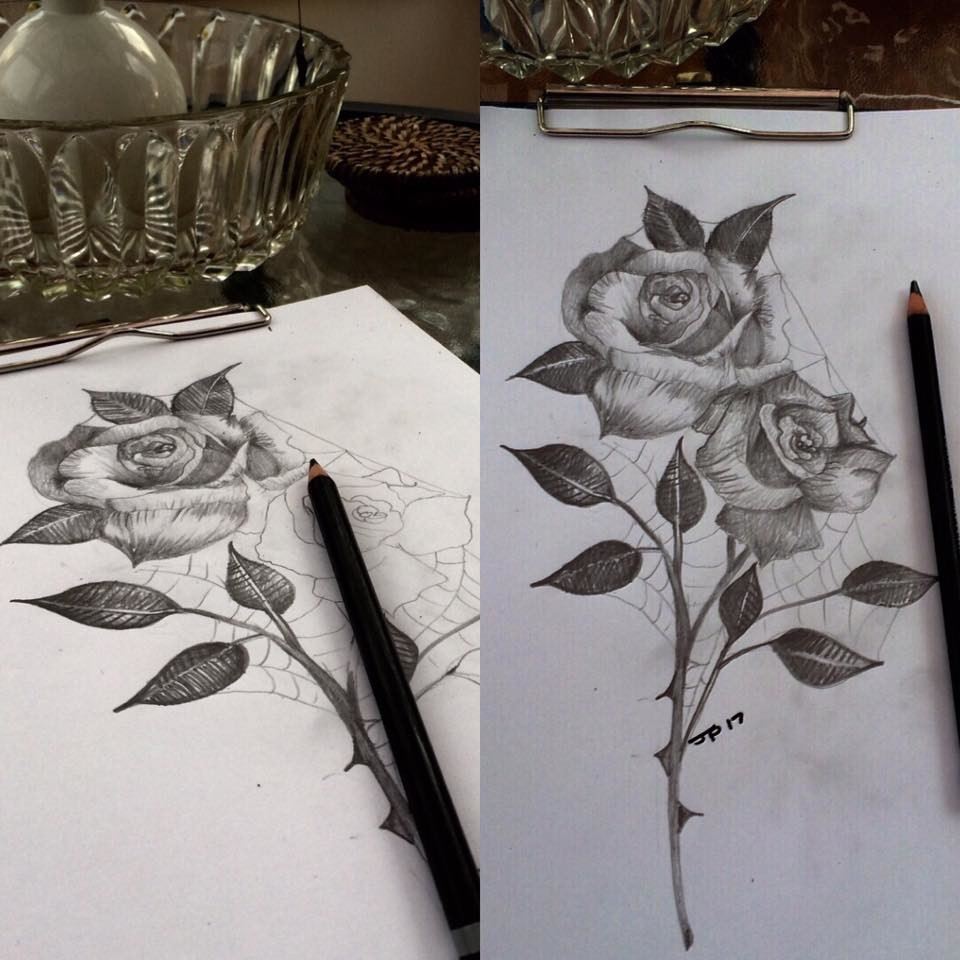
Start by sketching the subject from different angles and using a variety of reference pictures. This will give you a good sense of whatever it is you’re drawing and help you gain some insights into how the structure works. Your 100th drawing will always be better than your first one.
Drawing something over and over again is necessary if you want to capture it with power and authority. Also, by drawing something repeatedly, you will become more confident of the subject, which will allow you to take chances. So draw with abandon and don’t worry about how good those initial sketches are. Draw to learn; each drawing is leading you closer to the perfect rose.
2. Find the egg shape in the petals
 |
| (Image: © Thomas Fluharty) |
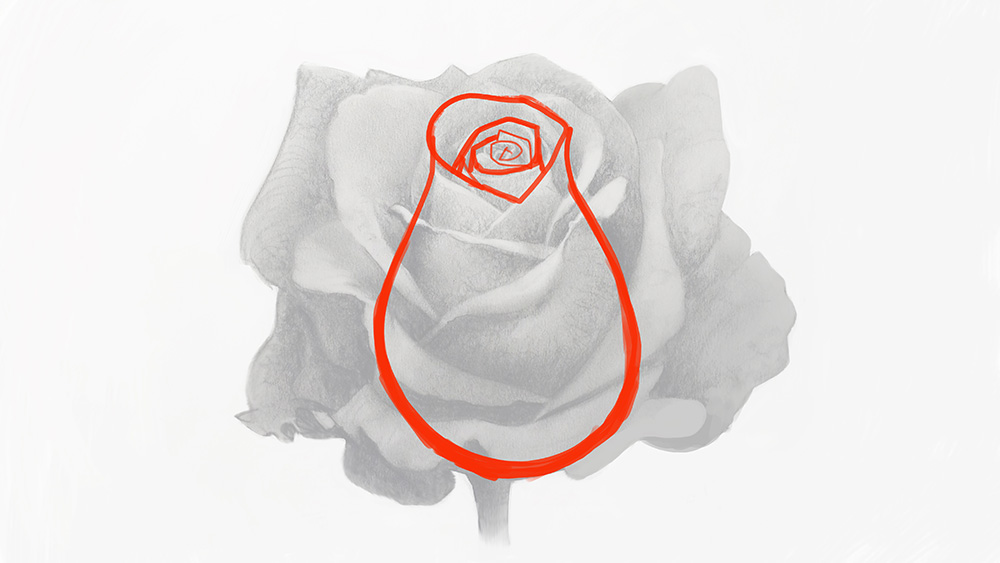
Successful drawing is more about logical thinking than having a trick up your sleeve. Start by observing your subject and asking the most basic question: What is the shape of this thing I’m drawing? Is it round? Square? Roses are complicated shape-wise because their unfolding petals distract us from the flower's basic shape.
A rose is an unfolding bud, so it’s egg-shaped: wider at the bottom and narrower at the top. So start by drawing the egg-shaped bud and then add in all the petals unfolding and opening around it. Make sense? Now that's an example of great thinking surpassing simply drawing what you see.
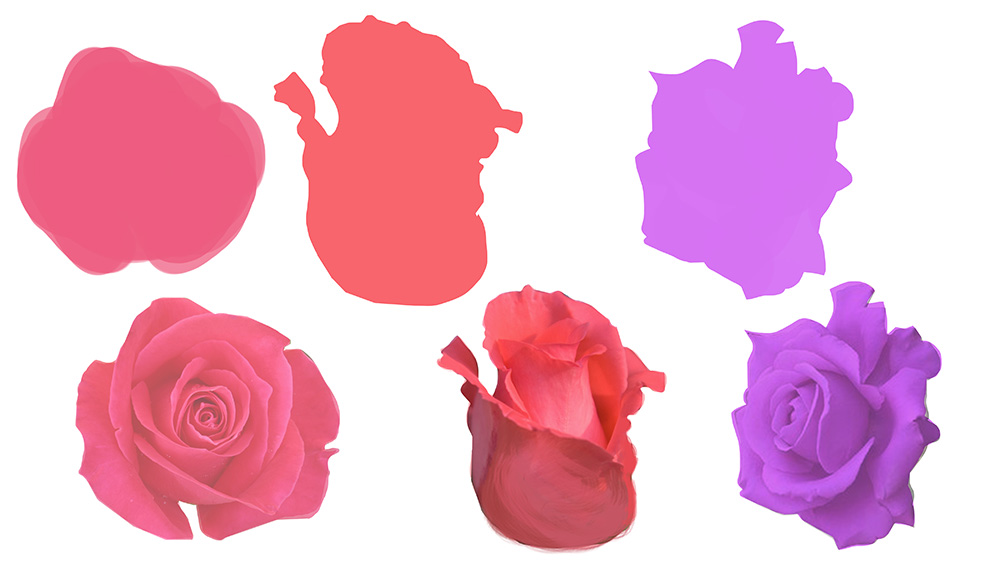
3. Establish a strong silhouette
 |
| (Image: © Thomas Fluharty) |
Not all reference is created equal. Sometimes rose pictures that you find might not be helpful to your drawing because they look wilted and not heroic, or are strangely shaped and not very rose-like. Make sure the photo you choose to draw from has a shape that can be instantly recognised as a rose.
Once you get drawing, you can turn your rose into a silhouette to see its overall shape and discern if it effectively communicates a rose. If you’re working from good reference, checking the silhouette will keep you on track.
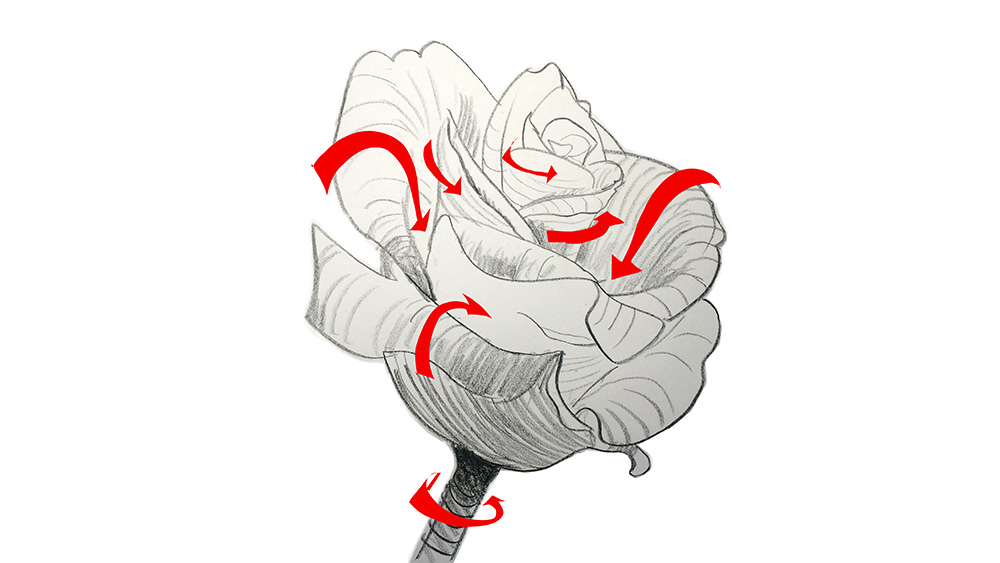
4. Focus on form
 |
| (Image: © Thomas Fluharty) |
If your drawing has good form, that means it has a three-dimensional quality to it that makes it look real and believable. The best way to render (i.e. draw) form is to make sure you think about what part of the rose you're drawing so that your hand movements follow the same curves of the petal or the roundness of the stem. Making round movements around a round object clarifies form; if something is round, use circular strokes to give the illusion of curvature.
5. Add some flair
 |
| (Image: © Thomas Fluharty) |
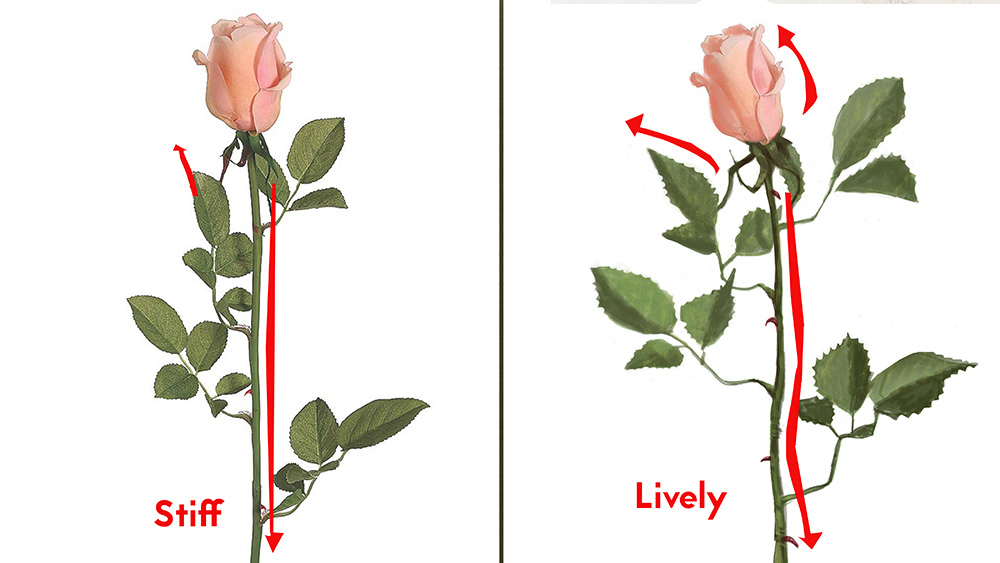
You might wonder what 'story' has to do with a rose. Everything! Whereas an amateur artist might draw a stiff stem and leaves (boring), an experienced artist will see the stem and leaves as a chance to tell a story because that’s what will connect them with the viewer emotionally.
You can turn the mundane into something magical through exaggeration. Even though the differences between the two roses (above) are slight, the one on the right is much more interesting than the one on the left. Just by adding a few exaggerated bends in the stem, tilting the bloom, and injecting a little wonder into the leaves, my drawing goes from stiff to lively.
 How To Clear Cookies On iPhone and iPad How To Clear Cookies On iPhone and iPad When you delete cookies from Safari on your iPhone or iPad, you free up storage space and improve your device's performance speeds. |
 What Is The Temperature and How To Measure It? What Is The Temperature and How To Measure It? In daily life, humans tell the hotness and coldness of different substances and weather in terms of temperature. But do you know what temperature is ... |
 How To Turn Off Auto-Correct On iPhone and iPad How To Turn Off Auto-Correct On iPhone and iPad Auto-correct helps you type the words better but sometimes disturb you. Many iPhone and iPad users want to turn it off! How to do it? |
 How to Change Language in Netflix on Mobile, Laptop and TV? How to Change Language in Netflix on Mobile, Laptop and TV? Netflix has become an important mode of entertainment and people around the globe love using this medium. If you are looking for ways to change ... |


