How To Convert JPEG To Vector: Step-By-Step Guide
 |
| How to convert Jpeg to vector |
Many photos and Web images are stored in the popular JPEG image format. But JPEG images have some limitations; some applications work best with images in vector formats such as Scalable Vector Graphics and Encapsulated Postscript. Here are some best ways to convert JPEG to Vector.
What is Vector Format?
 |
| Vector file. Photo: Adobe |
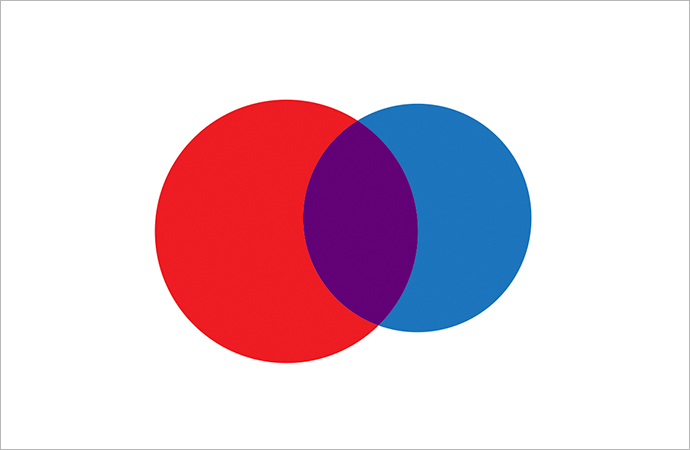
When you’re working digitally, there are two kinds of image file types: raster and vector. Both image types may be saved with several different file extensions. It’s important to understand when to use each image type and the best file extension for particular situations.
Vector files are images that are built by mathematical formulas that establish points on a grid. Raster files are composed of the colored blocks commonly referred to as pixels. Because they can infinitely adjust in size without losing resolution, vector files are more versatile for certain types of tasks than raster files. The most common types of vector files are:
.ai: Short for Adobe Illustrator, this file is commonly used in print media and digital graphics, such as logos.
.eps: Encapsulated PostScript is an older type of vector graphics file. .eps files don’t support transparency in the way more modern file formats like .ai do.
.pdf: The Portable Document Format is built for the exchange of documents across platforms and is editable in Adobe Acrobat.
.svg: The Scalable Vector Graphics format is based in XML (a markup language used widely across the Internet that's readable by both machines and humans). It’s useful for the web, where it can be indexed, searched, and scripted.
Difference between JPEG and vector image
The difference between JPEG and vector image files is in how the image is stored and displayed.
Bitmap format
A JPEG file stores the image in what's called a raster or bitmap format. In a bitmap format, every individual pixel or dot in the image contains a specific color; when you combine all the dots together they combine to form an image that you see as a single picture rather than as the individual dots. But since there are only a certain number of dots in an image, if the image is displayed in a larger or smaller space than intended, the image loses resolution and becomes fuzzy. Bitmap images are easy to create when taking photos or using drawing tools, but can't always be used when a larger image is needed.
Vector format
A vector image, instead of storing individual dots, stores equations that describe all the different lines and areas in the image. When the image is displayed, the equations are used to draw all the lines and areas to fit whatever space the image is displayed in. So although vector images don't always contain as many small details as bitmap images (especially large bitmap images), even very small vector images can be scaled to almost any size without losing resolution. Because they scale so well, vector images are often used for logos and other design work in programs such as Adobe Illustrator.
How to Convert JPEG to Vector in Photoshop
JPEG files are typically photographs. They show continuous color variations and tones throughout the image. Vector files, though, generally emphasize line and shape instead. They are often clip art illustrations, or outlined art like maps. JPEGs can not be enlarged without degradation to the resolution of the image, whereas vector files can be enlarged without any loss of quality. There are programs (like Genuine Fractals) which use complicated algorithms to enlarge JPEGs as if they were vector images, but there are ways to approximate the same result in Photoshop.
Step 1
Decide what part (shape) in your JPEG you want to convert to a vector file. You will not be able to convert every detail all at once, so you will have to pick out specific objects one at a time. Even dedicated tracing software (e.g., Adobe Streamline) is limited in how much detail from photos can be turned into a vector image all at once. For the sake of this article, let's say you wish to turn a hat from a photo into a vector image.
Step 2
Increase the contrast in your JPEG. With your JPEG open in Photoshop, select Image, then Adjustments, and the click Brightness/Contrast. Make sure the "preview" option is checked, and then drag the Contrast bar slowly to the right. You are trying to separate the hat tonally from whatever is surrounding it. You may have to play with both the Brightness and the Contrast sliders, depending upon the hat and the background.
Step 3
Use the Magic Wand tool from the Tool Bar. Try setting the tolerance to 10, and click the hat. If the image was fairly contrasting, it should immediately select the entire hat. If it selected more than the hat, decrease the tolerance and try again. If it selected less than the whole hat, try increasing the tolerance. Use the Magnetic Lasso tool from the Tool Bar, if the Magic Wand does not work.
Step 4
Make a working path from the selection. Go to the Paths palatte (Window, then Paths), and choose "Make work path from selection."
Step 5
Export the path. Go to File, then Export, and then click "Paths to Illustrator." Choose a name for the file to save it under, and then click "okay." The file will be saved as an Adobe Illustrator (.ai) vector file, and can now be manipulated in vector illustration programs like Illustrator.
Step 6
Follow the steps outlined above to convert other elements from your original JPEG file.
How to change the JPEG picture to Vector image by using Image Trace Tool
Vector design are the perfect configuration for use in logos, pictures, or basic outlines since they have clear lines and forms. While most vector images are starting from scratch, you can use Adobe Illustrator Program to "trace" JPEG images and convert them to vectors.
If you’re working on your project in Adobe Illustrator, but the image you use is in .jpg or .png files with background. If you’re not familiar with vector, and want to start creating your own, this tutorial will help you on your way and convert jpeg to vector.
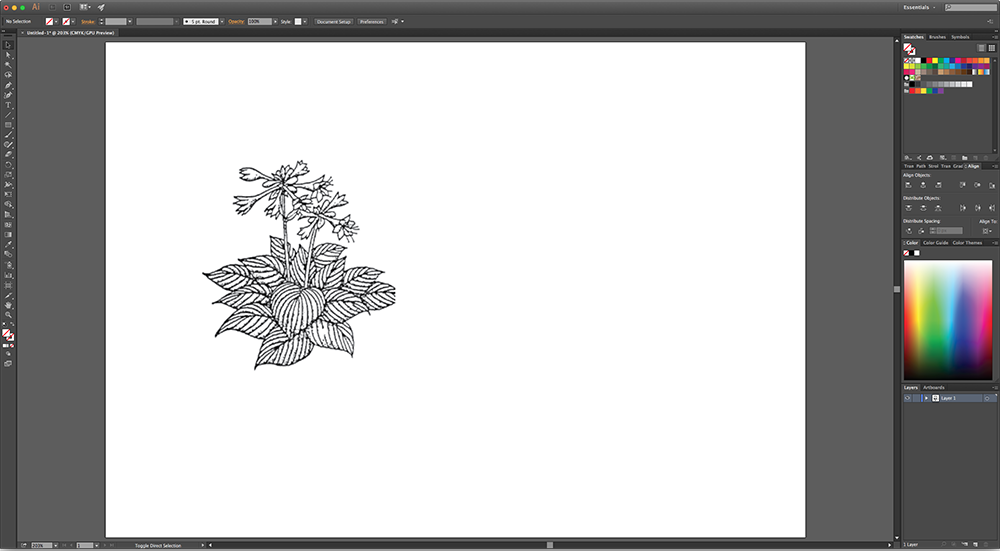
Step 1. Open Adobe Illustrator, place the .jpeg or .png image file.
 |
| Photo: Webcoursebangkok |
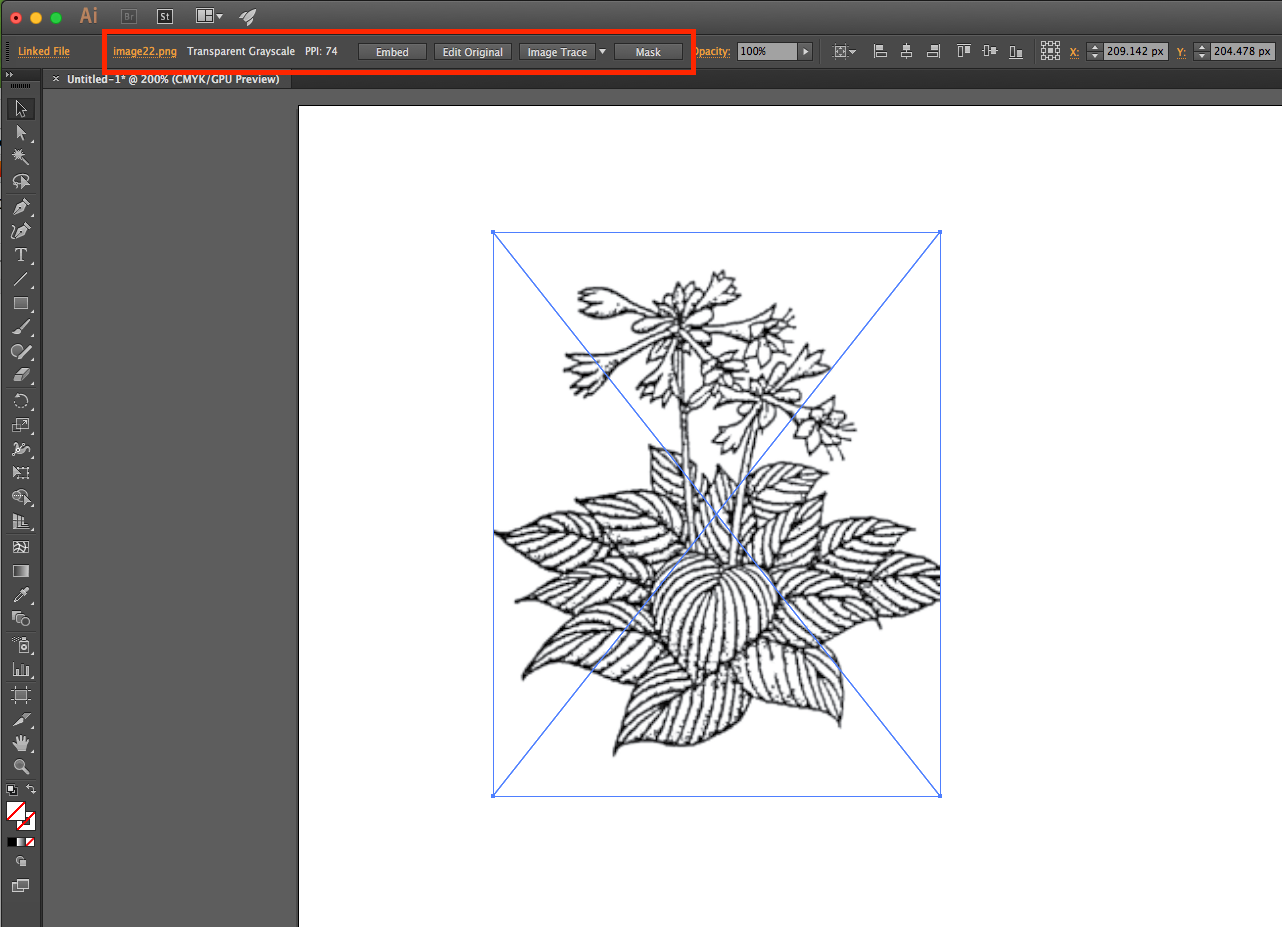
Step 2. Click on the picture, you will notice the menu bar on top changing.
 |
| Photo: Webcoursebangkok |
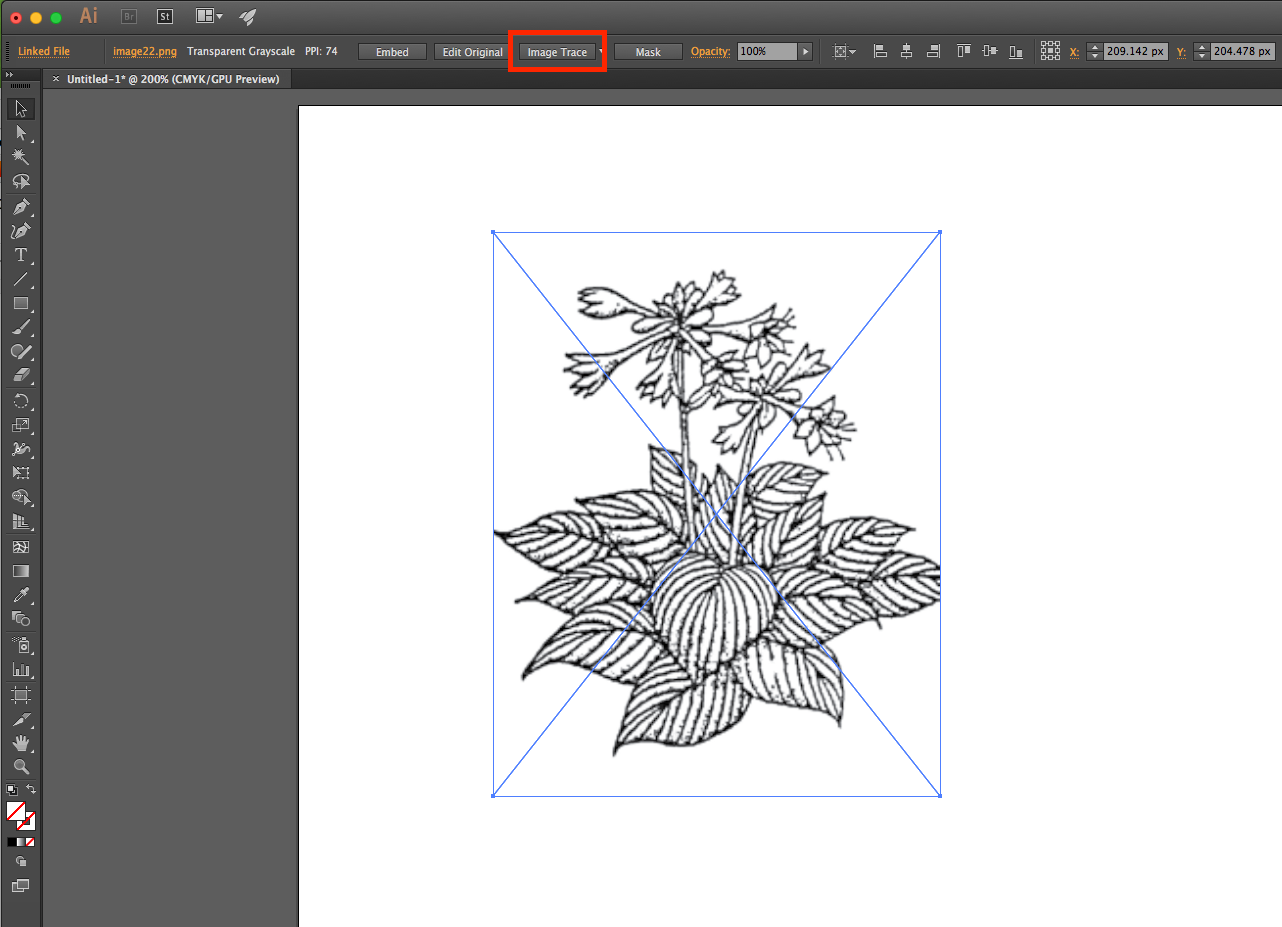
Step 3. Click > [Image trace], it will show you how it looks like in the vector.
 |
| Photo: Webcoursebangkok |
Step 4. Click > [Expand], then you will get vector image.
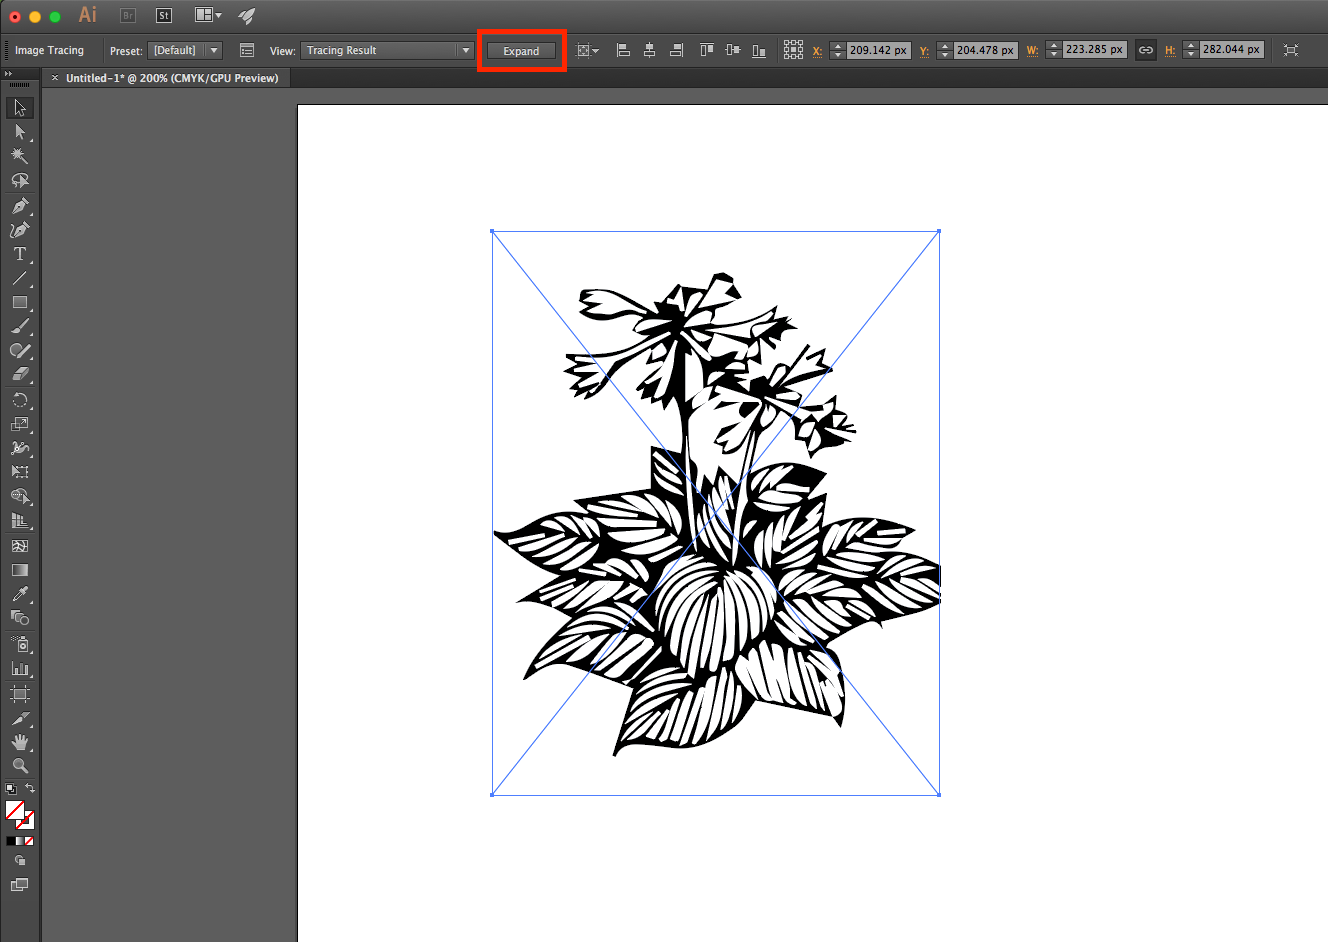 |
| Photo: Webcoursebangkok |
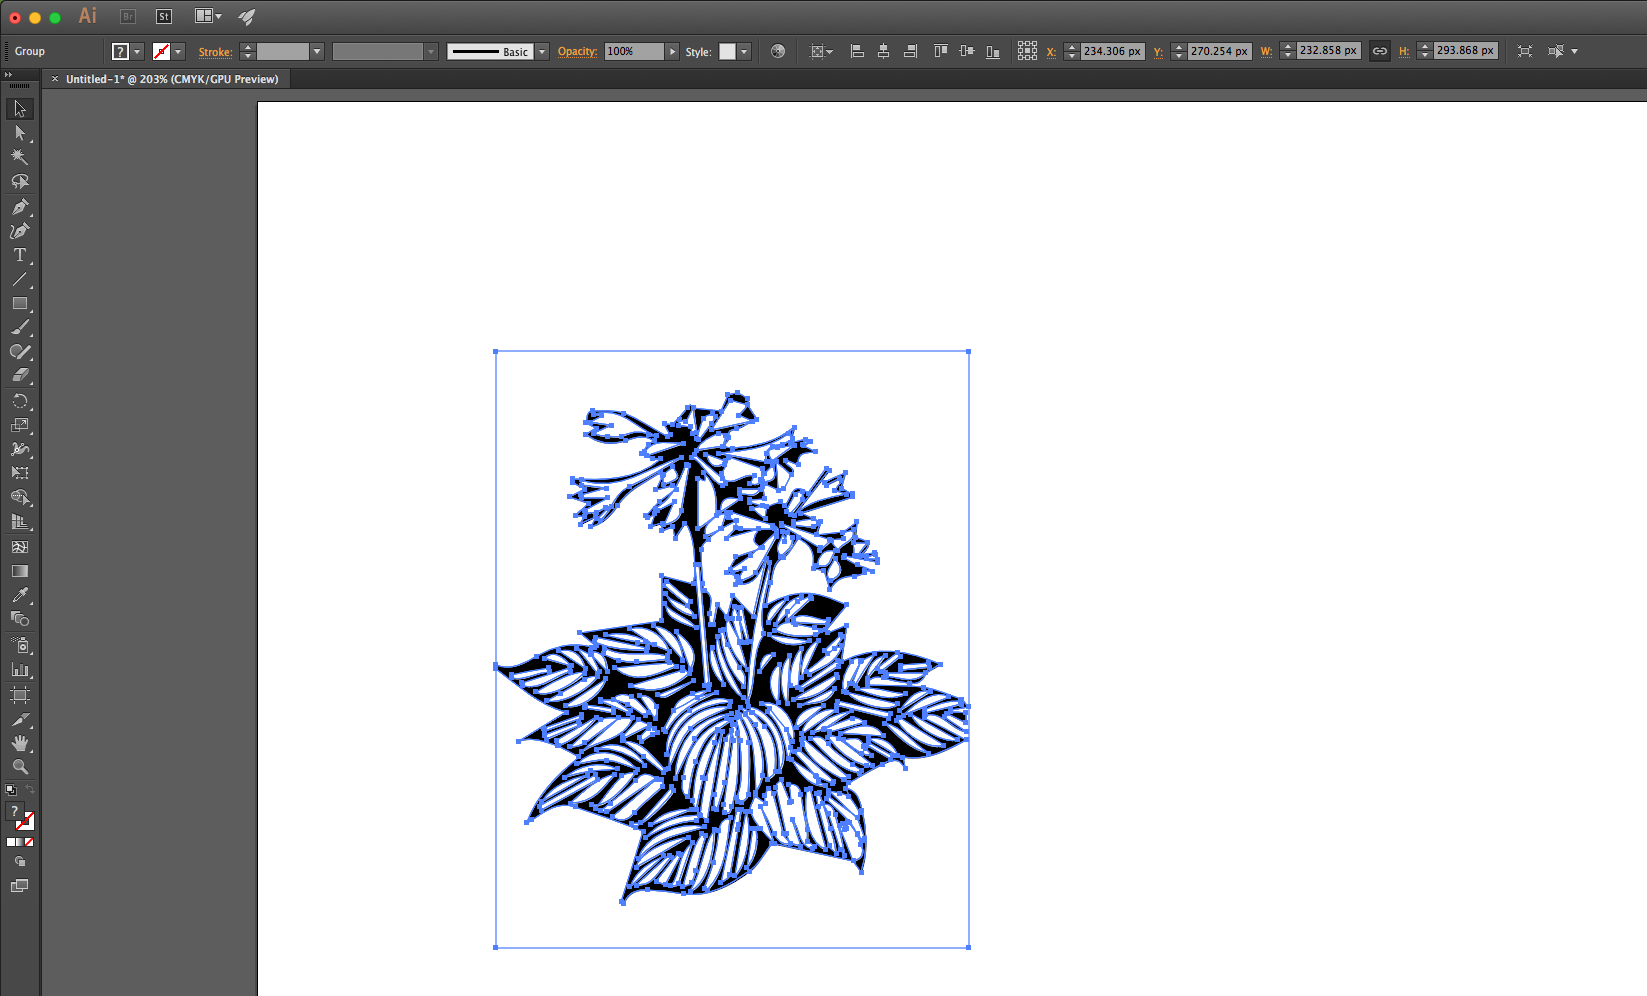
Step 5. Right click on the picture and choose ‘Ungroup’, then you can separate the background from the object.
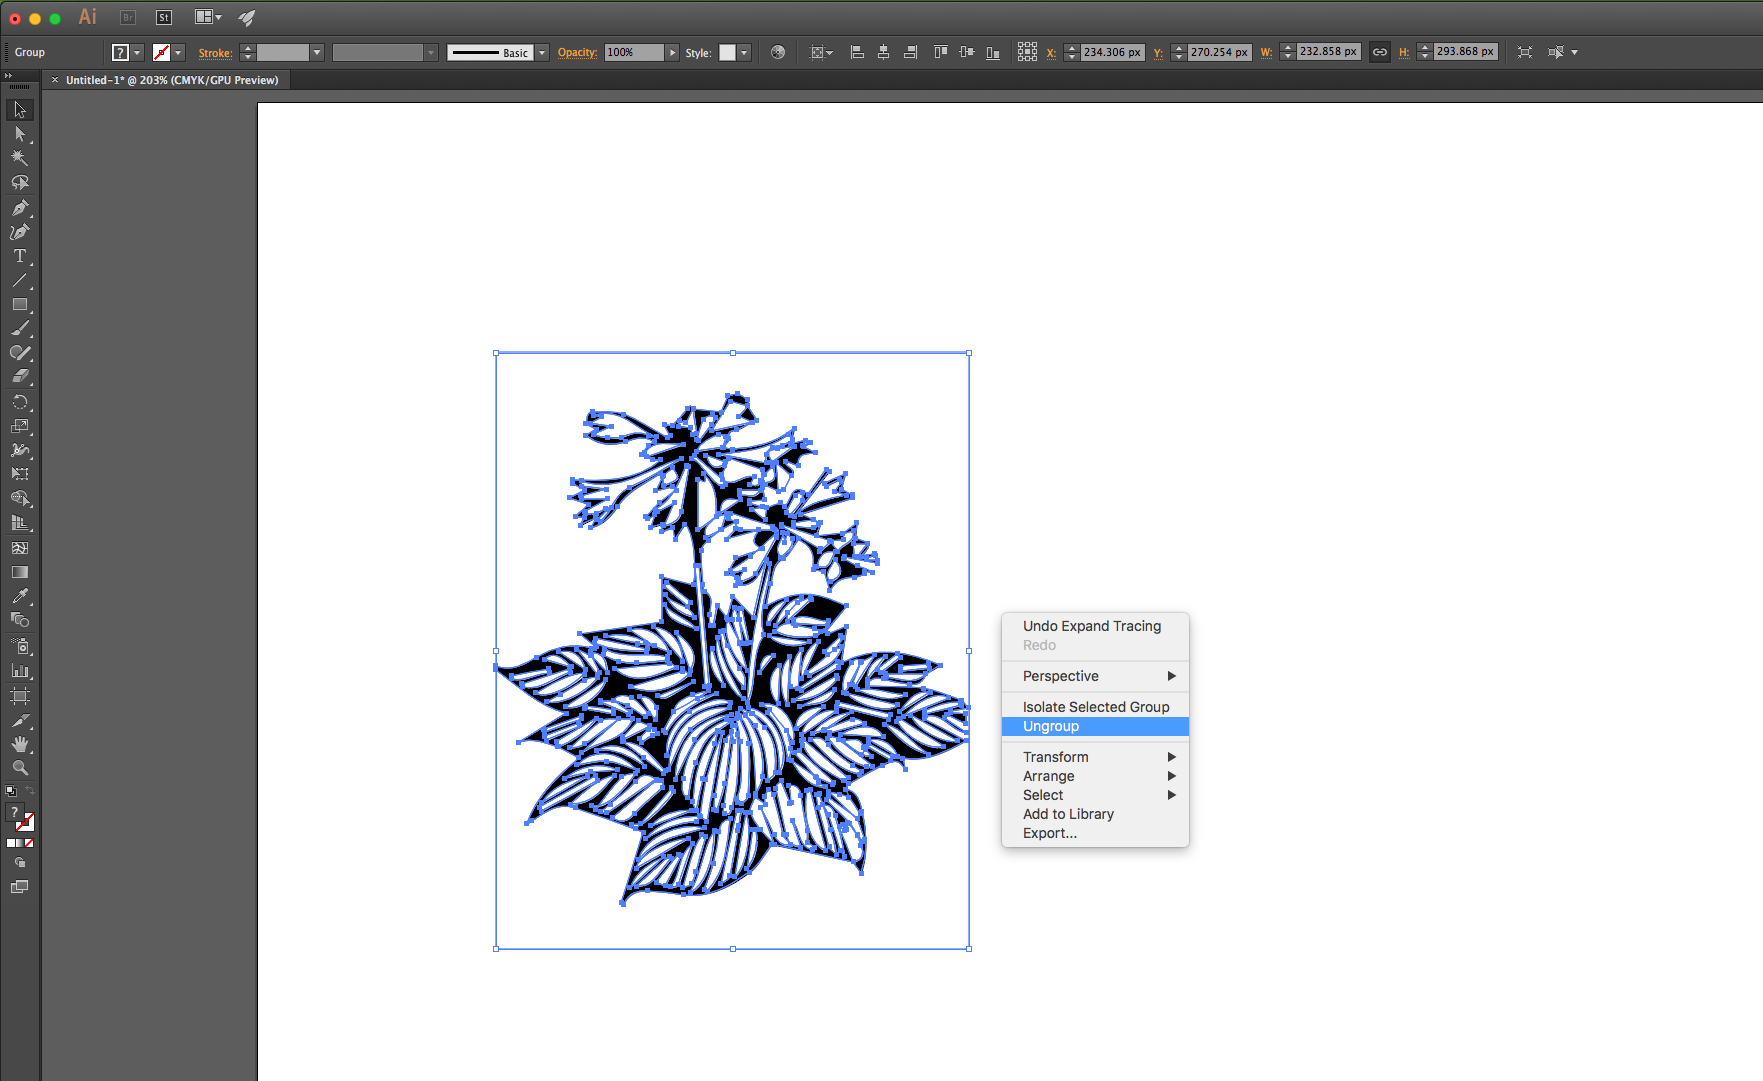 |
| Photo: Webcoursebangkok |
 |
| Photo: Webcoursebangkok |
Tips and TricksYou will notice a small arrow beside ‘Image Trace’ button, click on that, and you will see many different results. |
Convert Your JPEG File with Inkscape
Step 1: Import the JPEG file
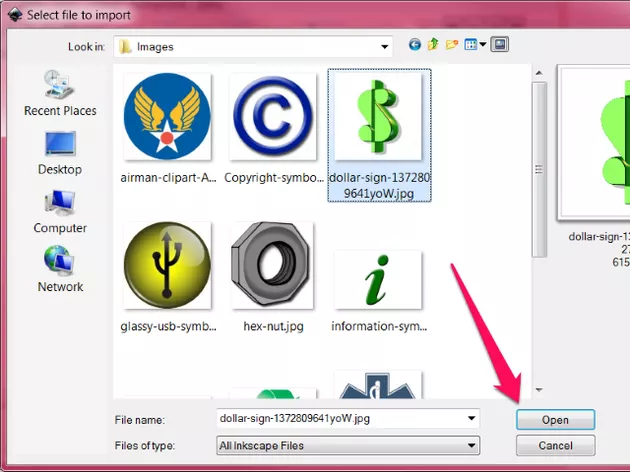
1. Open the File menu and select Import... from the menu. Select your file.
2. Select the JPEG file to be converted and press the Open button.
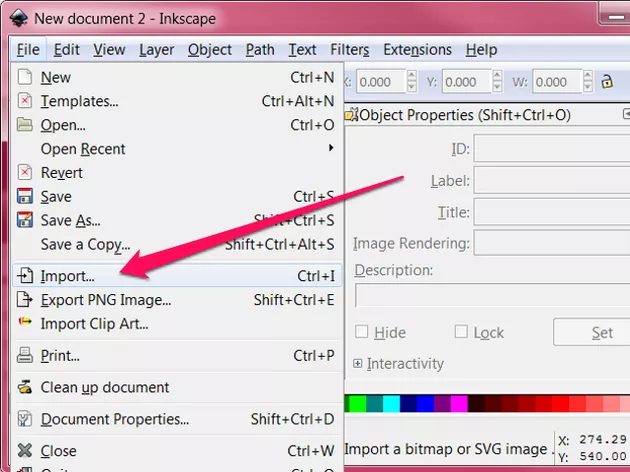 |
| The Import... option in the File menu Image Credit: Inkscape.org |
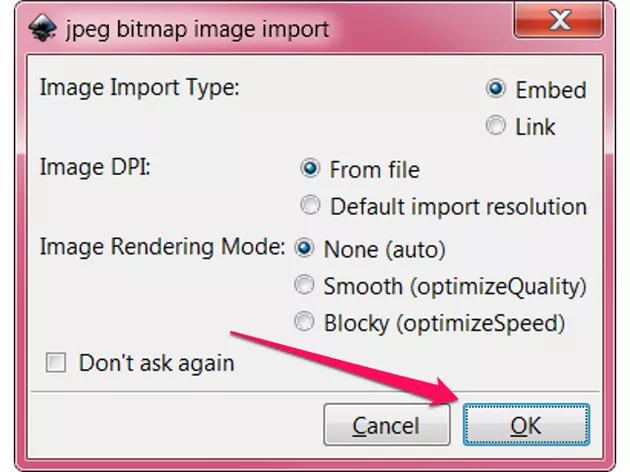
A jpeg bitmap image import dialog opens with options to use for the import. The default options work well for most images, so if you're not sure what options to select don't change any of the options.
3. Press the OK button.
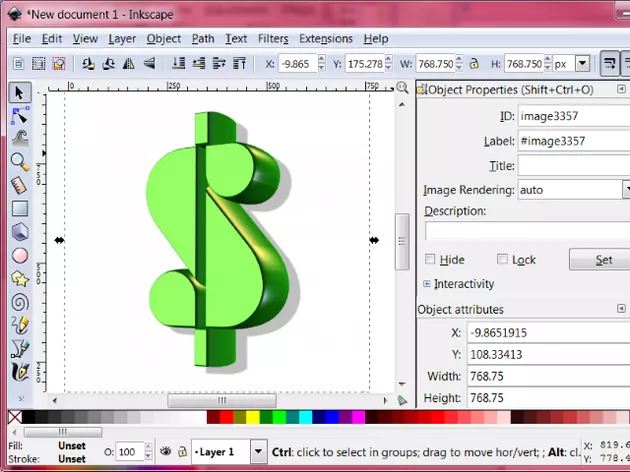
Inkscape displays the JPEG image, selected in the main window.
 |
| The "jpeg bitmap image import" dialog Image Credit: Inkscape.org |
Step 2: Convert the Image to Vector Graphics Format
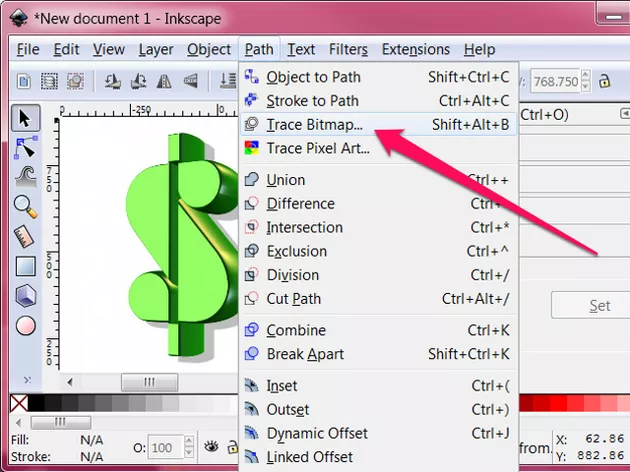
1. Click on the Path menu and select Trace Bitmap....
The Trace Bitmap dialog opens.
 |
| The "jpeg bitmap image import" dialog Image Credit: Inkscape.org |
 |
| The original jpeg image Image Credit: Inscape.org |
2. Click the Live Preview check box to see how the traced image will look with the selected options.
3. Select the Colors radio button under the Multiple scans creates a group of paths section of the dialog.
 |
| The Trace Bitmap item in the Path menu Image Credit: Inkscape.org |
The Preview changes to display a higher quality color version of the image.
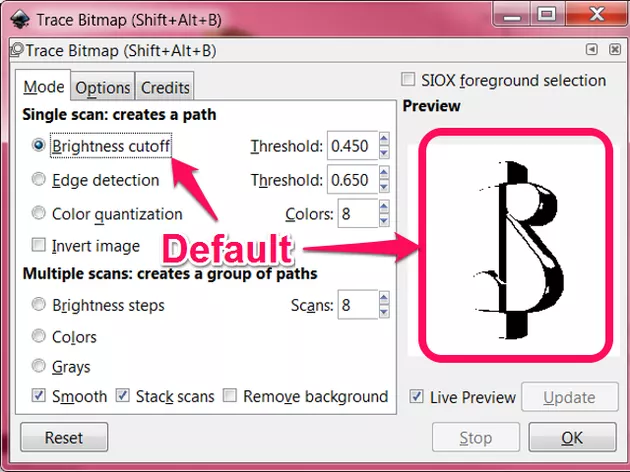 |
| The default Trace Bitmap options produce a poor quality black and white vector image Image Credit: Inkscape.org |
4. Press the OK button to perform the conversion, and the new vector image is inserted into the Inkscape main window.
Step 3: Save the Image as a Vector Graphics File
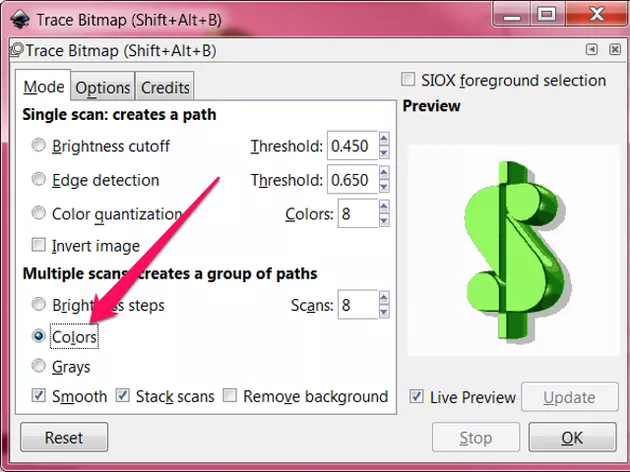 |
| The Trace Bitmap dialog with the Colors option selected Image Credit: Inkscape.org |
Although the new vector image has been added to the window, the original bitmap image is still in the window, and you need to delete the bitmap image before you save the file.
1. Select the original image in the main window and press the Delete key on your keyboard.
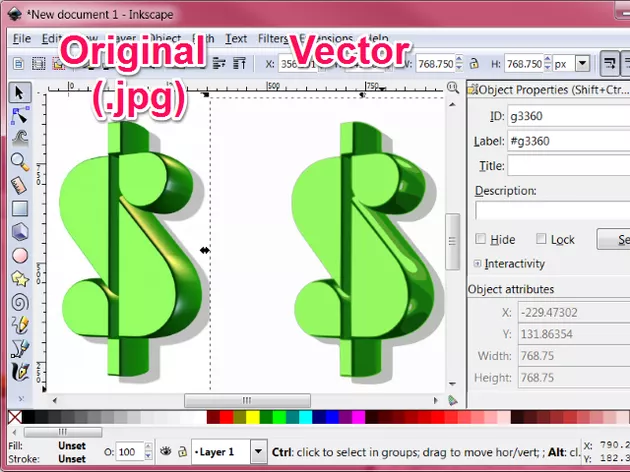 |
| The original .jpg image and the new traced vector image side-by-side Image Credit: Inkscape.org |
2. Open the File menu and select Save As....
The Save As... dialog opens and prompts you to Select file to save to.
3. Navigate to the folder where you want to save the vector graphics file and enter the name for your new file.
4. Click the Save as type field to open a list of file types.
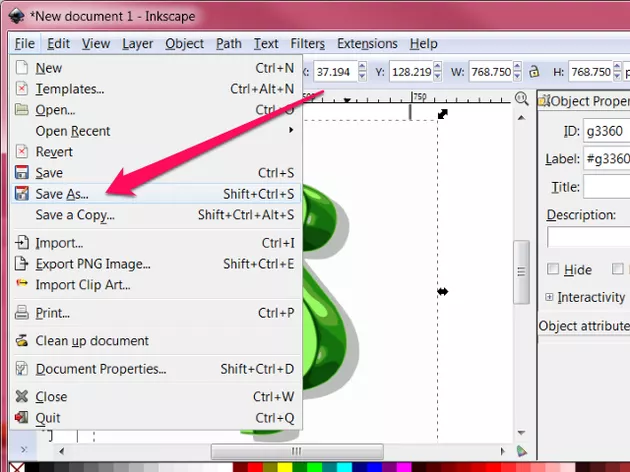 |
| The Save As... item in the File menu Image Credit: Inkscape.org |
5. Select the file type you wish to save.
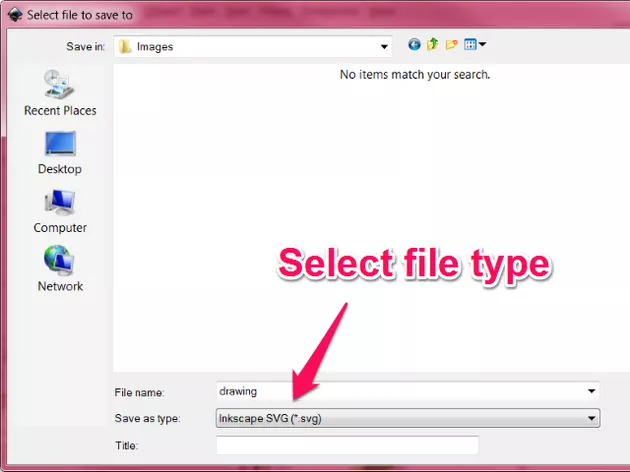 |
| The Save As... dialog Image Credit: Inkscape.org |
6. Press the Save button to create your file.
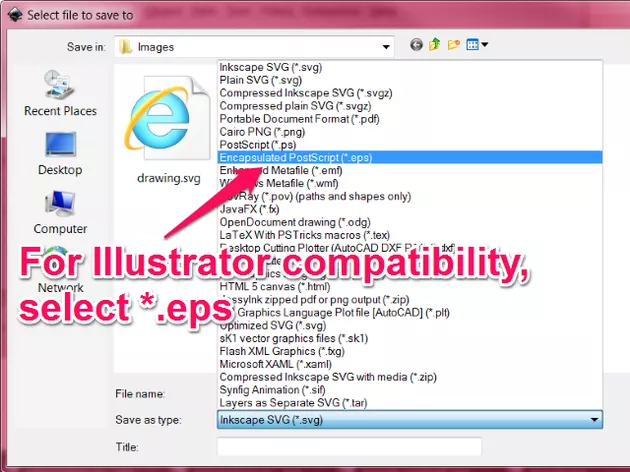 |
| The Encapsulated PostScript (*.eps) option selected in the Save As... dialog Image Credit: Inkscape.org |
Free Vector Converter Apps for Android & iOS
Vector graphics software allows users to design and manipulate computer images using geometric and mathematical commands, rather than clicks and strokes as used in drawing software.
Vector images created using these programs can be scaled indefinitely without losing quality. Vector graphics tools are often used to create high-definition illustrations for use on the web, in games, and in other multimedia.
Given all the advantages of this format, we decided to collect for you the best free vector converter apps, with which you can perform all the necessary actions even on your phone.
The Vector Converter
With this application, you can convert a vector image to almost any vector format.
For example SVG, EPS, ICO, PNG, PDF, JPG, EMF, WMF, BMP, TIFF, WEBP, or DXF. Using this application is very easy.
Select the source file and then choose the format you want to convert it to. The conversion process will only take a few seconds.
Then you can save it or share it via various messengers or email. You can also add it to any editor for further changes and adjustments.
Free Vector Converter
In this application, you will be able to convert files of different formats to vector images. This is a raster image tracing tool.
This means that here you will be able to transform an ordinary image into a smoother and more scalable one.
For example, creating vector files from scanned data such as company or university logos, handwritten notes, and more.
This application can work with most materials offered, even low-quality images or sketches. It can work and convert to vector most raster image files such as jpeg, bitmap, gif, png, and others.
SVG Converter
This application is a tool for converting files to vector formats.
Here you will be able to open and convert to jpeg many images with *.HEIC file extension at the same time. These are images in HEIF format.
Images in this format take up half the space on your device without losing image quality. Using this format will help you save up to 50% of your image storage space.
There is also an SVG image converter. Convert SVG to PNG, JPEG, and vice versa PNG, JPEG to SVG format. There is also a scale factor for image rendering and many file conversions are available.
Vector Converter can convert bitmap images such as JPEG and PNG to scalable vector graphics (EPS, SVG). Vector graphics can be scaled to any size without loss of quality.
Adobe Capture
This app turns your smartphone into a real creative tool. Here you can instantly create vector files using special shapes.
Turn images into smooth, detailed, scalable vectors with colors from 1 to 32 for use in logos, illustrations, animations, and more.
Select and activate your drawing or upload a photo and watch them magically transform into clean, crisp lines.
Find your perfect font with Adobe Capture. Take a picture of a font you like (in a magazine, on a label, on a sign) and watch as a list of similar Adobe Fonts magically appears.
Can’t find the right drawing brush? Take a snapshot or use an image to create digital brushes that match your creative vision. Use your brushes in Photoshop, Illustrator, and Fresco to create rich pictorial effects.
Capture inspiring images and create patterns with Capture’s preset geometric options. Easily create beautiful, colorful patterns to match your creative projects using your own vector shapes.
Create realistic PBR materials for use in your 3D project right from the camera. Change your materials to get more expressive texture, or blend edges to seamlessly replicate mosaics in 3D objects.
Vector Asset Creator
In this application, you can easily convert images to scalable vector graphics. This is a great utility for creating icons and logos from ready-made images.
You can also draw point and professional sketches. Create linear, radial, or sweeping gradients of any shape and size.
To get a vector image, upload the desired file. Then you can add the necessary lines.
You can export the finished result as an .svg, .xml, .png, or jpg file.
Free Image Converter
At the moment, a record number of image formats are supported. You can get images such as JPEG, BMP, GIF, PDF, PSD, PNG, TIFF, and others.
Using this program is quite simple. First, add the files to the list for conversion. Then choose the format you want.
Some formats support settings that you can use to get the best results. Then click on the “Convert” button and get the result.
 How to Convert Minutes to Hours: Easy Ways to Change How to Convert Minutes to Hours: Easy Ways to Change How to convert minutes to hours? Follow our simple steps! |
 How to Convert Degrees to Radians and Radians to Degrees: Best Ways to Change How to Convert Degrees to Radians and Radians to Degrees: Best Ways to Change Welcome to math lessons of KnowInsiders. The first lesson in the series will be how to convert degrees to radians with simple guides. |
 How to Convert PDF To Excel: Best Ways to Change How to Convert PDF To Excel: Best Ways to Change Your coworker sent you a PDF file instead of the Excel document you wanted, that doesn’t mean you’re actually stuck with it. In this guide, ... |
 How to Convert Word to PowerPoint How to Convert Word to PowerPoint PowerPoint is a great way to merge text and images for presentations. Are you struggling with the way to convert Word to Powerpoint? Check out ... |

